|
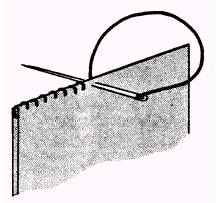
Hand-sewn Overthrow Stitch You use the overthrow stitch to attach metal parts, such as cones and eyelet. For this type of attachment, a sewing machine is not practical. The overthrow stitch is also used for harness
tackings. A curved needle is used when the stitch can only be sewn from one side of the fabric. Fold the
material under one-half inch for reinforcement. Insert the needle in such a manner that the knot
will be between the two pieces of material. Form the overthrow stitch by inserting the needle angles to the material, as shown in figure 10-27.
Make each stitch by inserting the needle from the same side as the previous stitch. For best results,
make six stitches per inch. At the end of the row, one-eighth inch from the folded edge and at right tie off the thread with two half hitches. Sewing the Baseball Stitch The baseball stitch is a useful, permanent stitch, because it is very flexible and very elastic. It pulls the edges of material (cloth or leather) evenly together to form a flat surface, and it is used for repair or closing an opening. The thread lies on both the top and bottom edges of the material. Like lacing, it can be pulled as tightly as desired. Usually a curved needle is used to sew the baseball stitch. Thread the needle with the required type of cord, waxed and tied with a knot at the end. If it is fabric to be sewn, rather than leather, turn the edges under one-half inch. Insert the needle through the fold of one ply of material to hide the knot, as shown in figure 10-28. Insert the

Figure 10-27.-Overthrow stitch.

Figure 10-28.-Baseball stitch. 10-23

Figure 10-29.-Baseball stitch (top view. needle from the outside of the lower ply and bring it out the center of the plies, forming a straight overthrow stitch at the beginning of the seam, as shown in view B of figure 10-28. Start the baseball stitch by inserting the needle in the center of the plies toward the outside of the opposite piece of material, as shown in view C of figure 10-28. Proceed with the baseball stitch along the folded edges of the fabric (or the edges of the leather), as shown in figure 10-29. Insert the needle from the inside of the folded edges, only one-sixth inch from the folded edge, as shown in views D, E, and F of figure 10-28. Keep enough tension on the thread to remove all loops and slack thread. Do not apply too much tension because this tends to pucker or draw the seam out of line. Every time you sew 6 inches of the baseball stitch, make a lock knot, as shown in figure 10-30. After the last two stitches of the baseball stitch, finish with a straight overthrow stitch and two half hitches.
|


