Custom Search
|
|
  |
|
|
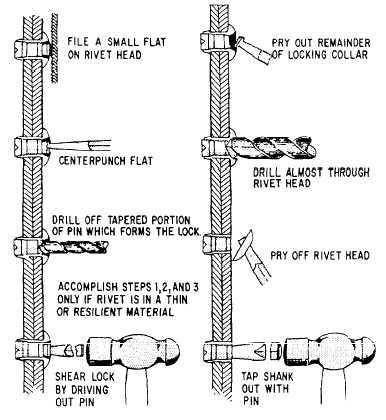
Inspection Visual inspection of the seating of the pin in the manufactured head is the most reliable means of inspection. If the proper grip length has been used and the locking collar and broken end of the pin are approximately flush with the manufactured head, the rivet has been properly upset and the lock formed. Insufficient grip length is indicated by the pin breaking below the surface of the manufactured head. Excessive grip length is indicated by the pin breaking off well above the manufactured head. In either case, the locking collar might not be properly seated and an unsatisfactory lock would be formed. Removal Removal of this rivet can be accomplished easily and without damage to the work if you use the following procedures. See figure 13-55. 1. Shear the lock by driving out the pin with a tapered steel drift pin not over 3/32-inch diameter at the small end. If you are working on thin material,
Figure 13-55.Removing self-plugging rivets (mechanical lock). back up the material while driving out the pin. If inaccessibility prohibits this, partially remove the rivet head by filing or with a rivet shaver. An alternative would be to file the pin flat, center punch the flat, and carefully drill out the tapered part of the pin forming the lock. 2. Pry the remainder of the locking collar out with a drift pin. 3. Use the proper size drill to drill almost completely through the rivet head. For a 1/8-inch-diameter rivet, use a number 31 drill; for a 5/32, use a number 24; and for a 3/16, use a number 15. 4. Break off the drilled head with a drift pin. 5. Drive out the remainder of the rivet with a pin that has a diameter equal to or slightly less than the rivet diameter. |
 
|
|
|
|
|
Integrated Publishing, Inc. - A (SDVOSB) Service Disabled Veteran Owned Small Business
|