Custom Search
|
|
  |
|
|
SKIN REPLACEMENT. Sometimes
damage to the metal skin is so
extensive that an entire panel must
be replaced. Also, an excessive number of patches
or minor repairs to a section may require the replacement
of the entire panel. As in all other forms of repairs, the first step is to inspect the damaged area thoroughly to determine the extent of the damage. Inspect the internal structure for damage or signs of strain. Members that are bent, fractured, or wrinkled must be replaced or repaired. They may be sheared considerably without visible evidence of such a condition. You should drill out rivets at various points in the damaged area and examine them for signs of shear failure. During the inspection, note carefully all unusual riveting problems or conditions that render riveting difficult or make rivet replacement impossible. Any fixtures that will hinder riveting and prevent the use of straight bucking bars will be apparent in a thorough inspection. There will also be places where flanges or reinforcing members, intersection of stringers, longerons, formers, frames, or rings make the bucking of rivets very difficult. This problem can be solved by designing and making bucking bars to suit these particular situations. You must take care to avoid mutilating the damaged skin in the removal process. In some cases, it can be used as a template for the layout and the drilling of holes in the new piece of skin. The rivet holes in stringers, longerons, bulkheads, formers, frames, rings, and other internal members must be kept in the best condition possible. If any of these members are loosened by the removal of rivets, their location should be marked so they can be returned to their original position. You should refer to the applicable repair material chart in the aircraft structural repair manual for the gauge and alloy of material to be used for the replacement panel. The size and shape of the panel
Figure 13-64.-Flush access door installation.
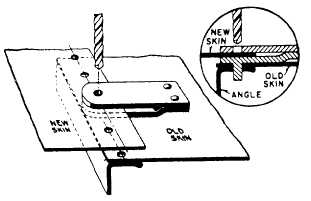
Figure 13-65.-Transferring rivet holes. may be determined in either of two ways. The dimensions can be measured during the inspection, or the old skin can be used as a template for the layout of the sheet and the location of the holes. The second method is preferable and more accurate. Regardless of the method used, the new sheet must be large enough to replace the damaged area, and it may be cut with an allowance of 1 to 2 inches of material outside the rivet holes. If the old sheet is not too badly damaged, it should be flattened and used as a template. The new sheet, having been cut approximately 1 inch larger than the old, should then be drilled near the center of the sheet by using the holes in the old sheet as a guide. The two sheets are then fastened together with sheet metal fasteners. The use of sheet metal screws is not recommended since they injure the edge of the rivet holes. The drilling should proceed from the center to the outside of the sheet. You should insert sheet metal fasteners at frequent intervals. If it is impossible to use the old sheet as a template, the holes in the new sheet should be drilled from the inside of the structure. Use the holes in the reinforcing members as guides, and insert fasteners at frequent intervals. This process is called back-drilling. Before you place the new sheet on the framework to drill the holes, make certain that the reinforcing members are aligned and flush at the points at which they intersect; otherwise, the holes in the new sheets will not be accurately aligned. For the same reason, the new sheet should have the same contour as the old before drilling the rivet holes. To duplicate holes from reinforcing members to the skin, you must exercise extreme care or both frame and skin will be ruined. Since most bulkheads, ribs, and stringers depend on the skin for some of their rigidity, they can easily be forced out of alignment in the drilling process. The skin must be held firmly against the framework, or the pressure from the drilling will force it away from the frame and cause the holes to be out of alignment. This may be overcome by placing a block of wood against the skin and holding it firmly while the drilling progresses. Also, make sure that the drill is held at a 90-degree angle to the skin at all times, or the holes will be elongated and out of alignment. When you drill through anchor nuts, a smaller pilot drill should be used first. You must use care so as not to damage the anchor nut threads. The pilot holes are then enlarged to the proper size. It maybe necessary to use an angle attachment or flexible shaft drill in places where it is impossible to insert a straight drill. In case neither type can be inserted, the new section should be marked carefully with a soft pencil through the holes in the old section. Another method of marking the location of the new holes is to use a transfer or prick punch, as shown in figure 13-65. Center the punch in the old hole, and then tap the punch lightly with a hammer. The result should be a mark that will serve to locate the hole in the new sheet. Still another way to locate the rivet holes without a template is to use a hole finder similar to the one shown in figure 13-66.
Figure 13-66.-Using a hole finder. After all the holes have been drilled, the temporary fasteners are taken out and the sheet is removed from the framework. The burrs left by drilling must be removed from both sides of all holes in the skin, the stringers, and the rib flanges. Burring may be accomplished with a few light turns of a deburring tool or drill bit. In this way, particles of metal left around the edges of the drilled holes are eliminated. If they were not removed, the joint would not be tight and rivets might expand, or flash, between the parts being riveted. |
 
|
|
|
|
|
Integrated Publishing, Inc. - A (SDVOSB) Service Disabled Veteran Owned Small Business
|