Custom Search
|
|
  |
|
|
Spray Gun Maintenance Fluid leakage at the front of the gun is an indication that the fluid needle is not seating properly. This may be caused by a fleck of dried material in the nozzle, or the fluid needle packing may be too tight. It may also be caused by a bent fluid needle, a broken fluid needle spring, or the wrong size fluid needle for the fluid tip.Air leakage results from an improperly set air valve. This may be caused by a bent valve stem, broken spring, or damaged valve or valve seat. Jerky or fluttering spray is caused by an obstructed fluid passage, loose tip, damaged seat, or air in the fluid line. Air can be inducted into the line from several sources: a loose packing nut, dried packing, loose or damaged coupling nut, loose or damaged fluid tube, or the cup tipped too far. See figure 14-35. Faulty spray
Figure 14-35.-Causes of jerky or fluttering spray. patterns, their causes, and how to correct them are shown in figure 14-36. Spray guns should be cleaned immediately after each use. To clean a suction gun, you should empty the container. Then, pour a small quantity of thinner or suitable solvent into the container. Draw the thinner or solvent through the gun by inserting the tube into the container of cleaning fluid. Move the trigger constantly to thoroughly flush the passageways and the tip of the fluid needle. Remove the air cap and soak it in solvent. If this action does
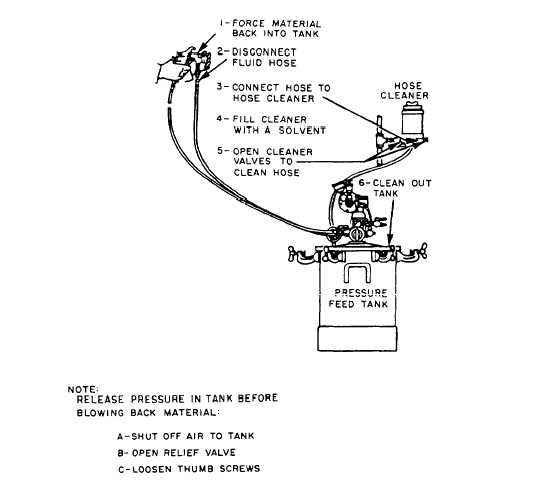
Figure 14-37.-Cleaning pressure-feed spray gun. not clean the small holes in the air cap, remove the paint material and use a toothpick or broomstraw to clean the holes. Do not use wire or other metal objects. They may cause permanent damage to the air cap.
Figure 14-38-Spray gun lubrication points. To clean a pressure-feed gun, you should back off the fluid needle adjusting screw. Then, release the pressure from the pressure tank with the relief or safety valve. Hold a cloth over the air cap and operate the gun trigger. The cloth forces the spray material back into the pressure tank (fig. 14-37). Remove the fluid hose from the gun and the pressure tank. Attach a hose cleaner to the hose and run thinner or suitable solvent through it. Clean the air cap by using the same method as the suction gun air cap. NOTE: Do not immerse an entire spray gun in cleaning materials, such as cleaning solvents and thinners. These materials dissolve the oil from leather packings and cause the gun to have an unsteady spray.The gun, fluid needle packing, air valve stem, and trigger bearing screw require frequent lubrication. You should remove the fluid needle packing before using the gun and soften it with oil. The fluid needle spring should be coated with grease according to the manufacturers instructions. See figure 14-38.
Figure 14-39.-Air compressors. |
 
|
|
|


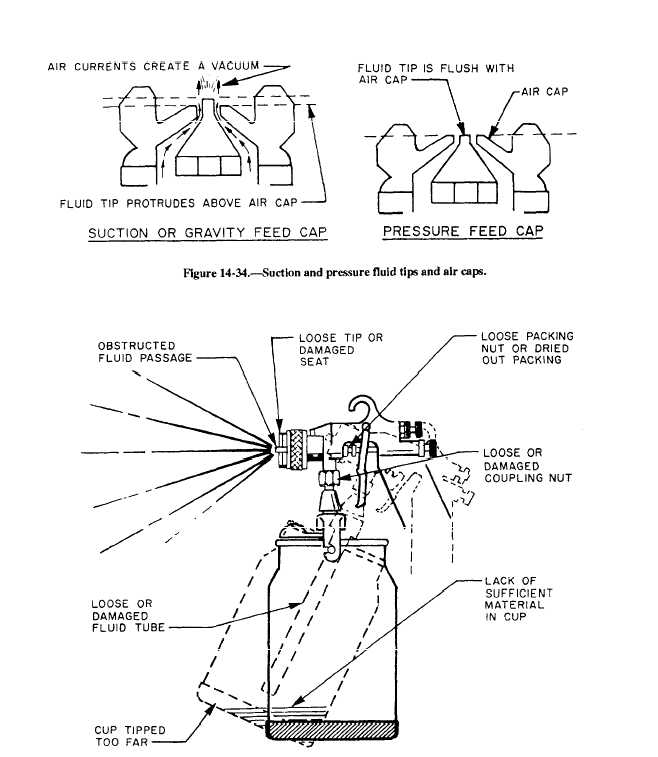
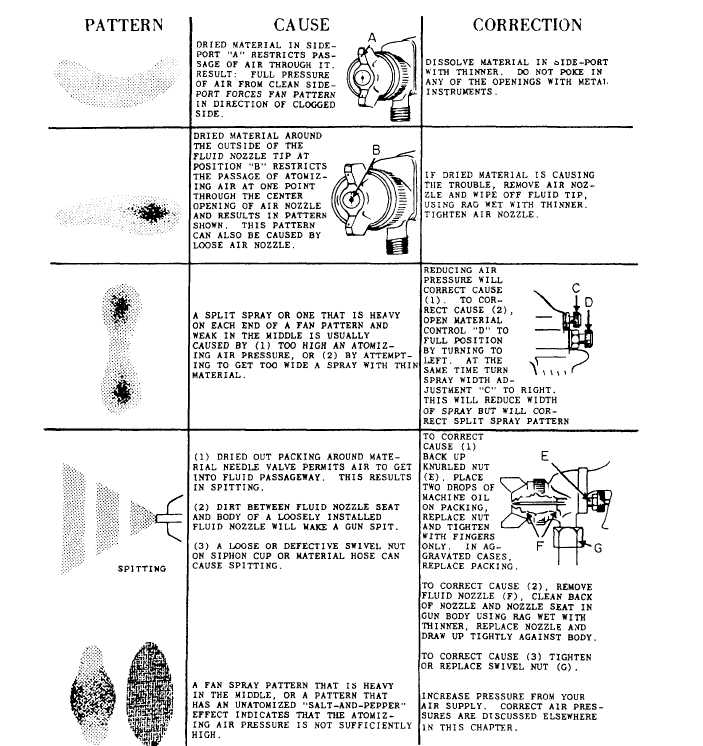 Figure 14-36.-Faulty spray
patterns and how to correct them.
Figure 14-36.-Faulty spray
patterns and how to correct them.