Custom Search
|
|
  |
|
|
HONEYCOMB CORE. Repairs
to damages completely through
the sandwich structure may be accomplished
either by the scarfed method (similar to the
repair described for damage extending into the core)
or the stepped method.
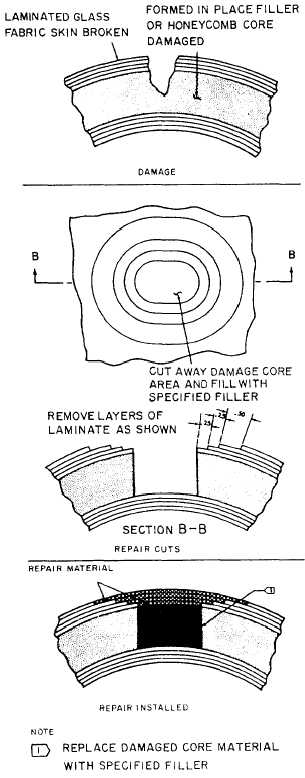
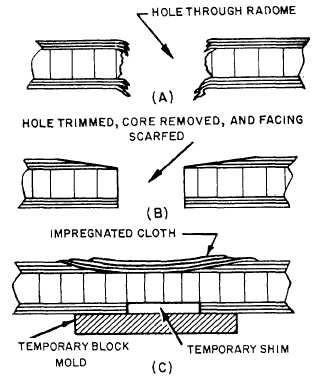
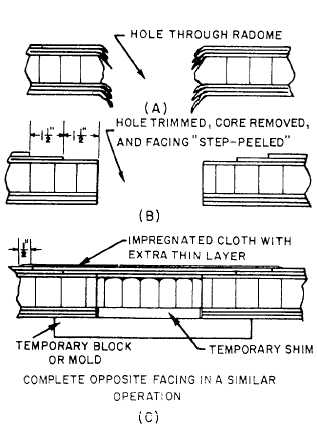
Figure 14-12.Foam-type core repair. The scarfed method is normally used on small punctures up to 3 or 4 inches in maximum dimension and in facings made of thin cloths (which are difficult to peel). The stepped method is usually employed on larger repairs to facings composed of thick cloths. The scarfed method of repair for punctures is the same as that used for damage extending into the core, with the exception that the opposite side of the sandwich is provided with a temporary mold or block to hold the core in place during the first step. See view C in figure 14-13.After the first facing repair is cured completely, the mold and the shim (temporarily replacing the facing on the opposite side) are removed. The repair is then completed by repeating the procedure used in the first step. When this facing is cured, the surface should be sanded down to the original contour and the repair area lightly sanded in preparation for refinishing.When you use the stepped method of repair, the damaged area is first trimmed out to a round or oval shape or to a rectangular or square shape (preferably having rounded corners).
Figure 14-13.Scarfed repair method. The individual plies are then cut out as shown in figure 14-14. Each ply is "stepped" back 1 1/2 inches and trimmed out by using a sharp knife. The sides of the repair should be parallel with the weave of the cloth, if possible. NOTE: Do not cut through more than one layer of cloth. If the layer of cloth underneath is scratched, the strength of the repair will suffer.The opposite facing is shimmed and backed up with a mold, and the core material is inserted as previously described. The outer repair plies are soaked in the resin and laid over the damaged area. An extra layer of thin cloth is laid over the repair area to extend one-half inch over the undamaged facing. The repair area is then covered with a sheet of cellophane to apply pressure, and then it is allowed to cure. The inner facing is then replaced in the same manner as the outer facing. After the inner repair has been cured, the entire repair area should be sanded to the original contour and prepared for refinishing.FOAM CORE. When the puncture penetrates the entire wall, remove the damaged core and face
Figure 14-14.Stepped repair method. laminates to one-fourth inch past the perimeter of the hole on the inner face. Make a plaster support to replace the removed core, conforming to the curvature of the inside layer of the inner face. Figure 14-15 shows a punctured repair with a plaster support.After repair to the inner face has been completed, remove the plaster support and continue the repair on the opposite side. |
 
|
|
|