Custom Search
|
|
  |
|
|
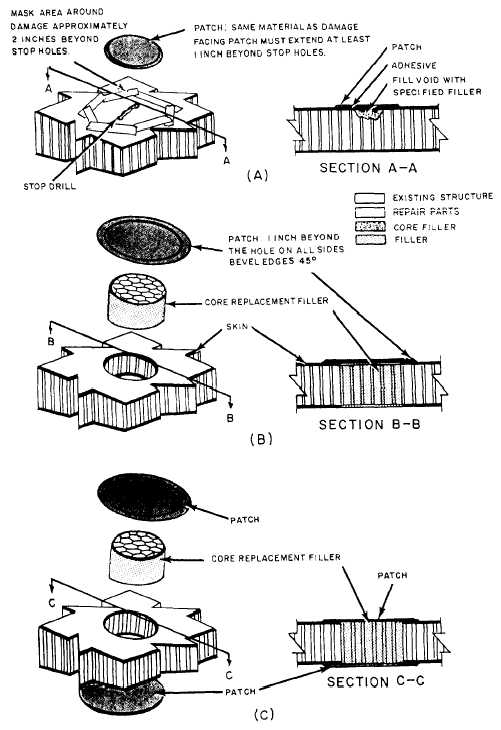
Repairing Delaminations Facing-to-core voids of less than 2.5 inches in diameter can usually be repaired by drilling a series of holes 0.06 to 0.10 inch in diameter in the upper facing over the void area. An expandable forming resin, such as Thermofoam 607 or equivalent, is then injected through the holes with a pressure-type caulking gun. When the void is on the lower surface of the panel, only sufficient resin must be injected so as to completely fill the void. With voids on the upper surface, the core area should be filled until the resin comes out of the injection holes. These holes should be sealed with a thermosetting epoxy resin adhesive, and the entire assembly cured with lamps, as required for the adhesive system.When the void areas are large, it is necessary to remove the facing over the damaged area and follow the repair procedures for a puncture. See figure 14-16.Repairing Punctures A puncture is defined as a crack, break, or hole through one or both skin facings with resulting damage to the honeycomb and/or balsa wood core. The size of the puncture, amount of damage to the core, assembly to be repaired (rudder, elevator, etc.), and previous repairs to the damaged assembly are factors to be considered in determining the type of repair to be made. Damage to a honeycomb and/or balsa wood core assembly that exceeds a specified length or diameter in inches or the total number of repairs exceeds a specified percentage of the total bonded area necessitates replacement of the assembly.NOTE: These figures are found in the applicable structural repair manual.HONEYCOMB CORE. The repair shown in figure 14-16, view A, is used when a puncture through one skin facing has caused only minor damage to the core material. To repair this type of damage, proceed as follows: Cover the component with a suitable protective covering (polyvinyl sheet or kraft paper). Cut out a section of the protective covering that will extend approximately 2 inches beyond the damaged area. Use masking tape to hold the cutout in place. Stop-drill as necessary through the skin facing only. Strip the paint and protective coating 1 1/2 inches beyond the stop drilled holes. Then, clean the stripped area with a special cleaning paste. Fill the void with the specified filler material to within approximately 0.063 inch of the skin facing, and cure as directed. Prepare a round or oval patch large enough to overlap the damaged area at least 1 inch. Apply sealant to the undersurface of the patch and to the filler and skin surface. Install the repair patch, maintaining correct overlap, and clamp to the assembly to assure contact with the skin facing. Cure as directed. Remove the excess adhesive, and refinish as necessary. The repair shown in figure 14-16, view B, is used when a puncture through one skin facing has caused extensive damage to the honeycomb core. When the core has been damaged extensively, the damaged material must be replaced. Prepare the assembly as previous] y described. Cut out the damaged skin facing with a hole saw or aviation snips. File the edges of the hole smoothly. Using a pocket knife, carefully cut out the damaged core. CAUTION Do not damage the opposite facing. Install a new core filler and complete the repair as previously described for view A of figure 14-16. The repair shown in figure 14-16, view C, is used when both skin facings and the core have been damaged. Use the same procedures as described above for views A and B to make this repair.
Figure 14-16.-Sandwich construction puncture repair (honeycomb core). |
 
|
|
|