Custom Search
|
|
  |
|
|
BACKHAND WELDING.
-In this
method the torch tip precedes the rod in the direction of welding, and the flame is pointed back at the molten puddle and
the completed weld. The end of the rod is placed between the torch tip and the molten puddle. The
welding tip should make an angle of about 45 to 60 with the plates or joint being welded (fig. 15-33).
Less motion is required in the backhand method than in the forehand method. If you use a straight
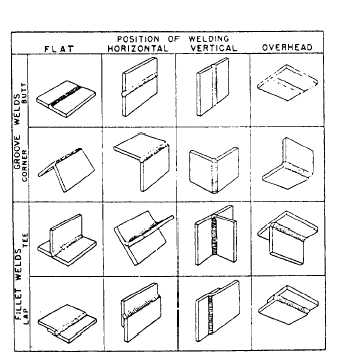
Figure 15-34.-Four basic welding positions. welding rod, it should be rotated so that the end will roll from side to side and melt off evenly. You may also bend the rod and, when welding, move the rod and torch back and forth at a rapid rate. If you are making a large weld, you should move the rod so as to make complete circles in the molten puddle. The torch is moved back and forth across the weld while it is advanced slowly and uniformly in the direction of the weld. Youll find the backhand method best for welding material more than 1/8 inch thick. You can use a narrower "V" at the joint than is possible in forehand welding. An included angle of 60 is a sufficient angle of bevel to get a good joint. It doesnt take as much welding rod or puddling for the backhand method as it does for the forehand method. By using the backhand technique on heavier material, it is possible to obtain increased welding speeds, better control of the larger puddle, and more complete fusion at the root of the weld. Further, by using a reducing flame with the backhand technique, a smaller amount of base metal is melted while welding a joint. Backhand welding is seldom used on sheet metal because the increased heat generated in this method is likely to cause overheating and burning. When welding steel with a backhand technique and a reducing flame, the absorption of carbon by a thin surface layer of metal reduces the melting point of the steel. This speeds up the welding operation. WELDING POSITIONS. -The four basic welding positions are shown in figure 15-34. Also shown are four
Figure 15-35.-Types of welded joints. commonly used joints. Notice that the corner joint and butt joint are classified as groove welds, while the tee and lap joints are classified as fillet welds. Welding is always done in the flat position whenever possible. The puddle is much easier to control, and the welder can work longer periods without tiring. Quite often it is necessary to weld in the overhead, vertical, or horizontal position in equipment repair. The flat position is used when the material is to be laid flat or almost flat and welded on the topside. The welding torch is pointed downward toward the work. This weld may be made by either the forehand or backhand technique. The overhead position is used when the material is to be welded on the underside, with the torch pointed upward toward the work. In welding overhead, you can keep the puddle from sagging if you do not permit it to get too large or assume the form of a large drop. The rod is used to control the molten puddle. You should not permit the volume of flame to exceed that required to obtain a good fusion of the base metal with the filler rod. Less heat is required in an overhead weld because the heat naturally rises. The horizontal position is used when the line of the weld runs horizontal across a piece of work, and the torch is directed at the material in a horizontal or near horizontal position. The weld is made from right to left across the plate (for the right-hand welder). The flame is inclined upward at an angle of 45 to 65, and the weld is made with a normal forehand technique. Adding the rod to the top of the puddle will prevent the molten metal from sagging to the lower edge of the bead. If the puddle is to have the greatest possible cohesion, it should not be allowed to get too hot. In a vertical weld, the pressure exerted by the torch flame must be relied upon to a great extent to support the puddle. It is important to keep the puddle from becoming too hot, and to prevent the hot metal from running out of the puddle onto the finished weld. It may be necessary to remove the flame from the puddle for an instant to prevent overheating, and then return it to the puddle. Vertical welds are begun at the bottom, and the puddle is carried upward with a forehand motion. The tip should be inclined from 45 to 60, the exact angle depending upon the desired balance between correct penetration and control of the puddle. The rod is added from the top and in front of the flame with a normal forehand technique. |
|
|
|