
Custom Search
|
|
  |
|
|
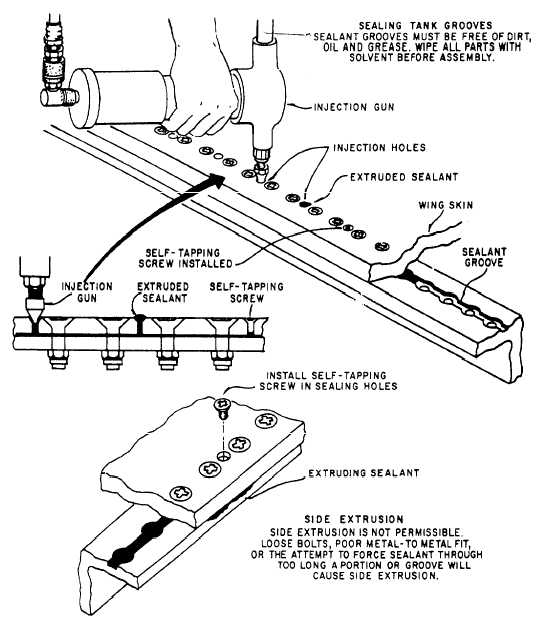
Maintenance Leaks are the most common trouble encountered with the integral fuel cells. Slight leaks may sometimes be repaired simply by retorquing (tightening) the bolts or screws on either side of the leak. On others it is often necessary to reseal the injection groove around the perimeter of the wing, and replace the O-rings and washers. Both of these procedures are described in the following text.RETORQUING. You should always retorque to stop a fuel stain or seepage before attempting to reseal. The first step in stopping a leak is to retorque the bolts or screws for 6 inches on each side of the leaking area according to the torque values given in the MIM for the different size bolts and screws being used. Standard bolts are used primarily in attaching wing skin and should be torqued from the nut side according to standard torque tables.REPLACING SEALS. If, after retorquing, the leak still persists around a bolt and washer seal, replace the seal with a new one. Be sure to install a washer between the bolt head and the seal or leakage will still occur. Also, be sure to torque the bolts according to the torque values listed in the MIM.If the leak is around an O-ring seal, replace the O-ring. First, loosen the bolt or screw with a steady pressure. Back out the bolt only as far as necessary to remove the O-ring over the head of the bolt or screw. Use petrolatum (Vaseline) if desired. Install a new O-ring and tighten the bolt to the required torque. The bolt should not be completely removed because of the possibility of cross threading during re-installation. Cross threading could result in the loss of a structural fastener by stripped threads on the nut plate or by the threads locking and twisting.REINFECTING SEALANT. If the leak is at the perimeter of the tank, reinject the sealant. You should use integral fuel tank groove injector compound and fill the groove sealant injector gun.NOTE: Be sure that the gun is filled in such a manner that no air is trapped in the sealant. Provide air pressure at the inlet of the gun according to the gun manufacturers instruc-tions.CAUTION The ability of the sealant compound to seal depends upon its adhesion to metal. Oils and greases are adhesion breakers and MUST be completely removed from all sealing areas, injection tools, and your hands when operating or servicing the injection gun. Some common contaminants are hair oils, body oils, and protective hand creams.Remove the screws from the injection holes of the area to be sealed, and place the sealant gun nozzle tip into the countersink of the injection hole. See figure 3-35. Special fittings may be attached between the gun tip and the barrel for use in areas of limited accessibility. Hold the gun firmly in position and depress the trigger until a plug of sealing compound at least 1 inch in length flows out of the next adjacent injection screw hole.CAUTION It is essential that the groove between injection holes be filled by injection from one direction only. If the sealant is forced into these areas from two directions, it is possible that air bubbles will be trapped in the groove. When injection has been inadvertently made from two directions, sealant should be injected from one side until a plug of sealant 5 inches long has been extruded. Figure 3-35.Injection of sealing compound. NOTE: The trigger must be released approximately every 30 seconds to allow the gun piston to return before another cycle can begin.Replace the screw in the hole that has just been injected. Proceed in the same manner on the next adjacent hole (the one from which sealant has protruded) until the area to be resealed is completed. After all injection hole screws have been installed, remove excess sealing compound from the wing by scraping with a wood or plastic blade. The area may be cleaned with solvent.CAUTION Do not use toluene for cleaning any surface with a corrosion-resistant or fuel-resistant coating. Toluene will remove the coating and cause the loss of the coatings protective properties.If the sealant is exceptionally slow to inject, the tank may be heated to 110F. Heating can be accomplished by using electric blankets.CAUTION Do not heat the tank in excess of 110F to seal the injection groove as higher temperatures are considered as a fire hazard.The proper temperatures for sealing are 79 to 84F. If the tank is exposed to temperatures below 50F, the tank must be heated above 70F before sealing is attempted. This may be accomplished in a heated hangar or by using portable heating units or electric blankets. NOTE: If the sealing compound does not appear after approximately 4 to 5 minutes, you may assume that the compound is too cold, the groove is plugged, or the surface gap is excessive. In this case, the injection should be discontinued until the discrepancy is remedied. |
|
  |
|