REPLACING SHEET METAL
Generally, a severely damaged panel will be replaced or repaired by cutting out the damaged area and replacing it with sheet metal. Should you have to repair a heavily damaged body panel, there are a few things you should consider before starting the job. The first and most important consideration is to determine the direction of force that caused the damage. This will enable you to use the hydraulic jack and its attachments to push the panels back into a near original position. At the same time, the braces holding the sheet metal will move back to their original position and allow access to any bolts and fasteners that must be removed to disassemble the damaged body parts. Once you have reached this point, it must be determined if the damaged panel is to be repaired or replaced.
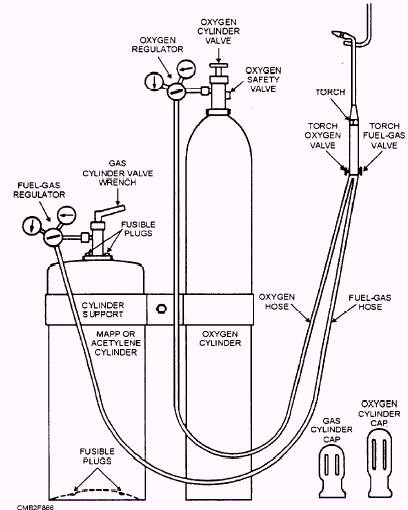
If you decide to replace the damaged panel, make sure any braces that support the panel are ordered also. New braces will assist in aligning the new panels with the rest of the body. Should only a portion of the damaged panel be replaced, a oxygas cutting and welding outfit (fig. 8-66) will be required to remove the damaged portion and weld the new sheet metal into position.
NOTE
Complete instructions on the use and care of oxygas cutting and welding outfit are contained in the current edition of the Steelworker training manuals. Consult these manuals for the proper method for adjusting and using the cutting and welding tips.

Figure 8-66.- Oxygas cutting and welding outfit.
The procedures for replacing a portion of a damaged panel are as follows:
Determine the amount of damaged area to be removed. Using oxygas cutting and welding equipment removes the damaged area.
Once the section of the damaged panel has been removed. straighten the remaining portion to the original contour.
Place a piece of sheet metal over the area that is cut away. Mark the new sheet metal so that when you cut on the lines drawn, the piece will be slightly larger than the area being replaced.
With the new piece of sheet metal held in place by clamps, weld the sheet metal into place. Work out to the sides then down the sides. Make a continuous weld, doing a length about 6 inches long at a time. To reduce distortion, stagger the welds.
With the new sheet metal welded into place, the weld should be ground down using a disc sander. Exercise care while sanding to prevent burning or cutting holes in the sheet metal.
When replacing sheet metal, it may be necessary to shrink the sheet metal in order to achieve a professional fit and finish. Figure 8-67 shows the procedure for shrinking sheet metal. Only a small area at a time is heated and shrunk. This will cause the panel to return to its original contour when performed properly.


