|
||
|
|
||
| |||||||||||||||
|
|
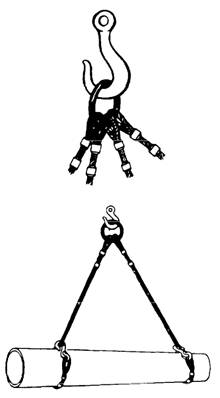
SAFETY RULES The following safety rules must be given to all hands engaged in hooking on. They must be strictly observed. The person in charge of hooking on must know the safe working load of the rig and the weight of every load to be hoisted. The hoisting of any load heavier than the safe working load of the rig is absolutely prohibited. When a cylindrical metal object, such as a length of pipe, a gas cylinder, or the like, is hoisted in a choker bridle, each leg of the bridle should be given a round turn around the load before it is hooked or shackled to its own part or have a spreader bar placed between the legs. The purpose of this is to ensure that the legs of the bridle will not slide together along the load, thereby upsetting the balance and possibly dumping the load. The point of strain on a hook must never be at or near the point of the hook. Before the hoist signal is given, the person in charge must be sure that the load will balance evenly in the sling.
Figure 4-37.-Ways of hitching on straps. Before the hoist signal is given, the person in charge should be sure that the lead of the whip or falls is vertical. If it is not, the load will take a swing as it leaves the deck or ground. As the load leaves the deck or ground, the person in charge must watch carefully for kinked or fouled falls or slings. If any are observed, the load must be lowered at once for clearing. Tag lines must be used to guide and steady a load when there is a possibility that the load might get out of control. Before any load is hoisted, it must be inspected carefully for loose parts or objects that might drop as the load goes up. All personnel must be cleared from and kept out of any area that is under a suspended load, or over which a suspended load may pass. Never walk or run under a suspended load. Loads must not be placed and left at any point closer than 4 feet 8 inches from the nearest rail
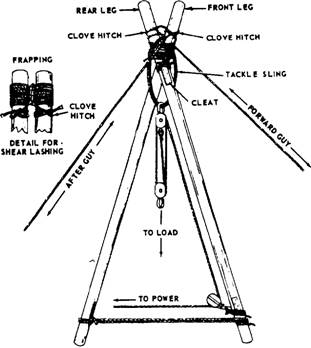
Figure 4-38.-Bridles. of a railroad track or crane truck, or in any position where they would impede or prevent access to fire-fighting equipment. When materials are being loaded or unloaded from any vehicle by crane, the vehicle operators and all other persons, except the rigging crew, should stand clear. When materials are placed in work or storage areas, dunnage or shoring must be provided, as necessary, to prevent tipping of the load or shifting of the materials. All crew members must stand clear of loads that tend to spread out when landed. When slings are being heaved out from under a load, all crew members must stand clear to avoid a backlash, and also to avoid a toppling or a tip of the load, which might be caused by fouling of a sling. SHEAR LEGS The shear legs are formed by crossing two timbers, poles, planks, pipes, or steel bars and lashing or bolting them together near the top. A sling is suspended horn the lashed intersection and is used as a means of supporting the load tackle system (figure 4-39). In addition to the name shear legs, this rig often is referred to simply as a "shears". (It has also been called an A-frame.) The shear legs are used to lift heavy machinery and other bulky objects. They may also be used as end supports of a cableway and highline. The fact that the shears can be quickly assembled and erected is a major reason why they are used in field work. A shears requires only two guy lines and can be used for working at a forward angle. The forward guy does not have much strain imposed on it during hoisting. This guy is used primarily as an aid in adjusting the drift of the shears and in keeping the top of the rig steady in hoisting or placing a load. The after guy is a very important part of the shears' rigging, as it is under considerable strain when hoisting. It should be designed for a strength equal to one-half the load to be lifted. The same principles for thrust on the spars or poles apply; that is, the thrust increases drastically as the shear legs go off' the perpendicular. In rigging the shears, place your two spars on the ground parallel to each other and with their butt ends even. Next, put a large block of wood under the tops of the legs just below the point of lashing, and place a small block of wood between the tops at the same point to facilitate handling of the lashing. Now, separate the poles a distance equal to about one-third the diameter of one pole. As lashing material, use 18- or 21-thread small stuff. In applying the lashing, first make a clove hitch around one of the legs. Then, take about eight or nine turns around both legs above the hitch, working towards the top of the legs. Remember to wrap the turns tightly so that the finished lashing will be smooth and free of kinks. To apply the frapping (tight lashings), make two or three turns around the lashing between the legs; then, with a clove hitch, secure the end of the line to the other leg just below the lashing (figure 4-39). Now, cross the legs of the shears at the top, and separate the butt ends of the two legs so that the spread between them is equal to one-half the height of the shears. Dig shallow holes, about 1 foot (30 cm) deep, at the butt end of each leg. The butts of the legs should be placed in these holes in erecting the shears. Placing the legs in the holes will keep them from kicking out in operations where the shears are at an angle other than vertical.
Figure 4-39.-Shear legs. The next step is to form the sling for the hoisting falls. To do this, take a short length of line, pass it a sufficient number of times over the cross at the top of the shears, and tie the ends together. Then, reeve a set of blocks and place the hook of the upper block through the sling, and secure the hook by mousing the open section of the hook with rope yarn to keep it from slipping off the sling. Fasten a snatch block to the lower part of one of the legs, as indicated in figure 4-39. The guys-one forward guy and one after guy-are secured next to the top of the shears. Secure the forward guy to the rear leg and the after guy to the front leg using a clove hitch in both instances. If you need to move the load horizontally by moving the head of the shears, you must rig a tackle in the after guy near its anchorage. |
|
Privacy Statement - Press Release - Copyright Information. - Contact Us - Support Integrated Publishing |