|
||
|
|
||
| |||||||||||||||
|
|
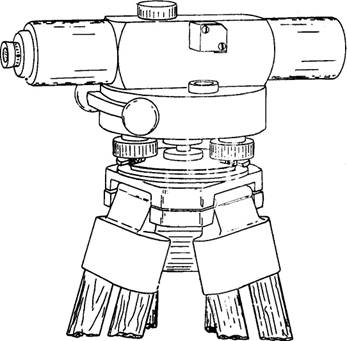
SETTING UP A LEVEL After you select the proper location for the level, your first step is to set up the tripod. This is done by spreading two of the legs a convenient distance apart and then bringing the third leg to a position that will bring the protector cap (which covers the tripod head threads) about level when the tripod stands on all three legs. Then, unscrew the protector cap, which exposes the threaded head, and place it in the carrying case where it will not get lost or dirty. The tripod protective cap should be in place when the tripod is not being used. Lift the instrument out of the carrying case by the footplate-not by the telescope. Set it squarely and gently on the tripod head threads and engage the head nut threads under the footplate by rotating the footplate clockwise. If the threads will not engage
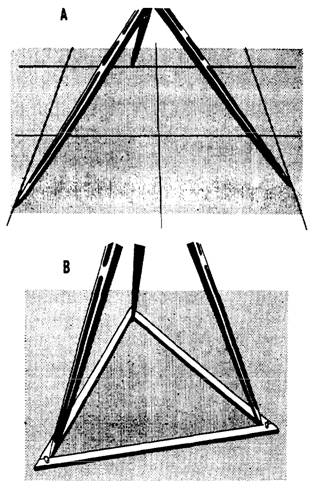
Figure 5-3.-Self-leveling level. smoothly, they may be cross-threaded or dirty. Do not force them if you encounter resistance; instead, back off, and, after checking to see that they are clean, square up the instrument, and then try again gently. Screw the head nut up firmly, but not too tightly. Screwing it too tightly causes eventual wearing of the threads and makes unthreading difficult. After you have attached the instrument, thrust the leg tips into the ground far enough to ensure that each leg has stable support, taking care to maintain the footplate as near level as possible. With the instrument mounted and the legs securely positioned in the soil, the thumbscrews at the top of each leg should be firmly tightened to prevent any possible movement. Quite frequently, the Builder must set up the instrument on a hard, smooth surface, such as a concrete pavement. Therefore, steps must be taken to prevent the legs from spreading. Figure 5-5 shows
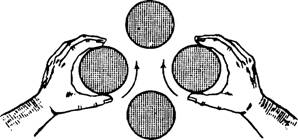
Figure 5-5.-Methods of preventing tripod legs from spreading. two good ways of doing this. In view A, the tips of the legs are inserted in joints in the pavement. In view B, the tips are held by a wooden floor triangle. LEVELING A LEVEL To function accurately, the level must provide a line of sight that is perfectly horizontal in any direction the telescope is trained. To ensure this, you must level the instrument as discussed in the next paragraphs. When the tripod and instrument are first set up, the footplate should be made as nearly level as possible. Next, train the telescope over a pair of diagonally opposite leveling screws, and clamp it in that position. Then, manipulate the leveling thumbscrews, as shown in figure 5-6, to bring the bubble in the level vial exactly into the marked center position. The thumbscrews are manipulated by simultaneously turning them in opposite directions, which shortens one spider leg (threaded member running through the thumbscrew) while it lengthens the other. It is helpful to remember that the level vial bubble will move in the same direction that your left thumb moves while you rotate the thumbscrews. In other words, when your left thumb pushes the thumbscrew clockwise, the bubble will move towards your left hand; when you turn the left thumbscrew counterclockwise, the bubble moves toward your right hand. After leveling the telescope over one pair of screws, train it over the other pair and repeat the process. As a check, set the telescope in all four possible positions and be sure that the bubble centers exactly in each. Various techniques for using the level will develop with experience; however, in this section we will only discuss the techniques that we believe are essential to the Builder rating.
Figure 5-6.-Manipulating leveling thumbscrews. |
|
Privacy Statement - Press Release - Copyright Information. - Contact Us - Support Integrated Publishing |