Custom Search
|
|
  |
|
|
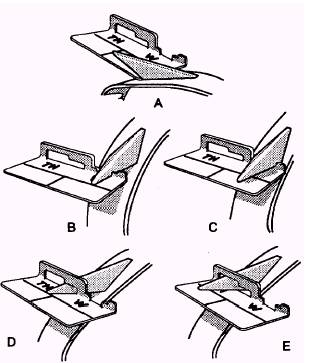
Climber's Gauge To minimize certain dangers that can occur from neglect of the climbers, make sure you check your gaffs frequently, using a climber's gauge (fig. 4-74). This gauge is used to check the dimensions of the gaffs. These must be within certain tolerances or the climber will "cut out" or lose contact with a pole or tree. Measurements of the length, width, and thickness of the gaffs are made as follows (fig. 4-75):
Figure 4-74.- Climber's gauge. LENGTH. Place the lined face of the gauge against the inner surface of the gaff, with the short edge of the gauge held tightly against the crotch (fig. 4-75, view A). The crotch is the point where the gaff joins the leg iron of the climber. lf the point of the gaff extends to or beyond the short reference line, the length of the gaff is satisfactory. WIDTH. Insert the gaff as far as possible through the small slot marked "W," with the inner surface of the gaff resting against the lined face of the gauge (fig. 4-75, view B). If the point of the gaff does not extend beyond the long reference line, the width of this section of the gaff is satisfactory. Insert the gaff as far as possible
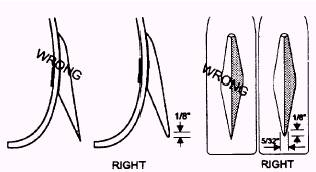
Figure 4-75.- Use of climber's gauge. through the large slot marked "W," with the inner surface of the gaff toward the lined face of the gauge (fig. 4-75, view C). If the point of the gaff does not extend beyond the far edge of the gauge, the width of this section of the gaff is satisfactory. THICKNESS. Insert the gaff as far as possible through the small opening marked "TH," with the inner surface of the gaff resting against the lined face of the gauge (fig. 4-75, view D). If the point of the gaff does not extend beyond the reference line, the thickness of this section of the gaff is satisfactory. Insert the gaff as far as possible through the large opening marked "TH," with the inner surface of the gaff resting against the lined face of the gauge (fig. 4-75, view E). If the point of the gaff does not extend beyond the far edge of the gauge, the thickness of this section of the gaff is satisfactory. Sharpen dull gaffs by taking long strokes with a file from the heel to the point of the gaff, removing only enough material to make a good point. NEVER USE A GRINDSTONE OR EMERY WHEEL TO SHARPEN GAFFS, since the metal may become overheated and lose its strength (temper). Never sharpen the gaff to a needlepoint (fig. 4-76) since it would sink too deeply into the pole and make climbing difficult. Always leave a shoulder about one-eighth inch back from the point. Remember that climbers are for use on poles ONLY. Do not wear them while working on the ground, and do not use the gaffs for such irregular procedures as the opening of cans. Going Up Before you start to climb a pole, there are a number of preliminary steps that you should take. First, of course, make the preclimb inspection of equipment previously described AND PUT ON YOUR HARD
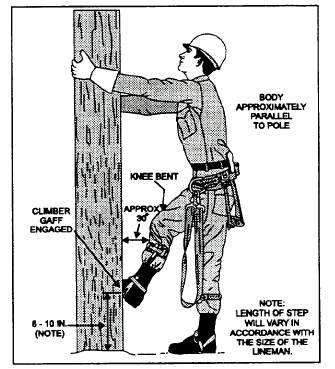
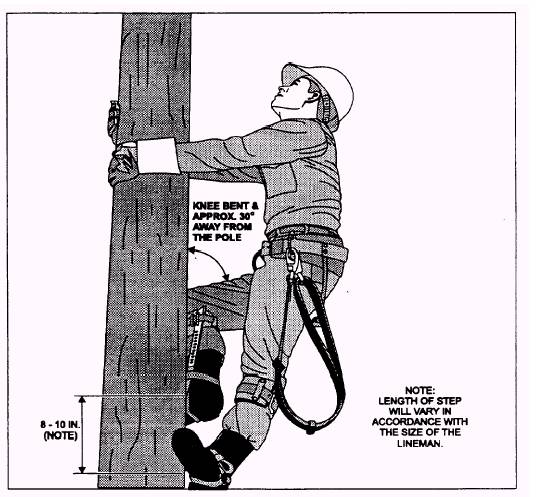
Figure 4-76.- Sharpening the gaffs. HAT. Then inspect the pole to determine the best side on which to start. This is usually the back, or high side. Get against the pole and grasp each side of it with your hands- not that you will hand support your weight in climbing, but simply because you will use your hands to help in balancing yourself on the climbers (fig. 4-77). To learn pole climbing, you must practice actual pole climbing. Some pointers that will help you become proficient in pole climbing in minimum time are as follows: Raise your right leg about 8 inches off the ground and sink the gaff on that leg into the pole. Do not jab the gaff in the wood. Allow your weight to sink it in. Now, swing yourself up off the ground and lock your right leg in a stiff-legged position so that all your weight is supported on that leg. At the next step, raise your left foot about 8 inches and sink the gaff on that foot into the wood. Then swing up onto the left leg, stiff-legged, and take the next step similarly with the right foot. Continue this stepping up and locking stiff-legged until you reach working position. Keep the upper-part of your body away from the pole (fig. 4-78); if you were to "hug" the pole, you would tend to throw the gaffs out of the wood.
Figure 4-77.- Starting to climb a pole.
Figure 4-78.- Continuing the climb. When you reach the working position, proceed immediately with great care to attach the safety strap. You should place your feet so that most of the weight is on the right foot, with the right knee locked. The left foot should be slightly above the right foot and the left leg should be slightly bent. Crook your right arm around the pole. Use your left hand to unsnap one end of the safety strap from the left D-ring on the body belt. Holding the end of the safety strap in your left hand, pass it around the back of the pole. Transfer the end of the safety strap from the left hand to the right hand; at the same time, crook your left arm around the pole to hold yourself in position. Then swing the end of the safety strap quickly around with your right hand and snap it onto the right D-ring on the body belt. WARNING Visually check to ensure that the snap hook on the safety strap is hooked on the D-ring and that the keepers on the snap hooks on both ends of the strap are facing away from your body. When you are sure the strap is secure, you may slowly lean back against the safety strap, as shown in figure 4-79.
|
|
|
|