Custom Search
|
|
 
|
||
|
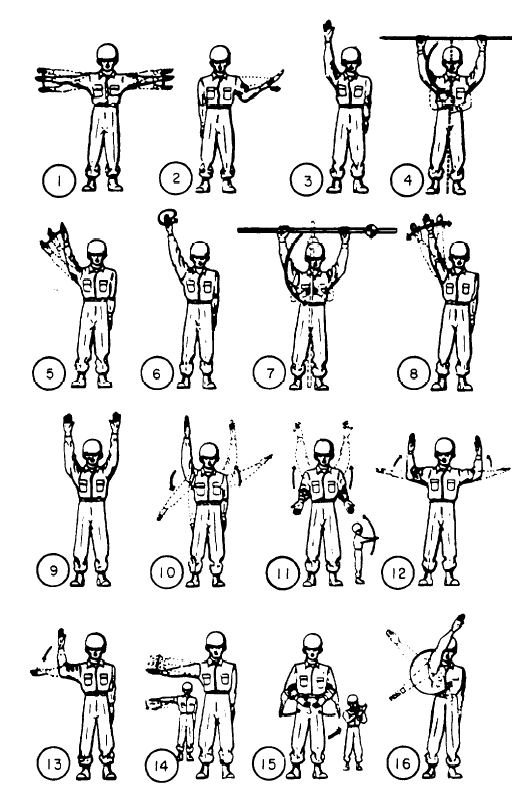
CHAPTER 12 DIRECT LINEAR MEASUREMENTS AND FIELD SURVEY SAFETYThis chapter covers the various duties, the techniques, and the skills a chaining crew member must learn thoroughly concerning chaining operations and some of the devices used in chaining itself. DIRECT LINEAR MEASUREMENTS, as used in this chapter, are methods used for measuring horizontal distances with a tape (or chain) and/or with electronic distance-measuring instruments presently available in the military. As a crew member, you should be concerned not only about the task at hand but also about the potential hazards to which you may be exposed in the field. It is important, therefore, that you recognize the precautions and safety measures applicable to the survey field crew. In this chapter we shall discuss these precautions and safety measures and also additional duties normally performed by the crew. DUTIES OF A CHAINING CREW MEMBER During a typical chaining operation, it is possible that many and varied duties other than the actual chaining itself are to be undertaken as part of the whole process. To prepare the field chaining party for the task ahead, we shall present some of these duties, as applicable. In some cases, these duties can be modified or tailored, contingent upon the mission, terrain features, and other conditions that may affect the speed and accuracy of the operation. GIVING HAND AND VOICE SIGNALS During fieldwork, it is essential that you communicate with the other members of the survey party over considerable distances. Some-times you may be close enough to use voice communication; more often, you will use hand signals. Avoid shouting; it is the sign of a beginner. Standard voice signals between chain-men must be used at all times to avoid misunderstanding. There are also several recommended hand signals, most of which are shown in figure 12-1. Those shown are recommended, but any set of signals mutually agreed upon and understood by all members of the party can also be used. It is important to face the person being signaled. Sometimes, if it is difficult for you to see the other person, it helps to hold white flagging in your hand when giving signals. When signals are given over snow-covered areas, red or orange flagging is more appropriate. Explanations of the hand signals shown in figure 12-1 are as follows: 1. ALL RIGHT. The "all right" is given by the instrumentman when the alignment is OK for a plumb line, a range pole, a stake, a hub, or any other device used as a target, or when the instrumentman has finished all activities at your location. It is given by waving both arms up and down while extending them out horizontally from the shoulders. If the instrumentman, in aligning a target, extends both arms out horizontally from the shoulders without waving them, the signal means that the target should be held steady while a quick check of its position is being made. 2. MOVE RIGHT OR LEFT. This signal is given by the instrumentman when lining in a target on a predetermined line. It is given by moving the appropriate hand outward from the shoulder. A slow motion of the hand means that you must move a long distance; a quick, short motion means that you must move a short distance. 3. GIVE ME A BACKSIGHT. This signal is given when the instrumentman wants a target held at a previously located point. It is given by extending one arm upward with the palm of the hand forward. 4. GIVE ME A LINE OR THIS ISA HUB. This signal, given by the rodman or the chainman, is intended to indicate a hub or to ask for a line on the point indicating the exact location. It is given by holding a range pole horizontally overhead, then moving it to a vertical
Figure 12-1.-Surveyors hand signals. position in front of the body. Sometimes the range pole tip is set on the ground to serve as a pivot. Then the pole may be swayed slowly to the left and/or right until the instrumentman picks up the signal. 5. PLUMB THE ROD. The signal to plumb the rod to the desired direction (right or left) is given by extending the appropriate arm upward and moving the hand in the direction the top of the rod must be moved to make it vertical. 6. ESTABLISH A TURNING POINT. This signal is given when the instrumentman wants a turning point established during traversing or leveling operations. It is given by extending either arm upward and making a circular motion. 7. THIS IS A TURNING POINT. The rodman gives this signal to indicate a turning point. This is done using a leveling rod and applying the method described in 4. 8. WAVE THE ROD. This signal, given by the instrumentman to the rodman, is important to get the lowest stadia reading. The instrumentman extends one arm upward, palm of the hand forward, and waves the arm slowly from side to side. The rodman then moves the top of the leveling rod forward and backward slowly about a foot each way from the vertical. |
||
|
||