Custom Search
|
|
 
|
||
|
Specific Gravity of Solids As discussed earlier, the specific gravity of solids is applied to soil that passes a No. 4 sieve. However, when the specific gravity is to be used in conjunction with hydrometer analysis, it is determined only on the fraction that passes a No. 200 sieve. In either case, the specific gravity may be determined for soil at natural water content or ovendried. APPARATUS. A 500-milliliter (ml) volumetric flask is required for this test. For the discussion in this TRAMAN, it is assumed that the flask has been calibrated. This means that the weight of the flask and water has been calibrated over a range of temperatures that would likely be encountered in the laboratory. As a matter of interest, calibration procedures are located in ASTM D 854. Some other apparatus used to perform test are as follows:
PROCEDURE. AS mentioned previously, you can perform the specific gravity test on soils at natural water content. When possible, however, you should first oven-dry the sample, as this makes it easier to perform the test. The procedure for performing the specific gravity test is as follows: 1. Record all identifying information regarding the sample on a data sheet similar to figure 15-33. Also, record identifying information for the flask and dish (or moisture can) that will be used for the test. 2. Air-or oven-dry the sample and breakup all lumps with a mortar and pestle. About 50 g of clay and about 100 g of coarser samples are the usual quantities. 3. Weigh and record the tare weight of a moisture can. Then fill the can with the dry sample; oven-dry and determine the weight to the nearest 0.01 g. This weight minus the tare weight is the weight of the dry soil (W.) entered in block 6g of figure 15-33. This weight is critical to the accuracy of the test. DURING THE REMAINDER OF THE TEST. 4. Transfer the material to the volumetric flask, using a funnel. Use a battery filler, or syringe, to CAREFULLY wash ALL material from the can and funnel into the flask. 5. Fill the flask two-thirds full of clean water (for exact analysis use distilled or demineralized water). Allow the material to soak from 4 to 6 hr, except for clean, sandy soil, which does not require soaking.
Figure 15-33.-Data sheet for specific gravity test. 6. Attach a vacuum pump to the flask and exhaust all air. The exhausted air is indicated by rising bubbles. For most soils, 30 min of pumping is enough. A heavy clay, however, may require as much as 2 hr of pumping. As an alternative to the vacuum pump, the air may be exhausted by gently boiling the pension for at least 10 min. To aid in removal of entrapped air, occasionally the flask. A slow boil should be used, as the roll fast
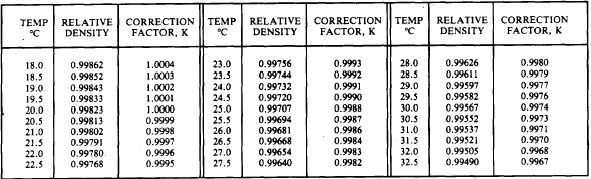
Table 15-3.-Relative Density of Water and Correction Factor (K) at Various Temperatures boiling may cause material to be boiled out of the flask. 7. After all air has been exhausted, and the flask and contents have cooled, add more de-aired, distilled water until the flask is filled to the ring marked on the neck. To ensure all air is exhausted, a second boiling may be necessary. 8. Next, dry the outside of the flask and any moisture above the water surface inside the flask. 9. Weigh the flask and contents to the nearest 0.01 g, and record the information in block 6j (fig. 15-33). This is Wbws. 10. Immediately after weighing, stir the suspension to assure even temperature distribu-tion. Immerse a thermometer to mid-depth of the flask, and read the temperature of the soil-water suspension. Record this temperature in block 6C (fig. 15-33). 11. Finally, with the data entered on the data sheet, compute the specific gravity using the following formula:
where: W, = Dry weight of the sample K= Correction factor based on the density of water at 20C. You can get this factor from table 15-3 by selecting the correction factor that cor- responds to the temperature obtained in Step 10, above. Wbw = Weight of the flask filled with water only, at test temperature. You can get this value from a calibration curve, or table, previously prepared for the flask used in the test. Wbws = Weight of the flask, water, and sample at test temperature |
 
|
|
|
||
|
|
Integrated Publishing, Inc. - A (SDVOSB) Service Disabled Veteran Owned Small Business
|