Custom Search
|
|
 
|
||
|
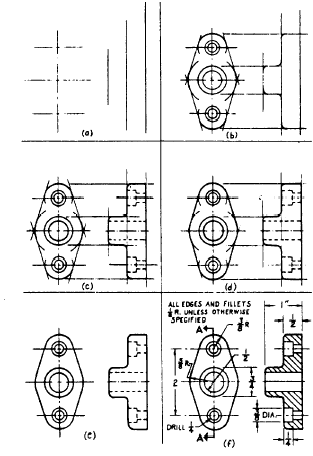
ORDER OF PENCILING Experience has shown that a drawing can be made far more efficiently and rapidly if all the lines in a particular category are drawn at the same time, and if the various categories of lines are drawn in a specific order or succession. Figure 3-40 shows the order in which the lines of the completed drawing (shown in the last view) were drawn. This order followed the recommended step-by-step procedures, which is as follows:1. Draw all center lines. 2. Draw the principal circles, arcs, fillets, rounds, and other compass-drawn lines. A fillet is a small arc that indicates a rounded concave joint between two surfaces. A round is a small arc that indicates a rounded convex joint between two surfaces.
Figure 3-40.-Order of penciling a drawing. 3. Draw the horizontal and vertical outlines, visible lines, and hidden lines.4. Draw the nonhorizontal and nonvertical outlines, visible lines, and hidden lines.5. Clean up the drawing, erasing all excess lines and construction lines. A construction line is a light line used as a drawing guide only.6. Draw extension lines, dimension lines, section lines, and any other lines required.7. Inscribe the dimensions and lettering. To a limited extent you can vary the thickness of a pencil line by varying the extent to which you bear down on the pencil. However, you cant bear down very hard without troughing the paper. Therefore, you cant get much variety in line weight with a pencil. For a drawing that will be inked over, this doesnt make any difference. However, for one that will not be reproduced, or which will be reproduced directly from the pen-cil original, you must follow, as nearly as you can, the line conventions. |
||
|
||