| Tweet |

Custom Search
|
|
 
|
||
|
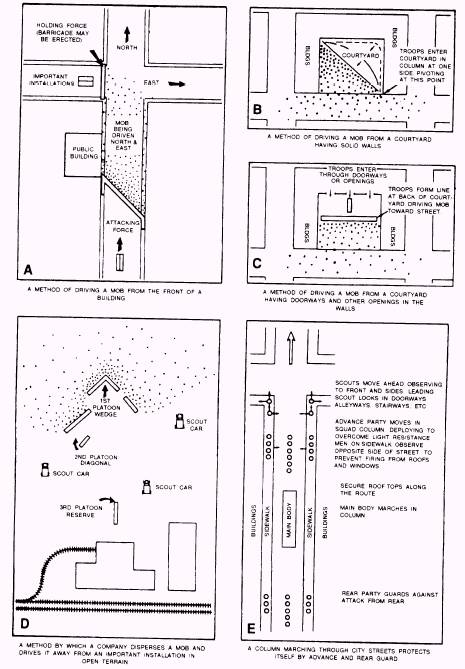
FORMATION INTERVAL Experience has shown that formations, to be effective, must be tailored to meet the situation. The members of a formation are usually separated by a one pace (30-inch) interval, but this spacing might not be sufficient in some situations and may need to be expanded or reduced. Some police forces have discovered that a greater interval makes members less susceptible to injury from thrown objects and a tighter interval reduces infiltration possibilities. The control force commander should adjust the formations to fit the needs of the particular situation. Figure 9-2 illustrates various ways that crowds and mobs can be dispersed in different situations. For example, in part A of figure 9-2, the attacking force is using an echelon right formation to move a crowd away from a public building. In parts B, C, D, and E of figure 9-2, other formations in various conflgurations are shown. Complete information and instruction of the use of formations, oral and visual commands, and organization of crowd control formations is contained in the U.S. Army Field Manual 19-15, Civil Disturbances. FORMATION WEAPONS AND CARRY POSITIONS LEARNING OBJECTIVES: Identify and describe the weapons used in control formations. Explain how to properly use riot control agents. Demonstrate three carry positions for weapons in control formations. Weapons used in formations include the riot baton and the riot shotgun. Other weapons that may be used in a sophisticated situation are sniper rifles, hand guns, and riot control agent dispersers. In this section, we will also look at how the weapons should be held while in formation. But first, let's look at the weapons themselves. THE RIOT BATON The riot (36-inch) baton is most effective in a crowd control operation and is the primary weapon for such operations. The baton is an offensive weapon with reduced lethality and, unlike the shotgun, the loss of a baton to the crowd does not create a serious threat. The riot baton may also be used in combination with the shotgun by having the control element confronting the crowd armed with riot batons and the support element armed with shotguns. If the riot baton is not available, nightsticks or patrol batons (22- to 26-inch) may be substituted, but with reduced effectiveness. THE RIOT SHOTGUN The riot shotgun is an extremely versatile weapon and is the primary individual weapon. The shotgun's appearance and capability produce a strong psychological effect on rioters, and it is particularly suited to certain applications in civil disturbance operations. When used with No. 00 buckshot, it is effective at limited range; however, use of No. 00 buckshot should be limited to specific missions. RIOT CONTROL AGENTS Riot control agents have a high safety factor and will not seriously endanger health or cause death when
Figure 9-2.-Mob dispersal techniques used properly. Riot control agents should not be used in hospital areas or other areas when undesirable effects may result from their use. Only designated and trained personnel should use riot control agent dispersers. POSITIONS FOR WEAPONS The civil disturbance control force should hold their weapons as prescribed by the commander. The methods include safe port position, safe guard position, and on guard position. Safe Port The "safe port" position is shown in figure 9-3. This position is extremely useful in making a show of force. In this elevated position, weapons can be seen by the participants in the middle or rear of a group. The sight of these weapons can create an impression of strength and superiority. However, control force members should not be required to maintain the position for extended periods of time, as it is very tiring. Safe Guard The "safe guard" position (fig. 9-4) is one of semi-readiness. It is less tiring than the "on guard" position and should be used to rest the control force when circumstances permit. For example, as the control force advances, they should maintain the "safe guard" position until just before contact is made or resistance is expectected and then be ordered to the "on guard' position. The "safe guard" position can also be used when pursuing a crowd withdrawing without resistance.
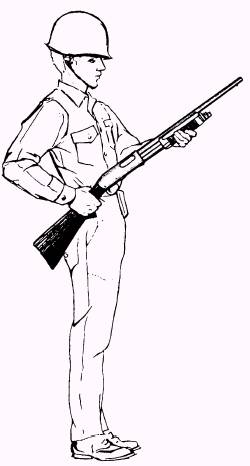
Figure 9-3.-Safe port position.
Figure 9-4.-Safe guard position. On Guard The "on guard" position (fig. 9-5) is one of complete readiness and should be used whenever the control force is in contact with a group that is showing resistance or a hesitance to withdraw. It is a tiring position to maintain for extended periods of time. The force should be rested at every opportunity by using less tiring positions. |
 
|
|
|
||