| Tweet |

Custom Search
|
|
 
|
||
|
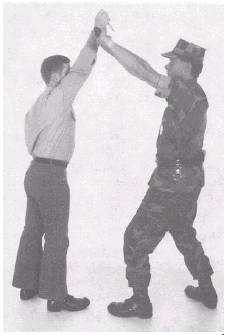
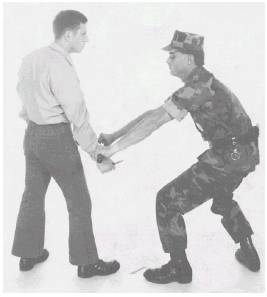
Defensive Movements All the defensive movements described here begin from the assumed position. They provide you an instantaneous response to an attack, and effective methods for quickly discouraging a violent offender. CHEST OR OVERHAND ATTACK.- Your suspect has drawn a knife and is coming at you with an overhead, downward thrust towards your chest. As the offender's arm is coming down, bring your arms up and out as shown in figure 12-6. This must be done in a quick snapping (hard thrust) motion. Your striking area should be between the offender's wrist and forearm. Between the combination of the offender's downward thrust and your upward snap, blocking it, this action will cause the offender to drop the knife. (NOTE: Be careful in practice. As you will find out, just doing this slowly will bruise your partner. If done with enough force, you could break your partner's wrist). If you need to follow through after blocking, bring the baton around to your right in a circular motion, and strike at either the chest or kneecap area. UNDERHAND THRUST ATTACK.- If the offender starts an upward thrust, slam your arms downward at an angle, striking the offender's wrist area
Figure 12-6.-Chest or overhead attack.
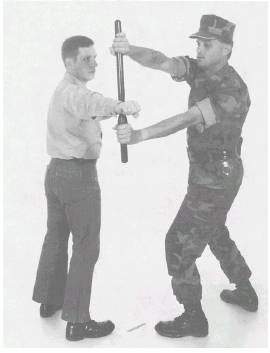
Figure 12-7.-Underhand thrust attack. as depicted in figure 12-7. This will cause a very sharp pain, forcing that person to drop the knife. SLASH ATTACK.- Should an offender attack you with a sweeping sideward motion, snap your baton to a position that is perpendicular to the ground, striking the bony part of the offender's wrist as shown in figure 12-8. PHYSICAL APPREHENSION AND RESTRAINT TECHNIQUES When an offender resists apprehension by force, you will find certain techniques are invaluable when you are unarmed. It is essential not to apply any more force than necessary. Once you use one of the techniques described here, do it with speed and surprise. The most critical moment is when you make your first physical contact. You are most vulnerable to attack at that moment. Therefore, you must protect yourself by executing the technique properly and swiftly. Never signal your intention to apply the technique, either vocally or through undue motion. If the technique fails because of improper application, lack of speed, or by signaling your intent-you cannot try it a second time-the element of surprise is lost. If you fail the first time, you may be compelled to use force or a more drastic measure. Avoid
Figure 12-8.-Slash Attack. this by developing the highest proficiency in using the techniques describe here. (NOTE: All of these techniques are shown by a right-handed person. Lefthanded persons should reverse these procedures. Come-Along Holds The come-along holds described in this chapter are effective in removing a violent offender from the scene of an apprehension. First, take the interview stance, which is similar to the assumed (ready) position previously discussed (without the baton). To refresh your memory, the interview stance is established by facing the offender, placing yourself about one arm's length away from your opponent's right side, at an angle of about 45. Your left leg will be slightly forward and slightly bent. Your right leg will be vertical, with most of your body weight on this leg. Always use this position when confronting a person, whether you intend to make an apprehension or only to question someone. This position is the most natural and suitable because the person you are talking to will normally be facing you and your stance will not look aggressive. It is suitable because you can move or strike in any direction with minimum motion and effective speed. The following two variations of come-alongs are an effective means of taking an offender from the scene of an apprehension should the offender refuse to come along. Even though these holds are simple, you must remember that to obtain proficiency, you must practice and maintain efficiency. REAR ARM BAR.- From the interview stance, slip your left hand (thumb up) under the offender's right arm, with the back of your left wrist pressing against the inside of the offender's right elbow. With a slight turning motion to your right while on the ball of your left foot, bend the offender's right forearm upward toward his/her left shoulder. At the same time, slip your left hand high enough to lock his/her right elbow by grabbing the upper arm. Now secure your hold of the suspect in one of two ways. Put your right arm around the front of the suspect's neck and grab the left shoulder. Another effective measure is to pull his or her head backward by pulling the hair until the suspect is on his or her toes. One word of caution, when you practice with your partner, be careful as this hold, and the one described in the following paragraph can be painful. PRESSURE POINT BAR.- This come-along is extremely simple but effective if applied properly. There are two key points you must remember when applying this hold. First, you must know how to locate a pressure point. One is about 2 inches past the elbow toward the armpit area. The second thing to remember is when you put your arm over and around the suspect's arm, use the bony part of your forearm to apply the proper pressure to the pressure point. This hold is applied when, if in the interview stance, the offender turns away from you, or if you have approached the offender from the side in a confrontation situation. Grab the opponent's left wrist from the inside, pulling it slightly towards you, so that the arm is away from the body, and the palm in an upward position. Swing your right arm over the person's upper arm (just past the elbow) locking your hand against your chest. Now apply pressure on the suspect's arm by forcing it downward and twisting the wrist. Once the pressure point is applied correctly, the suspect will be on his or her toes, and the body will be arched backwards. |
 
|
|
|
||