| Tweet |

Custom Search
|
|
 
|
||
|
TAKING FINGERPRINTS Taking good, clean fingerprints is not difficult. To be classified, a good fingerprint impression should be dark gray in color and free of smudges. All that is required to obtain good prints is practice. Steps in Taking Fingerprints To help you obtain the best set of fingerprints possible, use the following procedures: Initial steps. First, have the subject sign the fingerprint card. Next, have the subject wash his or her hands to remove any dirt particles. Ensure that the fingers are free of lint from towels used to dry the hands. Inking. There are various inking methods that a Master-at-Arms may encounter. The ink and glass method, the porelon pad, and the inkless system are the most common. The mechanics of rolling fingerprints is the same for all three methods. Rolled impressions. Rolled impressions are made by rolling the finger or thumb from nail edge to nail edge. They are made to show the entire friction surface of the finger or thumb, from the tip to one quarter inch below the first joint. Figure 16-1 shows the necessity for a fully rolled impression. Views A and B are impressions of the same finger. The finger in view A of the illustration is rolled fully and properly and reveals that the pattern is what the classifier calls an accidental whorl. View B shows that the finger is only partly rolled, leaving barely enough of the pattern to lead the classifier to believe it is a tented arch. The larger surface of the fully rolled impression not only allows accurate classification but it also gives more points for comparison.
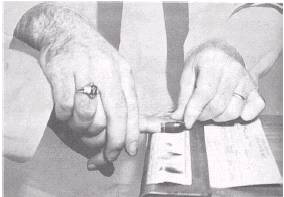
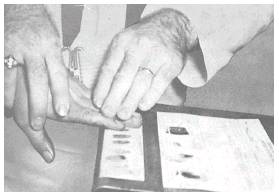
Figure 16-1.-Fingerprint impressions. There is a specific method of rolling the subject's fingers or thumbs in the ink and onto the fingerprint card to ensure a good impression. The basic premise is to roll the fingers or thumbs from awkward to comfortable. To illustrate this, hold your hands in front of you with the backs of your hands together. Now roll them around so that the palms are together and the thumbs are up. You will see that the right hand moved clockwise and the left hand moved counterclockwise. This is the direction the fingers on each hand should be moved. Thumbs are moved in the opposite direction of the fingers. The person taking the prints should grasp the top of the subject's hand and ensure that the finger to be printed is extended (See fig. 16-2.) The roll is a single movement with only enough pressure to provide a clear print. The subject being printed should be told to look away from the fingerprint card and to try not to "help" the roll. This will reduce smudging and produce a clean impression. Plain impressions. Plain impressions are made on the card by simply pressing the four fingers on it at a slight angle. (See fig. 16-3.) They should be showing the tips to one-quarter inch below the first joint. Thumbs are then printed by simply re-inking and pressing them on the block next to the plain finger impressions. The purpose of plain impressions is to verify the order of the rolled impressions and to show certain characteristics that are sometimes distorted in the rolled prints. The subject's fingers are held straight and stiff. The hand should be level with the wrist. The person taking
Figure 16-2.-Printing a rolled impression.
Figure 16-3.-Taking plain prints. the prints should grasp the wrist with one hand and press the fingers onto the cards with the other hand. Final step. After the printing procedure is completed, the person taking the prints should complete the information on the fingerprint card. There should be facilities nearby for the subject to clean the ink from the fingers. Other Types of Prints In addition to fingerprints, a case may require the application of additional techniques. Some of these are discussed in the following paragraphs. Photographic print impressions. The use of glossy photographic print paper and photographic developer makes a highly detailed print. It is limited to comparison purposes where extremely fine detail of a print is required. The fingertips receive a light application of the developer and then are rolled on the photographic paper. The paper is then placed in a fixing bath for approximately 30 seconds and washed the same as an ordinary photograph. Palm prints. It may be necessary to obtain palm prints from a subject since the whole hand also makes a distinctive impression and these types of prints might be found on evidence or at a crime scene. The biggest problem with making palm prints is that often the hollow part of the palm is not adequately printed The best method of recording palm prints is to wrap printing paper around a tubular object and then place the heel or base of the subject's palm on the tubular object and roll the print in a pulling motion from the heel of the hand to the fingertips. (See fig. 16-4.) Major case prints. These are made in the course of investigating serious offenses. They are often helpful in forgery investigations since the side of the hand is printed. (This shows the impression of a hand in the writing position.) In effect, prints are made of all parts of the hand to include the tips, palm, sides of the fingers, and sides of the palm. If necessary, the same procedures may be used to make prints of the feet.
Figure 16-4.-Taking palm prints. 16-3 Problem Prints Problems often arise in obtaining a good set of prints. Some of these problems are discussed in this section. Dry or soft skin. Certain people have dry and rough hands because of their occupations. Rubbing the tips of the fingers with oil or creams will often make the fingers pliable and soft enough for clear, unsmudged prints to be made. Holding ice against the fingers will sometimes help if the ridges are fine and small and the skin is soft-as is often the case with children or women. Deformed fingers or hands. If the hands and fingers are so deformed that the regular printing procedure cannot be followed, prints can be made by applying the ink directly to the fingers with a spatula or small roller. A square piece of paper is rotated around the finger. When a satisfactory print has been made, this square is then taped to the appropriate box of the fingerprint card. In cases where there are extra fingers (usually little fingers or thumbs), the innermost five are printed on the card, and the extra digit is printed on the reverse of the card. Webbed fingers are printed as well as possible in the roller and plain impressions. In cases where the finger or tip is amputated a notation of that fact is made in the appropriate box. (Example: "AMP" 1ST JOINT, FEB 1943 or "TIP AMP.") Excessive perspiration. Because of the subject's excessive perspiration, some inked impressions will be indistinct. Wipe each finger with a cloth and immediately ink and roll the finger on the fingerprint card. Follow this process with each finger. It is also possible to wipe the fingers with alcohol, benzine, or similar fluid that would act as a drying agent. |
 |
|
|
||