|
Headspace Too Tight.- If the headspace is too tight, the GO end of the
gauge cannot enter the T-slot freely. To correct this situation, take the following
steps: 1. Pull back on the retracting slide handle. Do so until the lug on the barrel
locking spring is visible through the 3/8-inch hole in the right sideplate.
(See fig. 13-36.)
2. Unscrew the barrel one notch (click).
3. Ease the retracting slide handle and bolt fully forward.

Figure 13-50.--Checking the headspace with the GO end of the headspace gauge.
4. Retract the bolt slightly, not exceeding 1/16 inch (fig. 13-50). Recheck
the headspace adjustment as before.
If necessary, repeat this procedure to obtain the proper adjustment. Be sure
to unscrew the barrel only one notch (click) each time. If the adjustment cannot
be made within one to five (maximum) notches (clicks), notify the maintenance
supervisor.
Headspace Too Loose.- If the headspace is too loose, the NO-GO end of
the gauge will enter the T-slot freely. The adjustment procedures for this situation
are the same as those just described. However, screw the barrel in one notch
(click) at a time for each adjustment attempt.
TIMING ADJUSTMENT.- Timing of the weapon is as critical as headspace
adjustment. Timing ensures that firing takes place when the recoiling parts
are between .020 and .116 inch out of the battery. That prevents contact between
the front end of the barrel extension and the trunnion block. Timing is correct
when the following conditions are met:
1. The recoiling parts are locked together.
2. Firing takes place just before the recoiling parts are in the battery (fully
forward).
3. The gun fires on the FIRE gauge and does not fire on the NO-FIRE gauge.
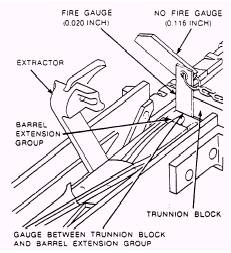
The timing of the gun is checked with the FIRE (.020 inch) and NO-FIRE (.116
inch) gauges, as shown in figure 13-49. Timing must be checked and/or set (1)
each time headspace is adjusted and (2) whenever the

Figure 13-51.-Checking the timing with the fire gauge installed.

Figure 13-52.-Checking the timing with the NO-FIRE gauge installed.
timing is questionable. The following steps explain how to check and set the
timing adjustment:
1. Ensure the headspace adjustment is correct. If not, correct it before checking
the timing.
2. Ensure the firing pin is cocked and the recoiling parts are forward in the
battery position.
3. Raise the extractor.
4. Retract the recoiling parts enough to insert the FIRE (.010 inch) gauge.
Place it between the barrel extension and trunnion block (fig. 13-51).

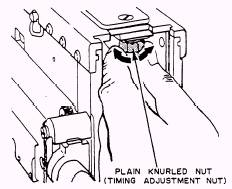
Figure 13-53.-Turning the trigger bar adjusting nut: Turn to the right to
correct for late timing; turn to the left to correct for early timing.
5. Allow the barrel extension to close on the gauge slowly.
6. Depress the trigger. The firing pin should release. Releasing indicates
that the timing is correct (or not late).
7. Retract the recoiling parts enough to remove the FIRE gauge. Cock the gun
and allow the recoiling parts to go forward into the battery.
8. Retract the recoiling parts enough to insert the NO-FIRE (.116 inch) gauge.
Place it in the same location, between the barrel extension and the trunnion
block (fig. 13-52).
9. Depress the trigger. The firing pin should not release. Its failure to release
indicates that the timing is correct (or not early).
|

