Custom Search
|
|
  |
|
|
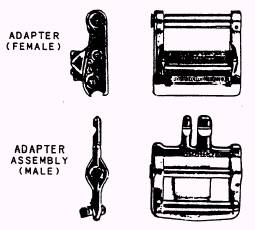
CONNECTOR LINKS Connector links are fittings designed to join the parachute to the harness. The suspension lines are attached to one side and the harness to the other connector links. Integrated torso suit harnesses are equipped with four Koch release adapters, which attach to the fittings on the lap belts and risers of the integrated parachute assembly. Release fitting adapters are manufactured in two parts-male and female. The male portion of the adapter is attached to the torso suit harness, while the female portion is attached to the riser assembly of the parachute. Figure 1-11 shows the Koch parachute release adapters. NOTE: Aircrew Systems Change 446 incorporates the "parachute harness sensing release unit," commonly referred to as SEAWARS. SEAWARS is designed to automatically release the parachute risers upon immersion in seawater.
Figure 1-11.-Koch release adapters. TRANSPORTING PARACHUTES When issuing parachutes you may need to give some instructions to the aircrewmen on proper ways to carry and handle them. The most effective way to explain the proper handling of packed parachutes is to list a series of DO's and DON'T's. 1. DO NOT pick up a parachute by its risers or ripcord. Lift web tackings break relatively easily, and when they do, the suspension lines are almost certain to become disarranged. 2. DO NOT allow a parachute to come in contact with light fixtures or heat sources. Heat tends to decompose the fabric. 3. DO take EVERY precaution to prevent soiling or contaminating parachute assemblies. 4. DO NOT stack parachute assemblies on top of each other or on the floor, unless they are in suitable shipping containers. 5. DO NOT leave a parachute where heavy objects can be dropped or placed on it. Permitting a parachute to be carried in a cargo net along with squadron cruise boxes or similar gear is an example of poor handling techniques. 6. DO use utmost CAUTION when handling parachute assemblies with installed cartridgeactivated devices. 7. DO NOT tack or tie a container with the parachute in the packed condition. 8. DO clean thoroughly vehicles used to transport parachute assemblies. DO check for contamination and provide with suitable covers during inclement weather. SHIPPING CONTAINERS Parachutes are shipped and/or stored in sealed shipping containers of either cardboard or metal construction and of suitable size. The containers are designed for reuse, and they must be opened and closed with care. When you are using the container to return parachutes to supply or to transfer the assembly to another activity, ensure that th eold tags and labels on the container are removed or marked out. Ensure that the proper tags and labels are attached and properly filled out on the transferring container. Tags and labels are shown in figure 1-12. STORING To place a parachute assembly into temporary storage, proceed as follows: NOTE: This procedure is for parachute assemblies that are in a ready-for-issue (RFI) status only. 1. Inspect the parachute assembly, ensuring that it is in an RFI status. Check the nameplate information with the recorded information on the parachute history card. Fill out an Aircraft Equipment Condition Tag, indicating the assembly name, serial number, and part number. 2. Remove and disarm the automatic actuator. (This is an explosive device used to automatically pull the ripcord on certain parachutes.) 3. Remove cartridges from all other cartridge-actuated devices (these are other explosive devices used to assist in opening certain types of parachute canopies). Store the cartridges from explosive devices in accordance with existing instructions. 4. Release all snap fasteners, open all slide fasteners, and remove one end of each of the parachute container spring opening bands. 5. Chain the parachute suspension lines. 6. Remove the manual ripcord cable assembly and place it in a small paper or plastic bag. 7. Examine the shipping container for condition. Remove or mark out all old tags or labels on the container. 8. Place the ripcord assembly in a side pocket of the parachute bag or at the bottom of the container. Spread one-eighth pound of naphthalene flakes on top of the parachute container. Insert the suspension lines loosely and fold in the canopy; then sprinkle one-fourth pound of naphthalene flakes into the canopy fold. Lay the pilot parachute into the shipping container uncompressed. 9. Close the shipping container; if a cardboard box is used, tape the flaps closed. 10. Place the parachute into storage according to local requirements. PERSONNEL PARACHUTE INSPECTIONS As a PR you have one of the most important jobs in naval aviation. The type of equipment you will be working with is lifesaving equipment. Unlike the other components that make up the naval aircraft, the parachute has no backup system. If all other parts fail, the parachute must function to prevent serious injury or death to the aircrewman. Parachutes are primarily designed to allow pilots and aircrewmen to escape from disabled aircraft. The nature of this lifesaving system leaves no margin for error in the work of the PR. Parachute inspections must be carefully conducted, ensuring security, rapid positive functioning, airworthiness, and comfort of the entire assembly. Procedures for working with parachutes are different from other types of work because whenever a critical operation is performed, the rigger's work must be inspected and his performance verified and recorded by a designated inspector before work continues. Continuing with a procedure without obtaining the required inspection is prohibited. Although this constant interruption of work may seem inefficient, you must appreciate how important it is to the parachute user that every step is done exactly right. |
 |