Custom Search
|
|
 
|
||
|
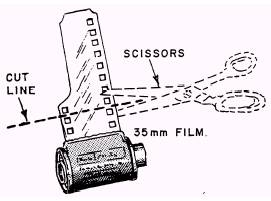
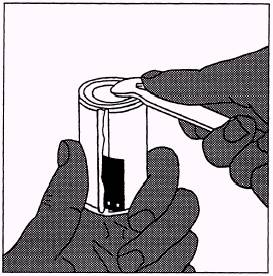
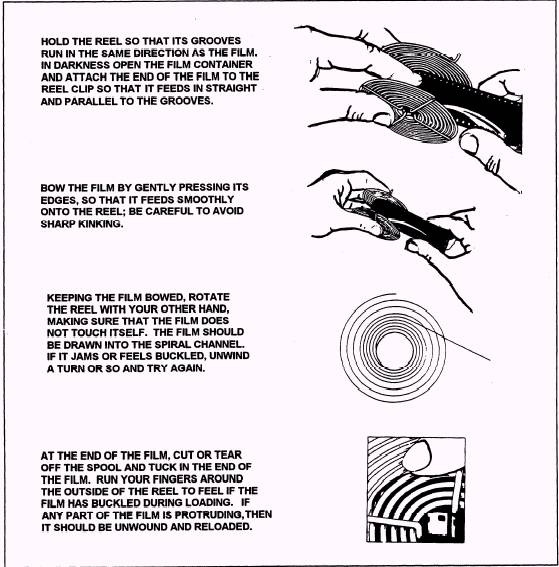
TANK DEVELOPING ROLL FILM LEARNING OBJECTIVE: Identify the steps involved in developing roll film in a tank. It is more convenient to develop roll film in a small tank than in a tray. The results are usually better, and the possibilities of damage to the film are minimized. Additionally, after the film is loaded in the tank you can turn on the regular room lights and complete processing in normal room light. Since the film must be loaded in total darkness, you should turn off all lights and allow your eyes to adjust for a few minutes before opening the film container. Examine the room for light leaks (cracks in walls, around doors, around air conditioners or vents). If you can see what you are doing after a few minutes, there is too much light in the room and the condition must be corrected before opening the film cassette. The most common unit used to develop roll film consists of a stainless steel, center feed, spiraled reel to hold the film; a tank with a lighttight cover; and a filler cap. The construction of tanks and reels differ somewhat among the various manufacturers' models, resulting in differences in loading and use. However, the one you are most likely to use is shown in figure 11-25, and the following discussion will be based on this equipment. Now that you know what the chemical solutions will do, just follow these steps for processing your film. ASSEMBLE MATERIALS Assemble your materials before turning off the lights. Searching for equipment in the dark can be nerve racking. Typical developing equipment for 35mm film includes the tank, can opener, timer, graduate(s), thermometer, scissors and film clip(s). Keep these materials in a handy location, but away from the area immediate yin front of you. This will prevent you from bumping into them or confusing them with other material. ADJUST WATER TEMPERATURE Adjust the tap water until a steady temperature of between 65 to 75 F is maintained. Dilute the film developer in a graduate and place it in a tray with the other chemical bottles. Let water run in the tray and wait for the temperature to stabilize, usually in two to three minutes. FILM REEL LOADING The proper loading of the film reel in total darkness can be the most challenging steps in processing roll film. A good amount of repetition is required to load film successfully. Practice loading several dummy rolls in both white light and total darkness before you turn off the lights and load actual exposed film. NOTE: Handle the film only by the edges to prevent scratches and fingerprints! Use the following steps to load the film on the reel: 1. If you are right-handed, position the ends of the wire spiral reel on the top and pointing to the right. If you are left-handed, position the ends on top and pointing to the left. 2. Pickup the film cassette. If a short length of film is left protruding from the 35mm cassette when the film is rewound, you do not have to open the cassette to remove the film. The leader or loading tab on 35mm film can be cut off square (in the light, if you desire) to ease loading, as shown in figure 11-26. However, if the leader is enclosed within the cassette, remove the flat bottom of the cassette with a can opener, as shown in figure 11-27; then cut off the leader as previously described. 3. Bow the film slightly concave to clear the edges of the spiral and clip or hold the film to the core (center)
Figure 11-26. - Cutting leader (loading tab) from 35mm film.
Figure 11-27. - Opening a 35mm film cassette with a can opener. of the reel. The film emulsion must face in, or toward, the center of the reel. The tension on the film should be firm enough to prevent the film from skipping the spiral grooves, but not too firm to cause it to overlap or fall into the same groove twice. 4. Turn the reel while applying a gentle pressure. This pressure will produce a slight curl in the film and allow it to pass into the edges of the reel. Make sure you keep your thumb and forefinger on the film edges! As you continue to turn the reel, the film will straighten out and fit into the grooved spaces in the reel. Figure 11-28 shows the proper way to load 35mm film on a wire reel.
Figure 11-28. - Loading 35mm film on a wire reel. |
 |
|
|
||