Custom Search
|
|
  |
|
|
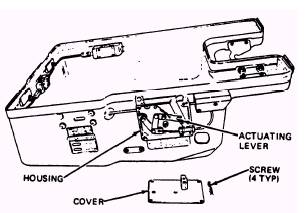
INSPECTIONS Your concern with this unit is mainly in inspecting it at scheduled intervals or when damage might be suspected. There are three types of inspections made at routine intervals: the turnaround/daily/preflight/postflight/transfer, special inspections, and the more detailed acceptance/phased/SDLM inspections. In addition, conditional inspections are unscheduled inspections required as the result of a specific situation or set of conditions; for example, hardlanding inspections or any inspection directed by higher authority that is not ordered in a technical directive. The turnaround/daily/preflight/postflight or transfer inspections consist of a visual-type inspection performed in conjunction with the aircraft inspection requirements for the aircraft in which the survival kit is installed. These inspections are performed by line personnel (plane captain) or delegated aircrewman who have been instructed and found qualified by the aviator's equipment branch. The special (7/14 day, etc.) inspections are performed on inservice survival kits installed in aircraft or in ready room issue. These inspections are done at the organizational level of maintenance by personnel assigned to the aviator's equipment branch. The date of these inspections and inspector's signature are recorded in the inspection section of the Aviation Crew Systems History Card. To perform the turnaround/daily/preflight/ postflight/transfer or special inspections, visually inspect the following: 1. Cushion for secure attachment, rips, tears, and loose or grayed stitching. 2. Release handle for proper seating and corrosion. 3. Oxygen gauge for FULL indication. 4. Emergency oxygen lanyard coupling assembly for spring security. 5. Emergency oxygen lanyard for proper installation and corrosion. 6. Manual emergency oxygen release for condition and security of attachment. 7. Container assembly for cracks, breaks, and other obvious damage. 8. Harness assemblies for loose or frayed webbing, stitching, and cracked or broken hardware. 9. Lapbelt release assembly for loose or missing screws and corrosion. 10. Beacon actuator indicator for bent shaft, hairpin cotter for elongation and corrosion. 11. Secure attachment of beacon automatic actuation lanyard (if installed). 12. Seal decal for secure attachment, tears, or rips. If the seal decal is damaged, the RSSK must be reclosed by IMA. 13. Condition of oxygen hose and secure attachment to kit. If repair procedure has been performed on the oxygen hose assembly, check external wiring for secure attachment. 14. For the S-3A aircraft, secure attachment of externally mounted electrical cable assembly to oxygen hose assembly. If any parts must be replaced, note that similar parts from kits made by different manufacturers are not interchangeable. Attempts to substitute one manufacturer's part for another may cause the kit to malfunction. Make sure the parts and assembly lists are for the proper kit when servicing a kit, or ordering replacement components for it. If discrepancies are found or suspected, maintenance control must be notified. Survival kit assemblies that do not pass inspection and cannot be repaired in the aircraft must be removed and replaced by Ready for Issue (RFI) survival kits. Non-RFI survival kits are forwarded to the nearest maintenance activity having repair capability. ACCEPTANCE/PHASED/SDLM INSPECTIONS The acceptance inspection is performed when the survival kit is placed into service. When a survival kit is an aircraft inventory item, the acceptance inventory inspection and packing serves as the acceptance inspection. In this case, the records concerning the RSSK must be examined. Phased/SDLM inspection cycle of a survival kit corresponds to the aircraft phased/SDLM maintenance inspection cycle as scheduled by the Planned Maintenance System. In no case should the phased interval exceed 225 days. Visual Inspection This inspection will be performed prior to the functional check of the kit. Visually check the kit for the following: 1. The cushion for rips, tears, and general condition. 2. The release handle for wear, corrosion, and damage. 3. The manual emergency oxygen release handle (green ring) for damage and security of attachment. 4. The upper and lower container for cracks, corrosion, and security of hardware. 5. Webbing for loose or frayed stitching and security of attachment. 6. The lapbelt release assembly for loose or missing screws and corrosion. 7. Swaged balls on cable assemblies for security of attachment. The swaged ball pull test is performed during the acceptance inspection only. Swaged Ball Pull Test To check the swaged ball attachment to cable assemblies, you will need a nylon cord, Type II scale (at least 100-pound capacity). Perform the pull test as follows: 1. Remove four screws and cover from assembly. 2. Push actuating lever down (fig. 7-4).
Figure 7-4.-Pushing actuating lever down.
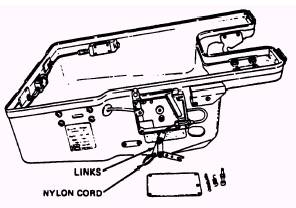
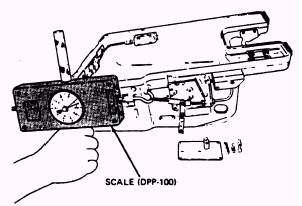
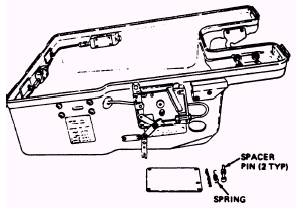
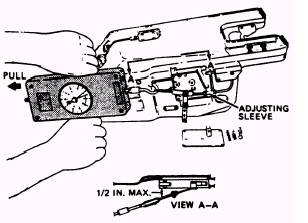
Figure 7-6.-Tying links together. 3. Remove spring and two spacer pins. Lift actuating lever assembly with cable inserted in clevis from housing (fig. 7-5). 4. Thread approximately 5 inches of nylon cord, MIL-C-5040, through "LINKS" and tie both ends together (fig. 7-6). 5. Insert hook of scale into loop of nylon cord (fig. 7-7). 6. Pull the scale towards aft direction of kit and in the normal direction of cable operation. Ensure the adjusting sleeve does not move from its housing while pull force is exerted. Ensure that the links and clevis are not pulled from the housing more than 1/2 inch. Swaged balls should withstand 100 pounds pull force (fig. 7-8).
Figure 7-7.-Attaching scale to nylon loop.
Figure 7-5.-Removing spring and spacer pins.
Figure 7-8.-Testing swaged ball.
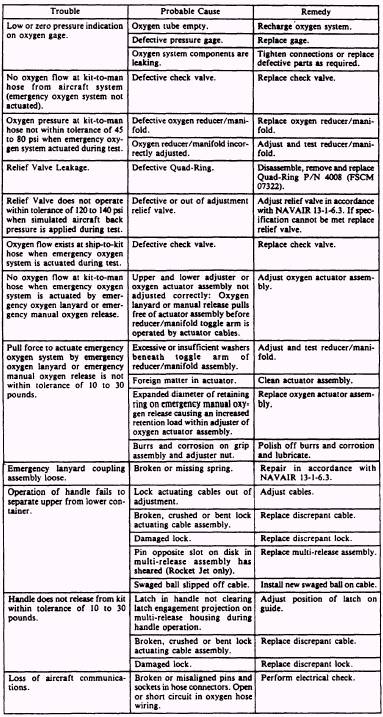
Table 7-2.-Troubleshooting 7. If the assembly fails to meet the specified pull force, slide the ball off the cable and swage a new ball in the same direction. 8. Assemble the parts and install the cover on the housing. |
 
|