Custom Search
|
|
  |
|
|
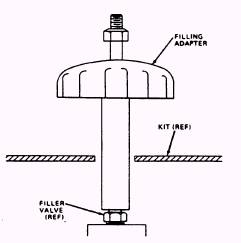
PURGING AND CHARGING EMERGENCY OXYGEN SYSTEMS To purge and charge the emergency oxygen cylinder, proceed as follows: Materials Required Leak detection compound Oxygen purging electric heater Nitrogen, type I, class I, grade A Aviator's breathing oxygen, type I Shutoff valve Adapter, filling 1. If the survival kit assembly has not been removed from the aircraft, remove the personnel parachute and survival kit in accordance with the applicable maintenance manual. 2. Remove the oxygen filler valve cap and connect a filling adapter to the filler valve (fig. 7-9). If the emergency oxygen system is
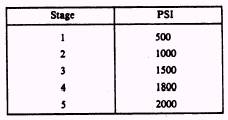
Figure 7-9.-Filling adapter. contaminated or the cylinder has remained empty for more than 2 hours, purging is required. If an emergency oxygen cylinder does not warrant the purging process, proceed to step 10 for the charging sequence. If it is necessary to release pressure in the oxygen bottle before purging/filling, pull the emergency oxygen lanyard. This releases the pressure through the pressure reducer. DO NOT release pressure through the filler valve or adapter. Releasing high-pressure oxygen through the restriction of the filler valve causes heat, and a fire or an explosion may result. 3. Deplete the emergency oxygen cylinder, if necessary. 4. Connect a nitrogen source to the filling adapter and close the pressure reducer. 5. Slowly pressurize to 100 psi with a nitrogen temperature of 110 to 130C (230 to 266F) using an electric heater. 6. Turn off the nitrogen source and deplete the oxygen cylinder. 7. Repeat steps 5 and 6, twice. 8. With the pressure reducer open, turn on the nitrogen source and purge for 10 minutes at a temperature of 110 to 130C (230 to 266F). 9. Turn off the nitrogen source and disconnect it. 10. Connect the oxygen source to the filling adapter with a suitable pressure regulator and shutoff valve. Reset the pressure reducer. 11. Slowly pressurize to 100 psi. 12. Deplete the cylinder to 50 psi. 13. Ensure that minimum slack exists in the actuating cables of the reducer/manifold, and that they are tight enough to ensure full engagement of the toggle arm. 14. Charge the emergency oxygen system in stages in accordance with table 7-4 until the pressure gauge indicates correct pressure for existing ambient temperature, as indicated in table 7-3. Carefully observe the scheduled filling stages, since rapid application of oxygen pressure creates
Table 7-4.-Charging Stages heat, which may result in fire or explosion. Allow no less than 3 minutes for each filling stage and 2-minute intervals for cooling between stages. If the kit is to be stored or shipped, fill it to 200 psi (when needle on gauge bisects E of REFILL). 15. Loosen the filling adapter until all pressure is bled from the high-pressure line. Remove filling adapter. Visually ensure that the filler valve does not turn as the filling adapter is removed. Serious injury could result. 16. Apply leak test compound around the filler valve, gauge, and reducer. Check for leaks; then wipe connections clean, using a lint-free cloth. 17. Replace the oxygen filler valve cap on the filler valve. 18. If the personnel parachute and survival kit assembly were removed from the aircraft in step 1, reinstall them at this time. As you know, there are a variety of seat kits available. Although the basic principles of operation are similar, they differ in accordance with the aircraft in which they are issued, their contents, and the type of ejection seat in the aircraft. Additional information concerning updating, modification, inspection, maintenance, etc., of seat survival kits can be obtained from NAVAIR 13-1-6.3. Aviation Crew Systems Seat Survival Kits. |
 
|