|
Timing the Sewing Hook
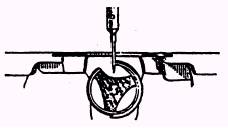
Remove the presser foot, slide plate, throat (needle) plate and bobbin case. Also remove the feed dog. With anew needle in the machine, turn the handwheel toward you until the needle bar reaches its lowest point. Continue turning and allow the needle bar to rise about 3/32 inch while on its upward stroke. With needle bar in this

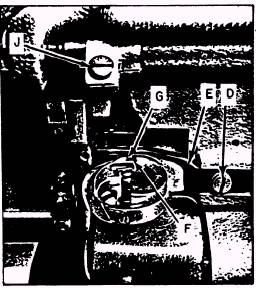
Figure 9-49.-Timing sewing hook. position, the point of the sewing hook should be at the center of the needle (fig. 9-49). If the sewing hook is not timed correctly, loosen the three setscrews in its hub. Turn the hook on its shaft to align the point with the center of the needle, as shown in figure 9-50. Tighten the three setscrews. To Remove and Replace the Sewing Hook Remove the needle, slide plate, and bobbin case. Take out screw (D of fig. 9-50) and remove hook retainer (E of fig. 9-50). Loosen the three setscrews in the hub. Turn the handwheel until the thread guard (widest part) of the hook is at

Figure 9-50.-Sewing hook.

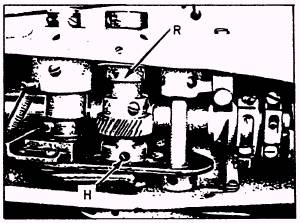
Figure 9-51.-Removing sewing hook. the bottom, then remove the sewing hook from its shaft (fig. 9-5 1). When installing a new sewing hook, have the thread guard at the bottom. Now turn the bobbin case holder until the notch (F) is at the top. Replace the hook retainer (E) watching that the projection (G) near its end (fig. 9-50) enters notch (F) in the bobbin case holder. Fasten the hook retainer to the underside of the bed by means of its screw. Replace the needle and time the sewing hook as described in the preceding paragraph. Reinstall the bobbin case, throat plate, and slide plate. Timing the Feeding Mechanism The feeding mechanism is timed at the factory for average stitching performance. Normal timing is such that the feed dog teeth, rising from their lowest position, should be just flush with the surface of the throat (needle) plate after the needle point has traveled about 5/16 inch above the plate while on its upstroke. To adjust the feeding mechanism, remove the top cover from the machine. Turn the handwheel toward you until the two setscrews, which lock the feed eccentric into the main shaft, come into view (fig. 9-5 1). Loosen both setscrews; lightly tap the feed eccentric toward you to advance the feed timing. To retard the feed timing, tap the eccentric to rotate it toward the rear of the machine. NOTE: Rotate the eccentric no more than about 1/16 inch, then tighten its setscrews and check for results. Timing the Movement of the Needle Bar Frame Set the zigzag knob for straight stitch. Turn the handwheel and observe the travel of the needle into and out of the needle slot in the throat (needle) plate. If the needle is not centered in the slot, make the adjustments that have been described. Now adjust the needle to produce the widest zigzag stitch. Turn the handwheel toward you and observe vibration (sidewise movement) of the needle bar. The needle bar, on its upward movement, should begin to vibrate when the point of the needle is no less than about 3/32 inch above the throat plate, and should stop vibrating when the needle has reached approximately the same position on its downward movement. To adjust the vibration of the needle bar on model 99R, loosen the setscrews (H of figure 9-51) in the vibrator cam and slightly turn this cam on its shaft. Tighten the setscrews and check for results. On model 99R-3, the vibration of the needle bar is produced by a plate cam located at R on figure 9-51. Loosen its setscrews and slightly turn the cam on its shaft, following the same procedure as outlined in the preceding paragraph. Be sure to retighten the setscrews.
|

