|
Rivet Removal Rivets must be removed and replaced if they show
even the slightest deformity or lack of alignment.
Reasons for replacing rivets are as

Figure 13-46.-Rivet dimensions
before and after bucking.
follows: rivet marred by bucking bar or
rivet set; rivet driven at slant or
shank bent over; rivet too short, causing
the head to be shallow; rivet pancaked too flat from
overdriving; sheets spread apart and rivet flashed
between the sheets; two rivet heads not in alignment;
and head of countersunk rivet not flush with
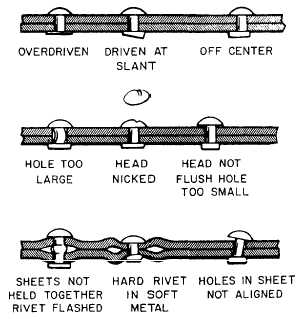
outside surface or driven below surface. Examples
of these incorrectly driven rivets are shown in
figure 13-47.
When you are removing rivets, be careful not to enlarge
the rivet hole. This will require you to use a larger
size rivet for replacement. To remove a rivet, file
a flat surface on the manufactured head. It is always
preferable to work on the manufactured head rather
than on the one that is bucked, since the former will
always be more symmetrical about the shank. Indent
the center of the filed surface with a center punch,
and use a drill of slightly less than shank diameter
to drill through the rivet head. Remove the drill
and, with the other rivet end supported, pry or lightly
tap off the head with a drift punch. If the shank
is too tight after the removal of the head, the shank
should be drilled out. However, if the sheet is
firmly supported from the opposite side, the

Figure 13-47.-Incorrectly driven
rivets.
shank may be punched out with a drift punch. See figure
13-48.
The removal of flush rivets requires slightly more skill.
If the formed head on the interior is accessible and
has been formed over heavy material, such as an extruded
member, the formed head can be drilled through
and sheared off. If the material is thin, it may be
necessary to drill completely through the shank of the
rivet, and then cut the formed head with diagonal-cutting
pliers. The remainder of the rivet may
then be drifted out from the inside.
|

