Custom Search
|
|
  |
|
|
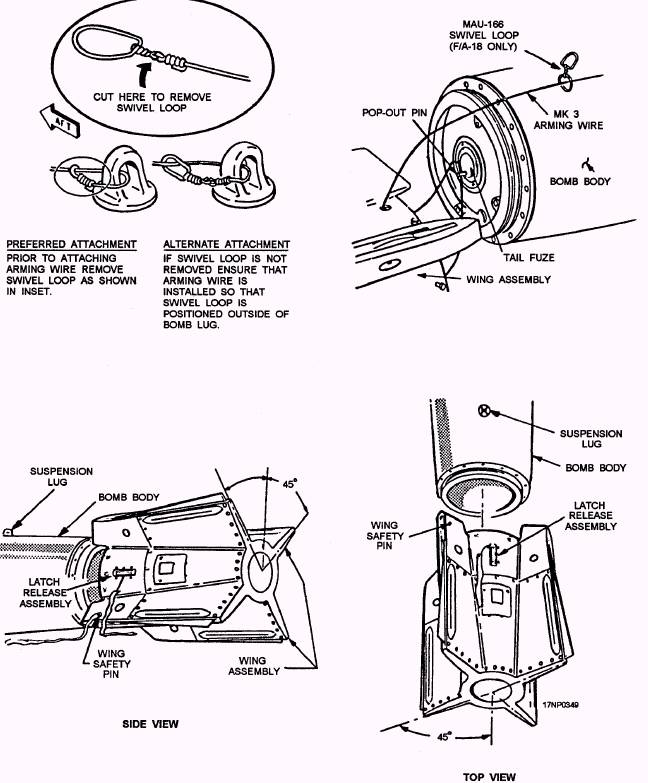
GUIDED-BOMB UNIT (GBU) ASSEMBLY GBUs are general-purpose bombs configured with a wing assembly and a computer control group. Preparation and inspection of the GBUs are the same as the GP bombs, discussed earlier in this chapter, Wing Assembly Installation Install the wing assembly on the bomb as follows: 1. Ensure safety pins are securely installed in latch release lever and collar assembly (fig. 13-17). 2. Remove access covers. NOTE: Refer to figure 13-18 for steps 3 through 8. 3. Attach Mk 3 arming wire to aft suspension lug. 4. Insert arming wire through MAU-166 swivel loop. 5. Orient wings as follows: a. Position GBU-12 and GBU-16 wings in X configuration with the wing release latch mechanism at 9 o'clock, with the bomb lugs at 12 o'clock when viewed from the rear. b. Position GBU-10 wings so that latch mechanism is at 12 o'clock in line with the bomb lugs. NOTE: Mk 3 arming wire installation for the GBU-12 and GBU-16 is the same as for GP bombs, discussed earlier in this chapter. For the GBU-10, install arming wire through hole at the 3 o'clock position of wing and route through pull-out pin/gagrod and pass wire out through hole at 9 o'clock position of wing assembly. 6. Remove safety cotter pin from pull-out pin/gagrod. 7. Keep arming wire taut while pressing the wing against the bomb body. Hand tighten setscrews. 8. Torque setscrews to the required torque.
Figure 13-17.-Wing assembly.
Figure 13-18.-GBU-12/16/10 wing assembly installation.
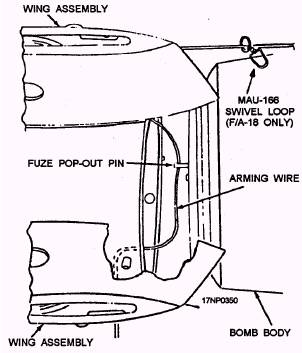
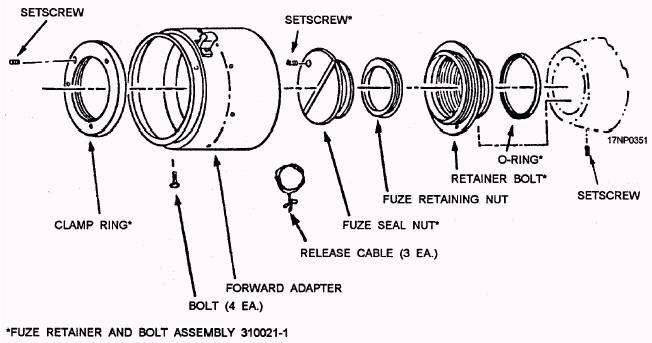
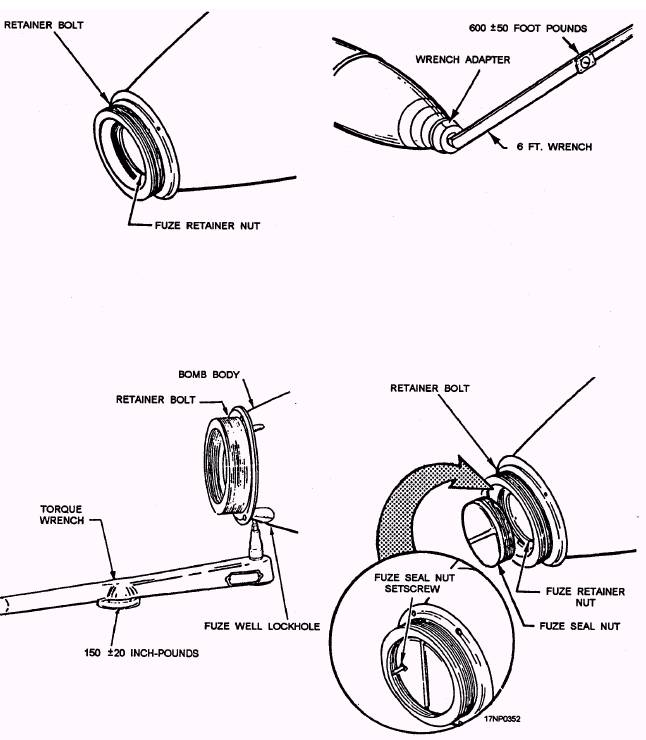
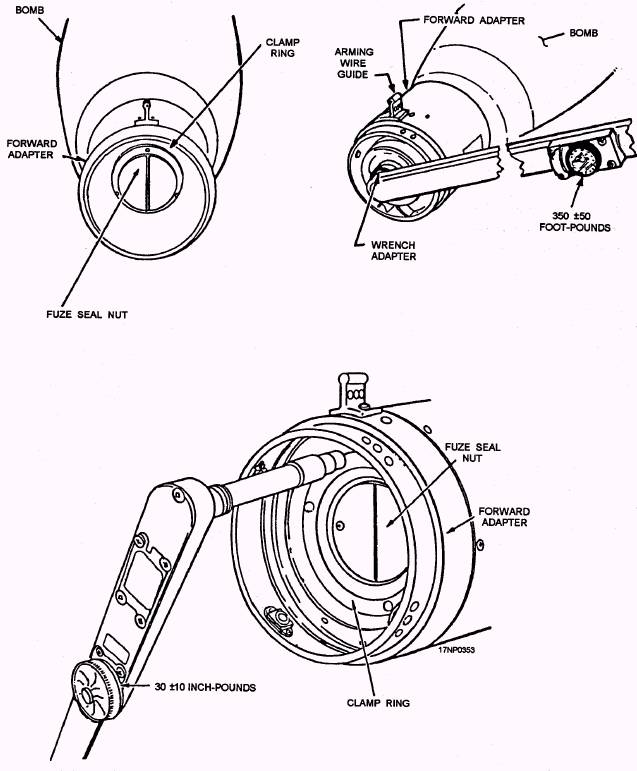
Figure 12-19.-Arming wire installation. 9. Remove the access cover, ensure that no kinks are in the arming wire, and that the wire is not looped around pull-out pin (fig. 13-19). 10. Secure access cover. 11. Wrap arming wire around wing assembly. 12. Mark wing assembly with type of fuze and date installed, fuze safety pin removed, and current date and QA initials. Forward Adapter Assembly Installation Install forward adapter assembly (fig. 13-20) on nose of bomb as follows: 1. Place O-ring on external threads of retainer bolt. 2. Install retainer bolt into nose fuze well (fig. 13-21). 3. Torque retainer bolt to specified torque by using wrench adapter (fig. 13-21). 4. Apply specified torque to setscrew in nose fuze well (fig. 13-21). 5. Install fuze seal nut in retainer bolt and tighten (fig. 13-21) setscrew. 6. Place open end of forward adapter over nose bomb body. Align arming wire guide with suspension lugs on bomb body.
Figure 13-20.-Forward adapter assembly with fuze retaining bolt.
Figure 13-21.-Retainer bolt and sealing nut instalIation.
Figure 13-22.-Clamp ring installation. 7. Install clamp ring onto retainer bolt (fig. 13-22). Back out setscrew to prevent assembly interference. 8. Torque clamp ring to specified torque. 9. Verify arming wire guide is aligned with suspension lugs of bomb body. 10. Apply specified torque to clamp ring setscrew (fig. 13-22). Computer Control Group Installation Install the computer control group (CCG) as follows: 1. Visually inspect CCG for physical damage. 2. Ensure thermal battery firing pin assembly safety wire and pull-out pin are installed (fig. 13-23). 3. Ensure control section seal is installed. 4. Remove detector dome protective cover and packing, inspect detector for cracks through the dome thickness, portions of the dome missing, or abrasion that prevents you from visually seeing the internal parts. 5. Inspect humidity detector ring inside of the detector optic assembly for indication of moisture. 6. Ensure detector moves freely on gimbals. 7. Replace detector dome protective cover and packing. 8. Position CCG on forward adapter (fig. 13-23), and align thermal battery firing pin assembly with arming wire guide on forward adapter. 9. Install four bolts through CCG mounting hole and forward adapter. Apply specified torque to bolts. |
 
|
|
|