|
||
|
|
||
| |||||||||||||||
|
|
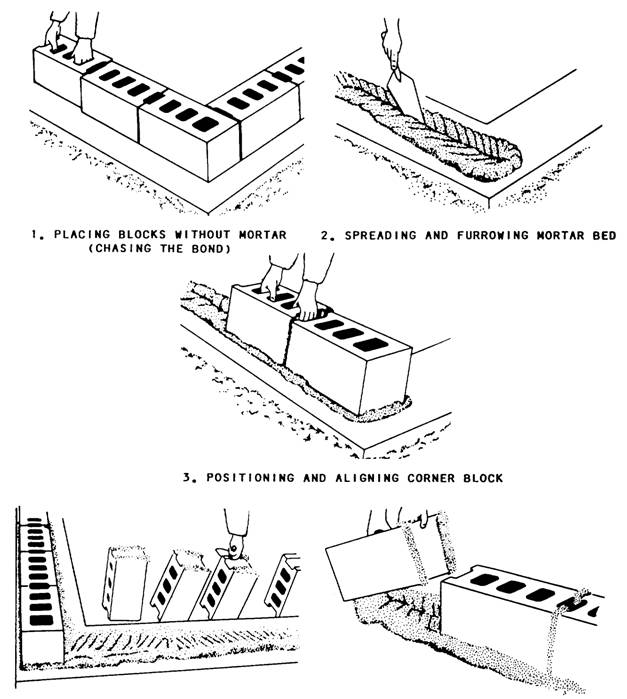
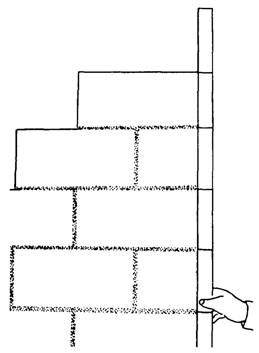
SAFE HANDLING OF MATERIAL When you handle cement or lime bags, wear goggles and snug-fitting neckbands and wristbands. Always practice good personal cleanliness and never wear clothing that has become stiff with cement. Cement-impregnated clothing irritates the skin and may cause serious infection. Any susceptibility of the skin to cement and lime burns should be reported. Personnel who are allergic to cement or lime should be transferred to other jobs. Bags of cement or lime should not be piled more than 10 bags high on a pallet. The only exception is when storage is in bins or enclosures built for such storage. The bags around the outside of the pallet should be placed with the mouths of the bags facing the center, The first five tiers of bags each way from any corner must be cross piled. A setback starting with the sixth tier should be made to prevent piled bags from falling outward. If you have to pile bags above 10 tiers, another setback must be made. The back tier, when not resting against an interior wall of sufficient strength to withstand the pressure, should be set back one bag every five tiers, the same as the end tiers. During unpiling, the entire top of the pile should be kept level and the necessary setbacks maintained. Lime and cement must be stored in a dry place. This helps prevent lime from crumbling and the cement from hydrating before it is used. CONCRETE MASONRY CONSTRUCTION LEARNING OBJECTIVE: Upon completing this section, you should be able to explain the elements of concrete masonry Good workmanship is a very important factor in building masonry walls. You should make every effort to lay each masonry unit plumb and true. In the following paragraphs, we will discuss the basic steps in laying up masonry walls. STEPS IN CONSTRUCTION The first step in building a concrete masonry wall is to locate the corners of the structure. In locating the corners, you should also make sure the footing or slab formation is level so that each Builder starts each section wall on a common plane. This also helps ensure that the bed joints are straight when the sections are connected. If the foundation is badly out of level, the entire first course should be laid before Builders begin working on other courses. If this is not possible, a level plane should be established with a transit or engineer's level. The second step is to chase out bond, or lay out, by placing the first course of blocks without mortar (figure 8-7, view 1). Snap a chalk line to mark the
Figure 8-7.-Laying first course of blocks for a wall.
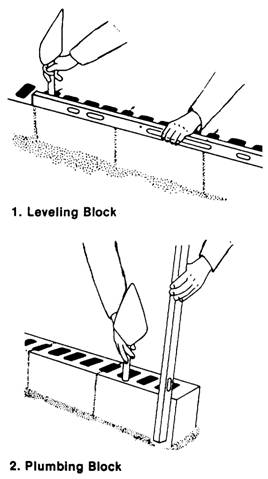
Figure 8-8.-Leveling and plumbing first course of blocks for a wall. footing and align the blocks accurately. Then, use a piece of material 3/8 inch thick to properly space the blocks. This helps you get an accurate measurement. The third step is to replace the loose blocks with a full mortar bed, spreading and furrowing it with a
Figure 8-9.-Vertical joints.
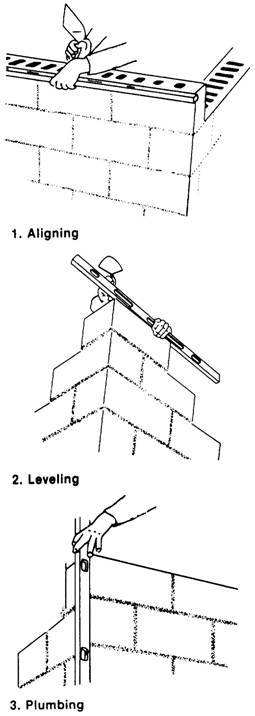
Figure 8-10.-Checking each course at the corner. trowel to ensure plenty of mortar under the bottom edges of the first course (figure 8-7, view 2). Carefully position and align the corner block first (view 3 of figure 8-7). Lay the remaining first-course blocks with the thicker end up to provide a larger mortar-bedding area. For the vertical joints, apply mortar only to the block ends by placing several blocks on end and buttering them all in one operation (view 4). Make the joints 3/8 inch thick. Then, place each block in its final position, and push the block down vertically into the mortar bed and against the previously laid block. This ensures a well-tilled vertical mortar joint (view 5). After laying three or four blocks, use a mason's level as a straightedge to check correct block alignment (figure 8-8, view 1). Then, use the level to bring the blocks to proper grade and plumb by tapping with a trowel handle as shown in view 2. Always lay out the first course of concrete masonry carefully and make sure that you properly align, level, and plumb it. This assures that succeeding courses and the final wall are both straight and true. The fourth step is to build up the corners of the wall, usually four or five courses high. This is also called laying up a lead. Step back each course one-half block. For the horizontal joints, apply mortar only to the tops of the blocks already laid. For the vertical joints, you can apply mortar either to the ends of the new block or the end of the block previously laid, or both, to ensure well-filled joints (figure 8-9). As you lay each course at the corner, check the course with a level for alignment (figure 8-10, view 1), for level (view 2), and for
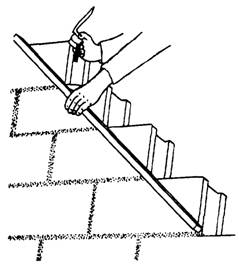
Figure 8-11.-Using a story or course pole.
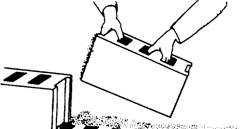
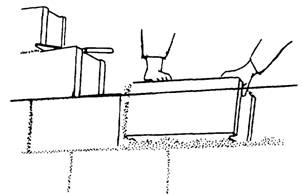
Figure 8-12.-Checking horizontal block spacing. plumb (view 3). Carefully check each block with a level or straightedge to make sure that all the block faces are in the same plane. This ensures true, straight walls. A story or course pole, which is a board with markings 8 inches apart (figure 8-11), helps accurately place each masonry course. Also check the horizontal block spacing by placing a level diagonally across the corners of the blocks (figure 8-12). When filling in the wall between the corners, first stretch a mason's line along the extensor block edges from corner to corner for each course. Then lay the top outside edge of each new block to this line (figure 8-13). How you grip a block before laying is
Figure 8-13.-Filling in the wall between corners.
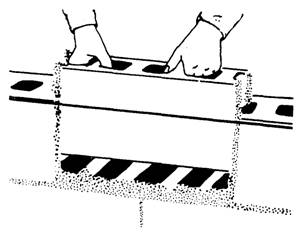
Figure 8-14.-Installing a closure block. important. First, tip it slightly toward you so that you can see the edge of the course below. Then place the lower edge of the new block directly on the edges of the block below (figure 8-13). Make all position adjustments while the mortar is soft and plastic. Any adjustments you make after the mortar stiffens will break the mortar bond and allow water to penetrate. Level each block and align it to the mason's line by tapping it lightly with a trowel handle. Fifth and last, before installing the closure block, butter both edges of the opening and all four vertical edges of the closure block with mortar. Then, lower the closure block carefully into place (figure 8-14). If
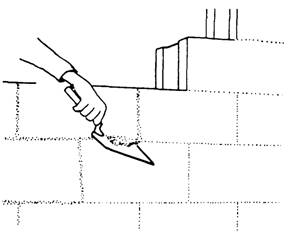
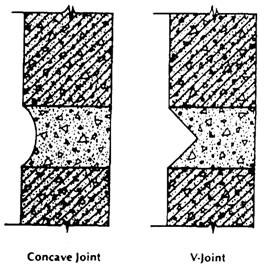
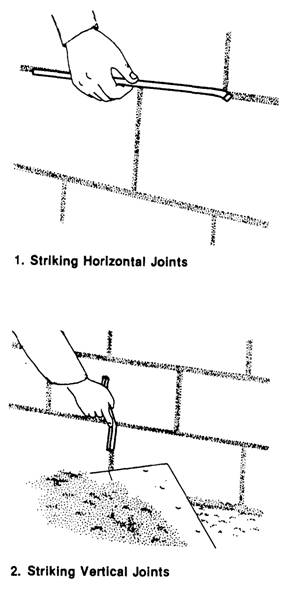
Figure 8-15.-Cutting off excess mortar from the joints. any mortar falls out, leaving an open joint, remove the block and repeat the procedure. To assure a good bond, do not spread mortar too far ahead when actually laying blocks. If you do, the mortar will stiffen and lose its plasticity. The recommended width of mortar joints for concrete masonry units is 3/8 inch. When properly made, these joints produce a weathertight, neat, and durable concrete masonry wall. As you lay each block, cut off excess mortar from the joints using a trowel (figure 8-15) and throw it back on the mortar board to rework into the fresh mortar. Do not, however, rework any mortar dropped on the scaffold or floor. Weathertight joints and the neat appearance of concrete masonry walls depend on proper striking (tooling). After laying a section of the wall, tool the mortar joint when the mortar becomes "thumb print" hard. Tooling compacts the mortar and forces it tightly against the masonry on each side of the joint. Use either concave or V-shaped tooling on all joints (figure 8-16). Tool horizontal joints (figure 8-17, view 1) with a long jointer first, followed by tooling the vertical joints (view 2). Trim off mortar burrs from the tooling flush with the wall face using a trowel, soft bristle brush, or by rubbing with a burlap bag.
Figure 8-16.-Tooled mortar joints for weathertight exterior walls.
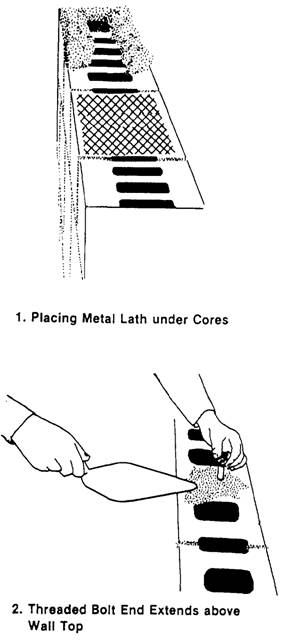
Figure 8-17.-Tooling mortar joints. A procedure known as pointing may be required after jointing. Pointing is the process of inserting mortar into horizontal and vertical joints after the unit has been laid. Basically, pointing is done to restore or replace deteriorated surface mortar in old work. Pointing of this nature is called tuck pointing. However, even in freshly laid masonry, pointing may be necessary for filling holes or correcting defective joints. You must prepare in advance for installing wood plates with anchor bolts on top of hollow concrete masonry walls. To do this, place pieces of metal lath
Figure 8-18.-Installing anchor bolts for wood plates. in the second horizontal mortar joint from the top of the wall under the cores that will contain the bolts (figure 8-18, view 1). Use anchor bolts 1/2 inch in diameter and 18 inches long. Space them not more than 4 feet apart. Then, when you complete the top course, insert the bolts into the cores of the top two courses and till the cores with concrete or mortar. The metal lath underneath holds the concrete or mortar filling in place. The threaded end of the bolt should extend above the top of the wall (view 2).
Figure 8-19.-Control joints. |
|
Privacy Statement - Press Release - Copyright Information. - Contact Us - Support Integrated Publishing |