|
||
|
|
||
| |||||||||||||||
|
|
BONDS The term "bond" as used in masonry has three different meanings: structural bond, mortar bond, or pattern bond. Structural bond refers to how the individual masonry units interlock or tie together into a single structural unit. You can achieve structural bonding of brick and tile walls in one of three ways: Overlapping (interlocking) the masonry units; * Embedding metal ties in connecting joints; and
Figure 8-32.-Masonry units and mortar joints.
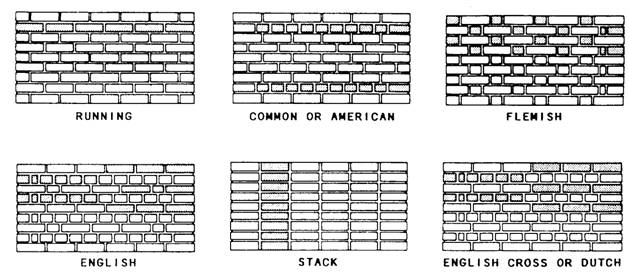
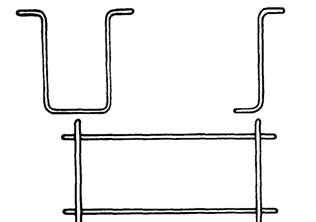
Figure 8-33.-Types of masonry bonds. Using grout to adhere adjacent wythes of masonry. Mortar bond refers to the adhesion of the joint mortar to the masonry units or to the reinforcing steel. Pattern bond refers to the pattern formed by the masonry units and mortar joints on the face of a wall. The pattern may result from the structural bond, or may be purely decorative and unrelated to the structural bond. Figure 8-33 shows the six basic pattern bonds in common use today: running, common or American, Flemish, English, stack, and English cross or Dutch bond. The running bond is the simplest of the six patterns, consisting of all stretchers. Because the bond has no headers, metal ties usually form the structural bond. The running bond is used largely in cavity wall construction, brick veneer walls, and facing tile walls made with extra wide stretcher tile. The common, or American, bond is a variation of the running bond, having a course of full-length headers at regular intervals that provide the structural bond as well as the pattern. Header courses usually appear at every fifth, sixth, or seventh course, depending on the structural bonding requirements. You can vary the common bond with a Flemish header course. In laying out any bond pattern, be sure to start the corners correctly. In a common bond, use a three-quarter closure at the corner of each header course. In the Flemish bond, each course consists of alternating headers and stretchers. The headers in every other course center over and under the stretchers in the courses in between. The joints between stretchers in all stretcher courses align vertically. When headers are not required for structural bonding, you can use bricks called blind headers. You can start the corners in two different ways. In the Dutch corner, a three-quarter closure starts each course. In the English corner, a 2-inch or quarter closure starts the course. The English bond consists of alternating courses of headers and stretchers. The headers center over and under the stretchers. However, the joints between stretchers in all stretcher courses do not align vertically. You can use blind headers in courses that are not structural bonding courses. The stack bond is purely a pattern bond, with no overlapping units and all vertical joints aligning. You must use dimensionally accurate or carefully rematched units to achieve good vertical joint alignment. You can vary the pattern with combinations and modifications of the basic patterns shown in figure 8-33. This pattern usually bonds to the backing with rigid steel ties or 8-inch-thick stretcher units when available. In large wall areas or load-bearing construction, insert steel pencil rods into the horizontal mortar joints as reinforcement. The English cross or Dutch bond is a variation of the English bond. It differs only in that the joints between the stretchers in the stretcher courses align vertically. These joints center on the headers in the courses above and below. When a wall bond has no header courses, use metal ties to bond the exterior wall brick to the backing courses. Figure 8-34 shows three typical metal ties.
Figure 8-34.-Metal ties. Install flashing at any spot where moisture is likely to enter a brick masonry structure. Flashing diverts the moisture back outside. Always install flashing under horizontal masonry surfaces, such as sills and copings; at intersections between masonry walls and horizontal surfaces, such as a roof and parapet or a roof and chimney; above openings (doors and windows, for example); and frequently at floor lines, depending on the type of construction. The flashing should extend through the exterior wall face and then turn downward against the wall face to form a drop. You should provide weep holes at intervals of 18 to 24 inches to drain water to the outside that might accumulate on the flashing. Weep holes are even more important when appearance requires the flashing to stop behind the wall face instead of extending through the wall. This type of concealed flashing, when combined with tooled mortar joints, often retains water in the wall for long periods and, by concentrating the moisture at one spot, does more harm than good. |
|
Privacy Statement - Press Release - Copyright Information. - Contact Us - Support Integrated Publishing |