|
||
|
|
||
| |||||||||||||||
|
|
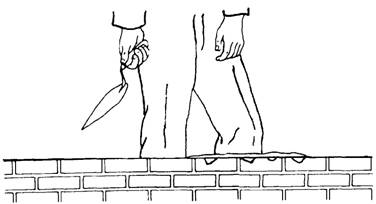
MORTAR JOINTS AND POINTING There is no set rule governing the thickness of a brick masonry mortar joint. Irregularly shaped bricks may require mortar joints up to 1/2 inch thick to compensate for the irregularities. However, mortar joints 1/4 inch thick are the strongest. Use this thickness when the bricks are regular enough in shape to permit it. A slushed joint is made simply by depositing the mortar on top of the head joints and allowing it to run down between the bricks to form a joint. You cannot make solid joints this way. Even if you fill the space between the bricks completely, there is no way you can compact the mortar against the brick faces; consequent y a poor bond results. The only effective way to build a good joint is to trowel it. The secret of mortar joint construction and pointing is in how you hold the trowel for spreading mortar. Figure 8-35 shows the correct way to hold a trowel. Hold it firmly in the grip shown, with your
Figure 8-35.-Correct way to hold a trowel.
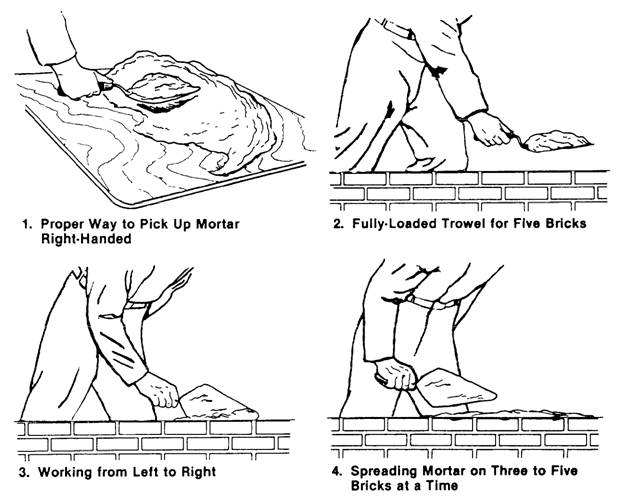
Figure 8-36.-Picking up and spreading mortar. thumb resting on top of the handle, not encircling it. If you are right-handed, pick up mortar from the outside of the mortar board pile with the left edge of your trowel (figure 8-36, view 1). You can pick up enough to spread one to five bricks, depending on the wall space and your skill. A pickup for one brick forms only a small pile along the left edge of the trowel. A pickup for five bricks is a full load for a large trowel (view 2). If you are right-handed, work from left to right along the wall. Holding the left edge of the trowel directly over the center line of the previous course, tilt the trowel slightly and move it to the right (view 3), spreading an equal amount of mortar on each brick until you either complete the course or the trowel is empty (view 4). Return any mortar left over to the mortar board. Do not spread the mortar for a bed joint too far ahead of laying-four or five brick lengths is best. Mortar spread out too far ahead dries out before the bricks become bedded and causes a poor bond (figure 8-37). The mortar must be soft and plastic so that the brick will bed in it easily. Spread the mortar about 1 inch thick and then make a shallow furrow in
Figure 8-37: A poorly bonded brick.
Figure 8-38.-Making a bed joint in a stretcher course.
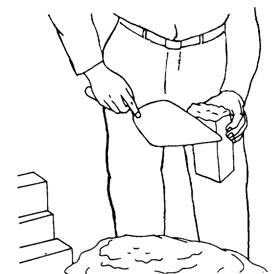
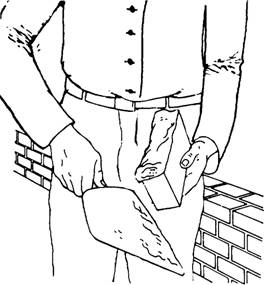
Figure 8-40.-Making a head joint in a stretcher course. it (figure 8-38, view 1). A furrow that is too deep leaves a gap between the mortar and the bedded brick. This reduces the resistance of the wall to water penetration. Using a smooth, even stroke, cut off any mortar projecting beyond the wall line with the edge of the trowel (figure 8-38, view 2). Retain enough mortar on the trowel to butter the left end of the first brick you will lay in the fresh mortar. Throw the rest back on the mortar board. Pick up the first brick to be laid with your thumb on one side of the brick and your fingers on the other (figure 8-39). Apply as much mortar as will stick to the end of the brick and then push it into place. Squeeze out the excess mortar at the head joint and at the sides (figure 8-40). Make sure the mortar
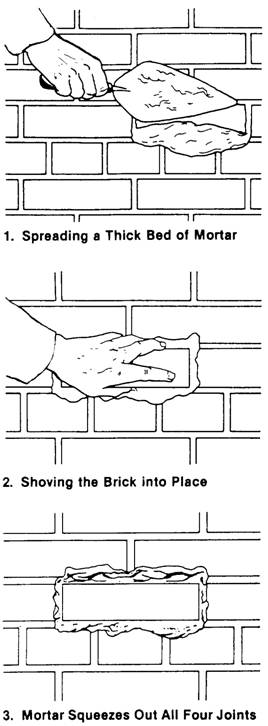
Figure 8-39.-Proper way to hold a brick when buttering the end. completely fills the head joint. After bedding the brick, cut off the excess mortar and use it to start the next end joint. Throw any surplus mortar back on the mortar board where it can be restored to workability. Figure 8-41 shows how to insert a brick into a space left in a wall. First, spread a thick bed of mortar (view 1), and then shove the brick into the wall space
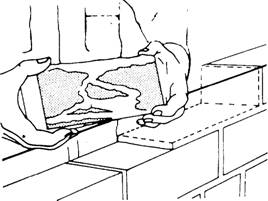
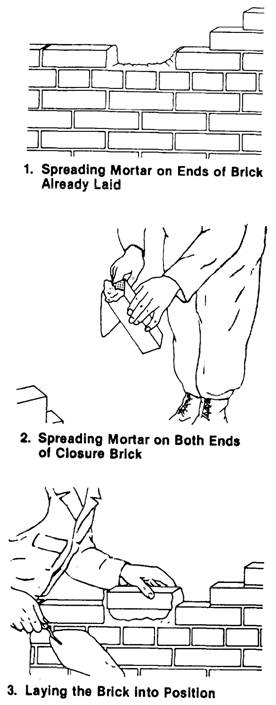
Figure 8-41.-Inserting a brick in a wall space. (view 2) until mortar squeezes out of all four joints (view 3). This way, you know that the joints are full of mortar at every point. To make a cross joint in a header course, spread the bed joint mortar several brick widths in advance. Then, spread mortar over the face of the header brick before placing it in the wall (figure 8-42, view 1). Next, shove the brick into place, squeezing out mortar at the top of the joint. Finally, cut off the excess mortar as shown in view 2. Figure 8-43 shows how to lay a closure brick in a header course. First, spread about 1 inch of mortar on the sides of the brick already in place (view 1), as well
1. Spreading Mortar over Brick Face
Figure 8-42.-Making a cross joint in a header course.
Figure 8-43.-Making a closure joint in a header course. as on both sides of the closure brick (view 2). Then, lay the closure brick carefully into position without disturbing the brick already laid (view 3). If you do disturb any adjacent brick, cracks will form between the brick and mortar, allowing moisture to penetrate the wall. You should place a closure brick for a
Figure 8-44.-Making a closure joint in a stretcher course. stretcher course (figure 8-44) using the same techniques as for a header course. As we mentioned earlier, filling exposed joints with mortar immediately after laying a wall is called pointing. You can also fill holes and correct defective mortar joints by pointing, using a pointing trowel.
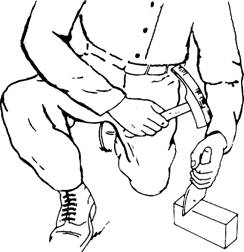
Figure 8-45.-Cutting brick with a chisel. CUTTING BRICK To cut a brick to an exact line, you should use a chisel (figure 8-45), or brick set. The straight side of the tool's cutting edge should face both the part of the brick to be saved and the bricklayer. One mason's hammer blow should break the brick. For extremely hard brick, first roughly cut it using the brick hammer head, but leave enough brick to cut accurately with the brick set. Use a brick hammer for normal cutting work, such as making the closure bricks and bats around wall openings or completing corners. Hold the brick firmly while cutting it. First, cut a line all the way around the brick using light hammer head blows. Then, a sharp blow to one side of the cutting line should split the brick at the cutting line (figure 8-46, view 1). Trim rough spots using the hammer blade, as shown in view 2. |
|
Privacy Statement - Press Release - Copyright Information. - Contact Us - Support Integrated Publishing |