|
||
|
|
||
| |||||||||||||||
|
|
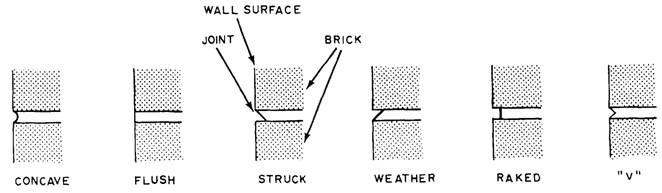
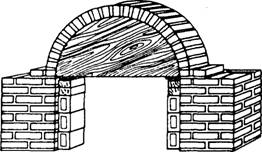
FINISHING JOINTS The exterior surfaces of mortar joints are finished to make brick masonry waterproof and give it a better appearance. If joints are simply cut to the face of the brick and not finished, shallow cracks will develop immediately between the brick and the mortar. Always finish a mortar joint before the mortar hardens too much. Figure 8-47 shows several types of joint finishes, the more important of which are concave, flush, and weather. Of all joints, the concave is the most weather tight. After removing the excess mortar with a trowel, make this joint using a jointer that is slightly larger than the joint. Use force against the tool to press the mortar tight against the brick on both sides of the mortar joint. The flush joint is made by holding the trowel almost parallel to the face of the wall while drawing its point along the joint. A weather joint sheds water from a wall surface more easily. To make it, simply push downward on the mortar with the top edge of the trowel. ARCHES A well-constructed brick arch can support a heavy load, mainly due to the way weight is distributed over its curved shape. Figure 8-48 shows two common arch shapes: elliptical and circular. Brick arches require full mortar joints. The joint width is narrower
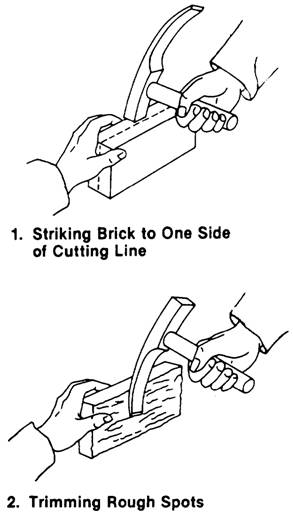
Figure 8-46.-Cutting brick with a hammer.
Figure 8-47.-Joint finishes. at the bottom of the arch than at its top, but it should not narrow to less than 1/4 inch at any point. As laying progresses, make sure the arch does not bulge out of position. Templet It is obviously impossible to construct an arch without support from underneath. These temporary wooden supports must not only be able to support the masonry during construction but also provide the geometry necessary for the proper construction and appearance of the arch. Such supports are called templets. DIMENSIONS.- Construct a brick arch over the templet (figure 8-49) that remains in place until the
Figure 8-48.-Common arch shapes. mortar sets. You can obtain the templet dimensions from the construction drawings. For arches spanning up to 6 feet, use 3/4-inch plywood to make the templet. Cut two pieces to the proper curvature, and nail them to 2-by-4 spacers that provide a surface wide enough to support the brick. POSITIONING.- Use wedges to hold the templet in position until the mortar hardens enough to make the arch self-supporting. Then drive out the wedges. Layout Lay out the arch carefully so that you don't have to cut any bricks. Use an odd number of bricks so that the key, or middle, brick falls into place at the exact arch center, or crown. The key, or middle, brick is the last one laid. To determine how many bricks an arch requires, lay the templet on its side on level ground and set a trial number of bricks around the curve. Adjust the number of bricks and the joint spacing (not less than 1/4-inch) until the key brick is at the exact center of the curve. Then, mark the positions of the bricks on the templet and use them as a guide when laying the brick.
Figure 8-49.-Using a template to construct an arch. RECOMMENDED READING LIST Although the following reference was current when this TRAMAN was published, its continued currency cannot be assured. You therefore need to ensure that you are studying the latest revision. Concrete and Masonry, FM 5-742, Headquarters, Department of the Army, Washington, D.C., 1985. |
|
Privacy Statement - Press Release - Copyright Information. - Contact Us - Support Integrated Publishing |