|
||
|
|
||
| |||||||||||||||
|
|
DIAMOND BLADES Diamond blades have segments made from a sintered mixture of industrial diamonds and metal powders, which are brazed to a steel disk. They are generally used to cut old concrete, asphalt, and green concrete containing the harder aggregates. Diamond blades must always be used wet. Many grades of diamond blades are available to suit the conditions of the job. Twelve-inch-diameter diamond blades are the most popular size. This size makes a cut about 3 1/4inches deep. Larger-size blades are used for deeper cuts. CARBORUNDUM BLADES Low-cost, abrasive blades are now widely used to cut green concrete made with soft aggregates, such as limestone, dolomite, coral, or slag. These blades are made from a mixture of silicon carbide grains and a resin bond. This mixture is pressed and baked. In
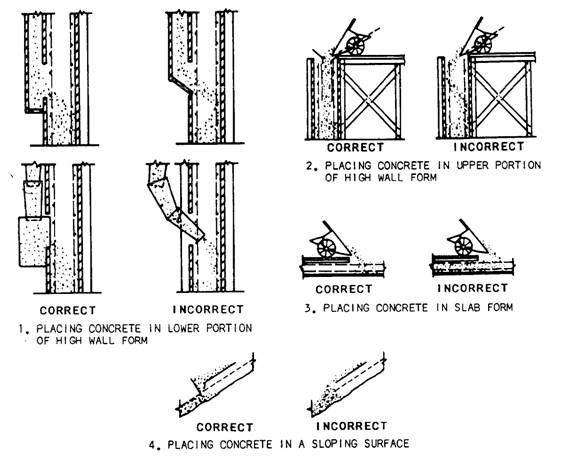
Figure 7-40.-Concrete saw. and baked. In many cases, some of the medium-hard aggregates can be cut if the step-cutting method is used. This method uses two or more saws to cut the same joint, each cutting only a part of the total depth. This principle is also used on the longitudinal saw, which has two individually adjustable cutting heads. When a total depth of 2 1/2 inches is to be cut, the leading blade cuts the first inch and the trailing blade, which is slightly narrower, cuts the remaining depth. Abrasive blades come in 14- and 18-inch diameters. They are made in various thicknesses to cut joints from 1/4-inch to 1/2-inch wide. When to Use When is the best time to saw green concrete? In the case of abrasive blades, there is only one answer-as soon as the concrete can support the equipment and the joint can be cut with a minimum of chipping. In the case of diamond blades, two factors must be considered. In the interest of blade life, sawing should be delayed, but control of random cracking requires sawing at the transverse joints as early as possible. Where transverse joints are closely spaced, every second or third joint can be cut initially and the rest cut later. Sawing longitudinal joints can be delayed for 7 days or longer. For proper operation and maintenance of the concrete saw, follow the manufacturer's manual. PLACING CONCRETE LEARNING OBJECTIVE. Upon completing this section, you should be able to describe the proper placing procedures for well-designed concrete. You cannot obtain the full value of well-designed concrete without using proper placing procedures. Good concrete placing and compacting techniques produce a tight bond between the paste and aggregate and fill the forms completely. Both of these factors contribute to the full strength and best appearance of concrete. The following are some of the principles of concrete placement: Segregation- Avoid segregation during all operations, from the mixer to the point of placement, including final consolidation and finishing. Consolidation- Thoroughly consolidate the concrete, working solidly around all embedded reinforcement and filling all form angles and corners. Bonding- When placing fresh concrete against or upon hardened concrete, make sure that a good bond develops. Temperature control- Take appropriate steps to control the temperature of fresh concrete from mixing through final placement. Protect the concrete from temperature extremes after placement. Maximum drop-To save time and effort, you may be tempted to simply drop the concrete directly from the delivery chute regardless of form height. However, unless the free fall into the form is less than 4 feet, use vertical pipes, suitable drop chutes, or baffles. Figure 7-41 suggests several ways to control concrete fall. Good control prevents honeycombing and other undesirable results.
Figure 7-4l.-Concrete placing techniques. Layer thickness- Try to place concrete in even horizontal layers. Do not attempt to puddle or vibrate it into the form. Place each layer in one operation and consolidate it before placing the next layer to prevent honeycombing and voids. This is particularly critical in wall forms containing considerable reinforcement. Use a mechanical vibrator or a hand spading tool for consolidation. Take care not to over vibrate. This can cause segregation and a weak surface. Do not allow the first layer to take its initial set before adding the next layer. Layer thickness depends on the type of construction, the width of the space between forms, and the amount of reinforcement. Compacting- (Note: This is different from soil compaction.) First, place concrete into its final position as nearly as possible. Then, work the concrete thoroughly around reinforcement and imbedded fixtures, into the corners, and against the sides of the forms. Because paste tends to flow ahead of aggregate, avoid horizontal movements that result in segregation. Placing rate- To avoid excessive pressure on large project forms, the filling rate should not exceed 4 vertical feet per hour, except for columns. Coordinate the placing and compacting so that the concrete is not deposited faster than it can be compacted properly. To avoid cracking during settlement, allow an interval of at least 4 hours, preferably 24 hours, between placing slabs, beams, or girders, and placing the columns and walls they support. Wall construction-When constructing walls, beams, or girders, place the first batches of each layer at the ends of the section, then proceed toward the center to prevent water from collecting at the form ends and corners. For walls, stop off the inside form at the construction level. Overfill the form for about 2 inches and remove the excess just before the concrete sets to ensure a rough, clean surface. Before placing the next lift of concrete, deposit a 1/2- to 1-inch-thick layer of sand-cement mortar. Make the mortar with the same water content ratio as the concrete and with a 6-inch slump to prevent stone pockets and help produce a watertight joint. View 1 of figure 7-41 shows the proper way to place concrete in the lower portion of high wall forms. Note the different types of drop chute that can be used to place concrete through port openings and into the lower portion of the wall. Space the port openings at about 10-foot intervals up the wall. The method used to place concrete in the upper portion of the wall is shown in view 2 of figure 7-41. When placing concrete for walls, be sure to remove the spreaders as you fill the forms. Slab construction- When constructing slabs, place the concrete at the far end of the slab first, and then place subsequent batches against previously placed concrete, as shown in view 3 of figure 7-41. Do not place the concrete in separate piles and then level the piles and work them together. Also, don't deposit the concrete in piles and then move them horizontally to their final position. These practices can result in segregation. Placing concrete on slopes- View 4 of figure 7-41 shows how to place concrete on slopes. Always deposit the concrete at the bottom of the slope first, then proceed up the slope placing each new batch against the previous one. When consolidated, the weight of the new concrete increases the compacting of the previously placed concrete. CONSOLIDATING CONCRETE LEARNING OBJECTIVE. Upon completing this section, you should be able to describe the methods available for consolidating concrete. Except for concrete placed underwater, you must compact or consolidate all concrete after placement. |
|
Privacy Statement - Press Release - Copyright Information. - Contact Us - Support Integrated Publishing |