Custom Search
|
|
 
|
||
|
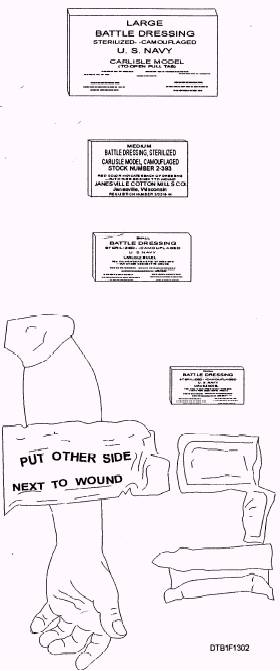
TREATING OBVIOUS CONDITIONS In your primary assessment, you will notice some obvious conditions that require treatment (e.g., external hemorrhaging, shock, fractures, wounds, etc.). After you triage the casualties, you will start treatment of the obvious conditions. Hemorrhage Hemorrhage, or bleeding, occurs whenever there is a break in the wall of a blood vessel. Blood circulates throughout the body by means of three different kinds of blood vessels: arteries, veins, and capillaries. Arteries are large blood vessels that carry the blood away from the heart. Veins are large blood vessels that carry blood back to the heart. Capillaries are smaller blood vessels that form a connecting network between the arteries and veins. Arterial bleeding is when bright red blood comes from the wound. If the artery is near the surface of the body, the blood will spurt out each time the casualty's heart beats. If the artery is located deep within the body, the blood will flow from the wound in a steady stream. Venous bleeding is when dark red blood comes from the wound in a steady stream. Capillary bleeding is when dark red blood comes from the wound in a steady stream. Slight wounds usually cause only capillary bleeding. This bleeding can be controlled by lightly fastening a sterile dressing over the wound. Deeper wounds, however, may cause venous or arterial bleeding. Because the veins and arteries are large blood vessels, a casualty may lose a lot of blood. You should regard venous or arterial bleeding as a serious, life-threatening emergency. The four methods for controlling hemorrhage are direct pressure, elevation, applying pressure to the pressure points, and the use of a tourniquet. WARNING Apply a tourniquet only as a last resort. DIRECT PRESSURE.\In most cases, serious external bleeding can be controlled by applying pressure directly on the wound with your hand on a sterile dressing as shown in figure 13-1. A battle dressing is a combination dressing and bandage in one unit. It is made of many layers of gauze sewed to a muslin strip or strips. Emergency medical kits are supplied with battle dressings (fig. 13-2), each stored in a sterile package, ready for instant use. These dressings come in different sizes; select a size to completely cover the wound and extend at least 1 inch in every direction beyond the border of the wound. Make sure that the sterile side covering the wound does not come into contact with your fingers, your clothes, or other unsterile objects. Do not drag the dressing across the casualty's skin, or allow it to slip out of place once it has been positioned over the wound. When the dressing is in place over'the wound, apply pressure to the dressing with the palm of your hand. Maintain pressure until the bleeding is controlled. If blood soaks through the dressing, do not replace it; add a second dressing on top of the first one and maintain hand pressure. When the bleeding is controlled, wrap the ends of the dressing around the wound and secure them by tying or pinning. If you have no battle dressings, you may use the cleanest cloth available (e.g., freshly laundered handkerchief, towel, or shirt) and a roller bandage (fig. 13-3). But never use material that will stick to the wound and be difficult to remove (e.g., absorbent cotton and adhesive or friction tape). The roller bandage is used to hold a compress in place, create pressure, and immobilize joints. The purpose of the bandage is to stop the bleeding, to prevent further
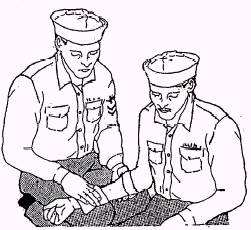
Figure 13-1.\Direct pressure.
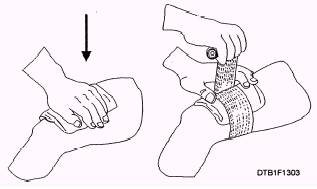
Figure 13-3.\Direct pressure to control bleeding and application of a roller bandage. ELEVATION.\Elevating or raising an injured limb above the level of the heart will help to control bleeding. Elevation should be used together with direct pressure (fig. 13-4). If you suspect a fracture, do not elevate a limb until the fracture has been splinted and you can be reasonably certain that elevation will cause no further injury. Use a stable object to maintain elevation. PRESSURE POINTS.\If direct pressure and elevation fail to control serious external bleeding, try to control it by applying pressure to the appropriate pressure point.
Figure 13-2.\Battle dressings. contamination, and to prevent further injury to the wound. When the dressing is in place, treat the casualty for shock and complete the U.S. Field Medical Card, DD Form 1380. In cases of severe hemorrhage, do not worry about the dangers of infection. Although the prevention of infection is important, your main concern is to stop the flow of blood. If there is no material available, simply thrust your hand over the wound.
Figure 13-4.\Combination of direct pressure and elevation. A pressure point is located where an artery passes 22 principal pressure points, 11 on each side of the over a bone near the surface of the skin. By exerting body. Figure 13-5 shows pressure points for the right pressure with your fingers or hand at this point, you facial, subclavian, brachial, radial and ulnar, iliac, and will compress the artery against the bone, thus shutting anterior and posterior tibia1 arteries. There are off most of the blood flow to the injured part. There are corresponding pressure points in the same locations on
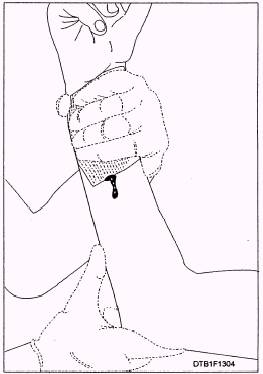
Figure 13-5.\Principal pressure points. the left side of the body. This figure also shows pressure points for the left superficial temporal, common carotid, brachial, femoral, and popliteal arteries. Whether you use a pressure point on the left side or the right side of the casualty depends on the side where the wound is found. You must also select the pressure point that is nearest the wound, and between the wound and the main part of the body. The following paragraphs discuss the pressure points used to control hemorrhage in different areas of the body. Throughout the discussion, refer to figure 13-5. For bleeding of the temple, forehead, and scalp, apply pressure to the superficial temporal artery just in front of the upper part of the ear. For bleeding of the cheeks, lips, or chin, apply pressure to the facial artery. To find the pressure point, start at the angle of the mandible until you feel a small notch. The pressure point is in this notch. For bleeding of the neck, apply pressure to the common carotid artery on the side of the neck. You can detect a very strong pulse. At a point below the wound, press inward and slightly backward against the pressure point. WARNING Do not use this pressure point unless it is absolutely necessary, because there is great danger of compressing the windpipe and choking the casualty. Never apply pressure to the pressure points on both sides of the neck at the same time. For bleeding at the shoulder and upper part of the arm, apply pressure to the subclavian artery under the front part of the collarbone. You can press down against the first rib or forward against the collarbone. For bleeding between the middle of the upper arm and the elbow, apply pressure to the upper portion of the brachial artery on the inner side of the arm, about halfway between the shoulder and the elbow. For bleeding between the middle of the upper arm and the elbow, apply pressure to the upper portion of the brachial artery on the inner side of the arm, about halfway between the shoulder and the elbow. For bleeding of the lower arm (forearm), apply pressure to the lower portion of the brachial artery on the inner side of the arm at the bend of the elbow. For bleeding of the hand, apply pressure to the radial and ulnar arteries at the wrist. For bleeding at the thigh, apply pressure to the iliac artery in the middle of the groin. It may be more effective to apply pressure to the femoral artery in the upper thigh. If you use this pressure point, apply pressure with the closed fist of one hand and use the other hand to give additional pressure. The femoral artery at this point is deeply buried, so great pressure is needed to compress the artery against the bone. For bleeding of the lower leg, apply pressure to the popliteal artery on the back of the leg, behind the knee. If you are unable to apply enough pressure with your fingers, hold the front of the knee firmly with one hand. With your other hand, make a fist and thrust it firmly against the back of the knee. For bleeding of the foot, apply pressure to the anterior and posterior tibia1 artery at the ankle. It is difficult to maintain pressure on a pressure point for more than 15 minutes. If you find you are no longer able to maintain pressure and there is no one to relieve you, you must find another way to control the bleeding. A dressing fixed securely over the wound may be enough. If this controls the bleeding, treat the casualty for shock and then complete the U.S. Field Medical Card. If you are unable to control the serious bleeding with the dressing, and if the wound is in one of the extremities (arms or legs), you may have to apply a tourniquet. |
 |
|
|
||