Custom Search
|
|
 
|
||
|
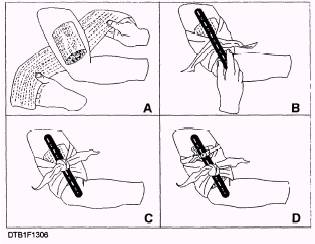
TOURNIQUETS. \Tourniquets are used as a last resort, and then only for controlling bleeding in the extremities. If you cannot control serious bleeding in an extremity by applying direct pressure, elevation, or by using the appropriate pressure point, you may apply a tourniquet. You will rarely have to apply a tourniquet. When you do, it will most likely be a situation when part of an extremity is amputated (cut off). A tourniquet consists of a pressure pad, a band, and a device for tightening the band. Place the pressure pad over the main artery supplying blood to the injured extremity. Wrap the band around the extremity and over the pressure pad. Tighten the band only enough to shut off the supply of blood to the injured extremity. You may use a rolled compress, battle dressing, or bandage as a pressure pad. If the materials are not available, you may use any round, smooth pressure object, such as a rolled handkerchief, a flat stone, or a rifle shell. If no pressure object can be found, apply the band without it. You may use any long, flat material, (i.e., bandage, belt, stocking, strip of rubber, or necktie) as the tourniquet band. The band must be flat. Narrow materials such as rope, wire, or string should not be used; they will cut into the casualty's flesh. Most Navy emergency medical kits contain a webbed band with a buckle on it. The band is tightened by pulling one end through the buckle. This eliminates the need for a separate device to tighten the band. If you are using another type of band, you may use a small, short stick to tighten it. There are some general rules to keep in mind when applying a tourniquet. Apply it over a main artery between the wound and the main part of the body. Apply the tourniquet as close to the wound as possible, making sure that the tourniquet is not touching the wound and that it is not placed over a joint. Once a tourniquet is correctly applied, only experienced medical personnel may loosen or remove it. Refer to figure 13-6 and use the following steps to apply a tourniquet: 1. Place the pressure pad or similar pressure object over the main artery supplying blood to the injured extremity (see A in fig. 13-6).
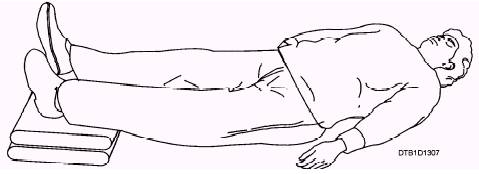
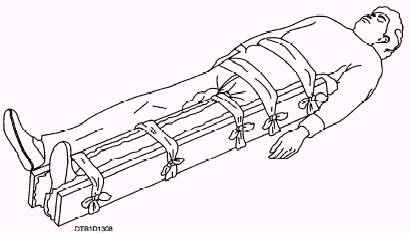
Figure 13-6.\Steps in tourniquet application. 2. Wrap the band once around the extremity and over the pressure pad. Place a short stick on the crossing band (see B in fig. 13-6). 3. Knot the band over-the-stick (see C in fig. 13-6). 4. Twist the stick to tighten the tourniquet just enough to control the flow of blood. Do not make it any tighter than necessary. A tourniquet that is too loose will not control the bleeding; one that is too tight may further injure the extremity. 5. Tie the stick in place with a strip of bandage or other material (see D in fig. 13-6). If bleeding fails to stop after the band has been tightened, there is a good chance the pressure pad is not placed directly over the artery. If this is the case, loosen the tourniquet and reposition the pad. After you have brought the bleeding under control, place a sterile dressing securely over the wound. Do not cover the tourniquet with a dressing. Do not loosen the tourniquet. Again, once a tourniquet has been correctly applied, only experienced medical personnel may loosen or remove it. After placing the dressing, treat the casualty for shock. Finally, complete the field medical card. In addition, write the letter "T" and the time the tourniquet was applied (e.g., T-0830) on the casualty's forehead. Use a skin pencil, colored antiseptic, ink, or crayon for this purpose. Shock Review the shock section in chapter 9, Dental Technician, Volume 2, NAVEDTRA 12573, for causes, signs, symptoms, and treatment of basic shock, fainting, anaphylactic shock, and insulin shock. Shock may develop at the time of the injury or hours later. Never put off treating a casualty for shock until the signs and symptoms appear. Begin treatment immediately. If shock has not yet developed, the treatment may prevent it from developing. If shock has already developed, the treatment may prevent it from becoming worse. TREATMENT OF SHOCK.\To prevent shock or to treat shock that has already developed, you should position the casualty, conserve body heat, and relieve pain. Position the Casualty.\The casualty should be lying down. Never let that person sit up, stand, or walk around. Generally, the standard position for the shock casualty is lying on the back with the feet elevated 6 to 12 inches (fig. 13-7). You must consider the type of injury before deciding on the position. The casualty's injuries may prevent you from using the standard position. For example, if a person with a chest wound has trouble breathing, you will raise the head slightly, and place the patient in a sitting or semi-sitting position. If a casualty is vomiting or bleeding around the mouth, place the patient on the side or back with the head turned to one side and lower the feet. If the face is flush rather than pale, or if you have any reason to suspect head injury, do not raise the feet. Instead, keep the head level with or slightly higher than the feet. If the casualty has broken bones, you must judge the best position for both the fractures and for shock. A fractured spine must be immobilized before the casualty is moved at all to avoid further injuries. A helpful mnemonic: If the face is red, raise the head; if the face is pale, raise the tail (feet). Conserve Body Heat.\Loss of body heat can cause shock to develop or to become worse. Keep the casualty warm. Cover the patient with blankets or any dry material. Do not overheat the casualty. Relieve Pain.-Pain is a major cause of shock. Treatment of injuries will often reduce pain. Pain may also be relieved by slightly repositioning the casualty. Under mass casualty conditions, you may have to administer morphine to certain types of casualties to relieve pain. The condition under which morphine may be administered will be discussed in the Morphine Administration section. Morphine must never be administered if there is evidence of severe or worsening shock. Injuries to Bones, Joints, and Muscles Injuries to bones, joints, and muscles are some of the most common situations that you will encounter. These injuries can range from the simple to the critical and life threatening. Whether the injury is mild or severe, your ability to provide quick and efficient emergency care may prevent further pain and injury. An essential part of em emergency treatment for fractures consists of immobilizing the injured part with splints so the sharp ends of broken bones will not move around and cause further damage to nerves, blood vessels, or vital organs. Splints are also used to immobilize severely injured joints or muscles and to prevent the enlargement of extensive wounds. You must have a general understanding of the types and uses of splints. SPLINTS.\Whether ready made or improvised, splints must fulfill certain requirements. They should be lightweight, but must be strong and fairly rigid. They should be long enough to reach the joints above and below the fracture. Splints should be wide enough so that the bandages used to hold them in place will not pinch the injured part. Splints must be padded on the sides that touch the body; if they are not properly padded, they will not fit well and will not adequately immobilize the injured part. If you have to improvise the padding for a splint, you can use articles of clothing, bandages, cotton blankets, or any other soft material. If the casualty is wearing heavy clothes, you may be able to apply the splint on the outside, allowing the clothing to serve as part of the required padding. To apply a splint to an injured part, fasten it in place with bandages, strips of adhesive tape, articles of clothing, or any other available material. If possible, one person should hold the splint in position while another person fastens it. Figure 13-8 shows a properly placed splint for a fractured femur. Although splints should be applied snugly, they should never be tight enough to interfere with blood circulation. Remember to leave the fingers or toes exposed. If the tips of the fingers or toes become blue or cold, you will know that the splint or bandages are too tight. You should examine a splinted part approximately every half hour, and loosen the fastenings if the circulation appears to be impaired.
Figure 13-7.\Position of casualty for treatment of shock.
Figure 13-8.\Splint for a fractured femur. Remember that any injured part is likely to swell, and splints or bandages that are all right when applied may later be too tight. |
 
|
|
|
||
|
|
Integrated Publishing, Inc. - A (SDVOSB) Service Disabled Veteran Owned Small Business
|