Custom Search
|
|
 
|
||
|
VERTICAL LINES Vertical lines are produced parallel to the working edge of the drafting board by using triangles in combination with a T square. One leg of a triangle is placed against the working edge of the blade and the other faces the working edge of the board to prevent the draftsman from casting a shadow over his work. Lines are drawn from the bottom up, as shown in figure 3-3, view B. The pencil is inclined toward the top of the working sheet at an angle of approximately 60 degrees, with the point as close as possible to the junction of the triangle and the drafting paper. Sequence in drawing a series of vertical lines is from left to right. At no time should the lower edge of the T square blade be used as a base for triangles.
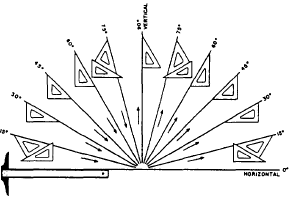
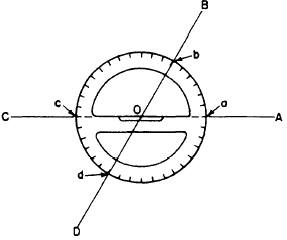
Figure 3-4.-Using T square (or parallel straightedge) and triangles to draw lines at different angles to the horizontal. Arrows indicate the direction in which the lines should be drawn. INCLINED LINES The direction or angle of inclination of an inclined line on a drafting sheet is measured by reference to the base line from which it is drawn. Inclined lines at standard angles are constructed with the T square as a base for triangles used either singly, as shown in views C and D of figure 3-3, or in combination, as shown in view E of figure 3-3. Used in combination with the T square as a base, the triangles serve as guides for producing lines at intervals of 15 degrees, as shown in figure 3-4. Used singly, the 45-degree triangle will divide a circle into 8 equal parts; the 30/60 triangle will divide a circle into 12 equal parts. For drawing lines at angles other than those described above, you should use a protractor. PROTRACTION OF ANGLES To measure an angle, place the center mark of the protractor at the vertex of the angle, with the 0-degree line along one side. Then note the degree mark that falls on the side. To lay off an angle, position the protractor as above and use a needlepoint or a sharp-pointed pencil to mark the desired values. Then project lines from the vertex to these marks. Using only the three points on the protractor, as described above, may result in considerable inaccuracy, particularly if the lines of an angle are to be extended for some distance beyond the protractor. A refinement of the procedure is indicated in figure 3-5. Suppose angle BOA is to
Figure 3-5.-Protracting an angle. be measured. Extend line AO on to C; extend line BO on to D. When you set the center of the protractor at O, make sure that both points c and a are on line AC. Take your reading at point d as well as at point b when you measure the angle. If you are laying off the angle BOA, protract and mark point d as well as point b; this gives you three points (d, O, and b) for establishing line DB. If you are using a semicircular protractor, you cant, of course, locate point d; but your accuracy will be improved by lining up c, O, and a before you measure or lay off the single angle BOA. |
 
|
|
|
||
|
|
Integrated Publishing, Inc. - A (SDVOSB) Service Disabled Veteran Owned Small Business
|