| Tweet |

Custom Search
|
|
 
|
||
|
PREPARING THE CENTERS The first step in preparing the centers is to see that they are accurately mounted in the headstock and tailstock spindles. The centers and the tapered holes in which they are fitted must be perfectly clean. Chips and dirt left on the contact surfaces prevent the bearing surfaces from fitting perfectly. This will decrease the accuracy of your work. Make sure that there are no burrs in the spindle hole. If you find burrs, remove them by carefully scraping and reaming the hole with a Morse taper reamer. Burrs will produce the same inaccuracies as chips or dirt. A centers point must be finished accurately to an angle of 60. Figure 9-18 shows the method of checking this angle with a center gauge. The large notch of the center gauge is intended for this purpose. If this test shows that the point is not perfect, you must true it in the lathe by taking a cut over the point with the compound rest set at 30. You must anneal the hardened tail center before it can be machined in this manner, or you can grind it if a grinding attachment is available.
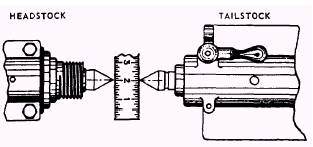
Figure 9-19.Aligning lathe centers.
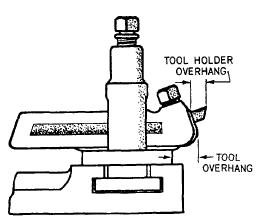
Figure 9-20.Tool overhang. CHECKING ALIGNMENT To turn a shaft straight and true between centers, be sure the centers are aligned in a plane parallel to the ways of the lathe. You can check the approximate alignment of the centers by moving the tailstockup until the centers almost touch and observing their relative positions as shown in figure 9-19. To test center alignment for very accurate work, take a light cut over at each end with a micrometer and, if readings are found to differ, adjust the tailstock accordingly. Repeat the procedure until alignment is obtained. SETTING THE TOOLHOLDER AND THE CUTTING TOOL The first requirement for setting the tool is to have it rigidly mounted on the tool post holder. Be sure the tool sets squarely in the tool post and that the setscrew is tight. Reduce overhang as much as possible to prevent the tool bit from springing during cutting. If the tool has too much spring, the point of the tool will catch in the work, causing chatter and damaging both the tool and the work The distances represented by A and B in figure
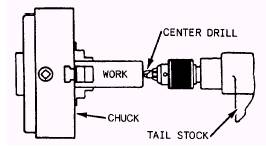
Figure 9-21.Drilling a center hole. 9-20 show the correct overhang for the tool bit and the holder. The point of the tool must be correctly positioned on the work Place the cutting edge. slightly above the center for straight turning of steel and cast iron and exactly on the center for all other work To set the tool at the height desired, raise or lower the point of the tool by moving the wedge in or out of the tool post ring. By placing the point opposite the tailstock center point, you can adjust the setting accurately. HOLDING THE WORK You cannot perform accurate work if the workpiece is improperly mounted. The requirements for proper mounting are as follows: 1. The work center line must be accurately centered along the axis of the lathe spindle. 2. The work must be held rigidly while being turned. 3. The work must NOT be sprung out of shape by the holding device. 4. The work must be adequately supported against any sagging caused by its own weight and against springing caused by the action of the cutting tool. There are four general methods of holding work in the lathe: (1) between centers, (2) on a mandrel, (3) in a chuck, and (4) on a faceplate. Work may also be clamped to the carriage for boring and milling, in which case the boring bar or milling cutter is held and driven by the headstock spindle. Other methods of holding work to suit special conditions are (1) one end on the live center or in a chuck and the other end supported in a center rest, and (2) one end in a chuck and the other end on the dead center. |
 
|
|
|
||