Custom Search
|
|
 
|
||
|
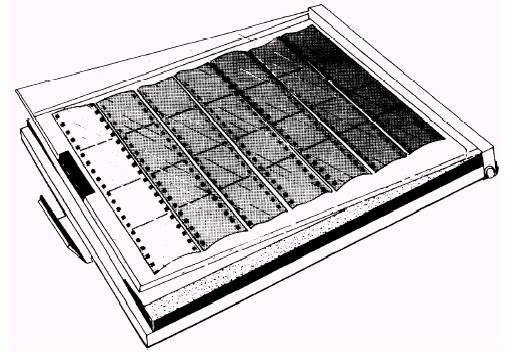
In photography, printing is the term used to describe the process of making positive images from negatives (and in some instances, from film positives). The most familiar example is the print made on a paper base. A photographic print is made by passing light through the negative onto a piece of paper coated with a light-sensitive emulsion, very similar to film. The two primary methods of making photographic prints are contact printing and projection printing. The principal difference in the two methods is the method of exposing the paper. In contact printing, the paper is physically in contact with the negative; while in projection printing, the paper is separated from the negative, and the image of the negative is projected onto the paper by a lens. Because projection printing is usually used to produce an enlarged image, it is generally referred to as enlarging. Contact printing produces positive images that are the same size as the negative images. Enlarging usually produces positive images that are larger than the negative image; however, because optics are used in projection printing, the image formed on the paper can also be made smaller or the same size as the negative image. The quality of the photograph can be varied during printing through the choice of printing material, exposure, and processing. In printing, some negative defects may be compensated for, thereby eliminating the reproduction of the defect in the print. A well-planned, black-and-white or print room should have at least the following material and equipment arranged properly so the flow of work moves easily from one stage to another: A contact and/or projection printer (enlarger) A sink large enough to accommodate the largest trays used in the print room Safelights A set of print trays A graduate A thermometer Print tongs A wall clock with a second hand Hand towels Photographic printing papers are predominantly blue and green sensitive and may be processed under the appropriate safelight conditions. Consult the data sheet packaged with the paper you are using or the Photo-Lab-Index for the recommended safelight. A minimum of three trays are needed for hand processing prints. The trays should be arranged in the sink from left to right-one each for developer, stop bath, and fixing bath. The ideal setup has five trays-one each for developer, stop bath, first fixer, second fixer, and a water rinse. This setup saves chemicals and results in better fixing of prints. The chemistry used to develop and fix prints is similar to and serves the same purposes as film processing. When processing conditions are controlled carefully, the processing specifications recommended by manufacturers for their printing papers can be used to provide excellent and consistent results. The print developer used most commonly in Navy imaging facilities is the llford Multigrade developer. The recommended tray processing developing times vary with the type of paper and developer being used. With the developer at 68F, resin-coated paper development is complete in about 2 minutes. The image appears in about 30 seconds. Because developer is incorporated in the paper, the useful capacity of 1 gallon of Ilford Multigrade developer (diluted 1:9) is about 400 8x10 prints, or equivalent. Any standard stop bath serves sufficiently. A stop bath may be used at all times, but it is necessary when processing a large number of prints; furthermore, the use of a stop bath after development prolongs the life of the fixing bath. If no acid is available for a stop bath, a water rinse should be used after the developer. A standard fixing bath should be used to fix the prints. Consult the Photo-Lab-Index for the various prepared chemicals available for fixing prints. Follow the manufacturer's instructions when fixing prints because there are adverse effects in over-fixation as well as underfixation. Overfixation tends to produce thinning
Figure 11-1. Proof printer. or bleaching of the photographic image. Underfixation causes the image to darken with time. WARNING Never dump fixer down the drain. Dispose of all chemicals according to the local instructions of your imaging facility. In this chapter, the procedures and techniques for producing black-and-white positive paper prints from black-and-white negatives are discussed. Keep in mind that the procedures and techniques provided are the basics for printing color negatives and positives to produce color prints as well as making duplicate black-and-white film positives. |
 
|
|
|
||