Custom Search
|
|
 
|
||
|
SHOOTING TECHNIQUES Your camera equipment should be prepared for the aerial assignment well before you approach the target area. As you approach the target area, you should recheck your equipment and have it ready for the first exposure. Check the altitude, speed, and direction of the aircraft. Check to see that you have the right camera angle for the best picture. Using voice communications or prearranged hand signals, direct the pilot to fly the aircraft into the best picture-taking position. Directing the necessary turns enables you to get the aircraft into proper position without a lot of explanation to the pilot. Whenever possible, decide on the altitude you want to fly before takeoff. When the subject requires photography from different altitudes, start at the highest level and work your way down. Thus time en route to the target can be used for climbing. Altitude can be reduced much faster than it can be gained. When an aircraft is turning to take up another heading, the wing or rotor blades may obscure the subject. Ask the pilot for precise, steep turns; this technique will blind you to the target for only a few seconds. Do not shoot photographs when the aircraft is turning. This causes your negatives to be reasonably sharp in the center, but decreasingly sharp toward the edges. High-shutter speeds may not correct this fault. One of the principal problems in hand-held aerial photography is camera movement during exposure. This basic problem is magnified significantly where aircraft vibration and relative target movement are also present. Best picture results can be achieved when the pilot reduces the throttle. This reduces aircraft vibration and minimizes image movement. Image blurring, caused by camera movement, can be reduced by using a faster shutter speed. You must handle the camera carefully to reduce the effects of aircraft vibration transmitted on the camera. You should firmly grip the camera with your elbows held firmly to your sides. No part of the camera or your upper body should touch the aircraft while exposing film. At the instant of exposure, you should hold your breath. The shutter should be depressed in a steady, smooth manner. You
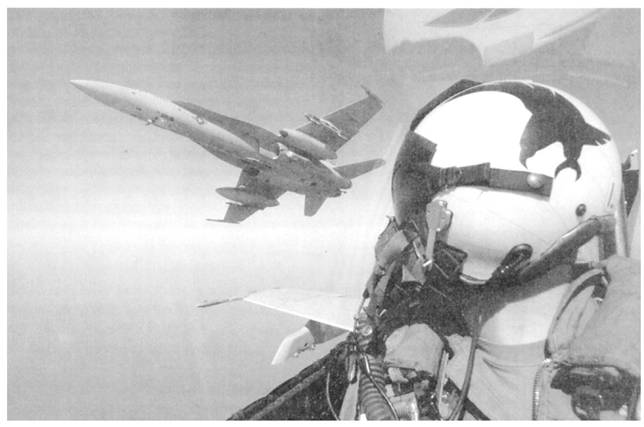
Figure 4-26.-Air-to-air photograph taken through a closed canopy. may also be able to minimize image motion by panning the subject with the camera. When you are flying low, the target may "shoot" past you so fast that the shutter speed cannot "stop" it. This results in a photograph that is not sharp. To prevent this, "follow the target" (pan) with your camera. The pan must be continuous and smooth. Move the camera in the direction opposite to the direction of flight, keeping the lens fixed at some point on the target. With this technique, the image on the film does not move as much as it would if the camera were held still. With a hand-held camera, you have freedom of movement; however, the view of the camera is limited by the structure of the aircraft. Do not include the tip of a wing or any other part of the aircraft in your photographs, unless you do it intentionally fig .4-25 . The views of the target are best when the aircraft is approaching or leaving the target and the target is off to one side. At a level altitude, in fixed-wing aircraft, you may have difficulty excluding the tip of the wing from the view of the camera. You can tell the pilot to bank the aircraft; that is, raise the wing of a high-wing aircraft on the side from which you are shooting. You can also tell the pilot to lower the wing of a low-wing aircraft when the aircraft passes the target. This maneuver should lift or drop the wing of the aircraft out of the picture area. Another flight maneuver for getting the wing of the aircraft out of the picture is to have the pilot crab the plane. After the plane is crabbed, it is on a different heading than the original direction of flight; thus the wing is outside the area of the photography. When you are shooting photographs from a helicopter, have the pilot fly at a level altitude or bank when the aircraft passes the target, so the rotor blades are raised from the area of the photograph. This minimizes the chance of rotor blades appearing in the photograph. The slipstream outside an aircraft can be very strong, so when you are taking photographs through an open window or door, be sure you have a good grip on the camera and all loose objects, and camera parts are well-protected and secured. In some aircraft, you must take photographs through a canopy or closed window fig 4-26. The plexiglass, or glass, can cause a slight shift in image focus. This shift in focus may be reduced by stopping down the lens; however, this is not always possible because you may need fast shutter speeds. The best method of shooting photographs through a window is to take the picture with the optical axis of the lens perpendicular to the surface of the window. The lens should be as close as possible to the surface of the window without touching it. Although this method allows you to take only one or two photos during each pass of the target, the quality and definition of the image is better. When shooting photographs with an SLR camera through a window or canopy, you will find it helpful to make a foam rubber "doughnut" about 2 or 3 inches thick. This foam rubber shield should be taped to the camera using surgical tape because it sticks well and can be removed without leaving a gummy residue. After attaching the foam rubber shield to the camera, you should place it against the aircraft window to block internal reflections from that part of the window that the camera "sees." The shield also absorbs vibrations from the window. Most of your hand-held aerial work, both oblique and vertical, consists of single shots; however, you may have to fly oblique and vertical strips that require overlapping photographs. The camera-to-scene distance must remain constant while you are shooting the strip. Changes in distance cause the image size to change and make matching the adjacent exposures impossible. You should make the exposures at regularly spaced intervals. You can determine the time interval visually between the exposures for a strip. Before the flight, mark your viewfinder to show the distance an object must move in the viewfinder to move the image 40 percent of the width of the film. During the flight, make the first exposure, hold steady, and make the second exposure after some point in the scene has moved the distance marked on the viewfinder. The marks are the same for any aircraft speed or altitude. When you are not using an SLR camera, change the marks on the viewfinder if you change either the film format or the focal length of the lens. Hand-held vertical photography is easiest from helicopters. You can lean out from your sitting position on the floor or from a passenger seat and hold the camera with the proper attitude for taking verticals. You should hold the camera firmly in your hands, keeping your torso relaxed so your arms will act as vibration dampers. Using this method, you can take vertical aerials that are incredibly sharp because of the maneuverability of the helicopter, its capability for slow flight, and the possibility for both the pilot and the photographer to see the target. Because of these features, accurate vertical photography is easier from helicopters than from fixed-wing aircraft. Most air-to-air photography you shoot will be of other aircraft. The purpose is to produce display and public affairs (PAO) photographs. You may also be assigned to take air-to-air photography for research and testing purposes. When shooting air-to-air photographs, you should maintain voice communication with both the pilot flying your aircraft as well as the pilot(s) of the aircraft you are photographing. This provides an opportunity for you to direct all the aircraft involved into position for photographs. Generally speaking, the best air-to-air photographs are made from slightly above, to the side, and slightly forward of the plane being photographed; however, you should try other views, such as from below or slightly aft of the subject aircraft. A longer than normal focal-length lens (80mm or greater for a 35mm camera) should be used when you are photographing only one or two aircraft at a time. Longer focal-length lenses prevent distortion that results from using a normal or short lens. With a normal or short lens, the wings that stick out from the fuselage of the target plane and the long nose or tail section appear distorted when you photograph them from close range. When shooting formations of three or more aircraft, you should use a normal focal-length lens because you are farther from the subjects and distortion is not a problem. For a head-on view use a long focal-length lens and have the pilot fly the aircraft you are in across and above or below the projected flight path of the plane being photographed. Of course, each of the pilots need plenty of room to avoid a mid-air collision. A better and safer way to get a head-on shot is to fly in front of the plane being photographed, in the same direction, and at the same speed. You can take this shot from the open ramp of an aircraft, such as a C-130 or CH-53. In aircraft such as these, you can stand at the edge of the open ramp; ensure that you are secured properly with a safety harness. The aircraft you are photographing does not always have to fly straight and level. Good, interesting pictures can be taken while aircraft are maneuvering, such as in a long, slow turn or in a bank. When the underside of the fuselage must be shown, request the pilot of the target aircraft to roll the plane, so the sun shines on the underside of the aircraft. For this shot, the plane containing the photographer should fly in a bank above the subject plane. This maneuver provides you with a camera angle looking down on the plane to be photographed. When shadows are not a problem and enough light is reflected on the fuselage of the aircraft being photographed, the plane with the photographer can fly under the other aircraft and take photographs while it is in straight and level flight. When shooting pictures of aircraft formations, you should be sure the spacing between them, as seen by the camera, is uniform. Navy pilots are among the best in the world. They can fly their aircraft in tight formations with near perfect spacing between them; however this may not be perfect as the camera "sees" it. Remember, what the camera "sees" is the way the picture will look fig. 4-27 . The pilots of the aircraft you are photographing will probably look at the camera while you are taking their picture. Go ahead and let them-for one shot. Then tell them, "I have your picture, and I'll be sure you get a copy of it; but for the rest of the mission, please do not look at the camera." When the pilot is looking into the camera, it looks unnatural and distracts from the main subject-the aircraft. |
 
|
|
|
||