Custom Search
|
|
 
|
||
|
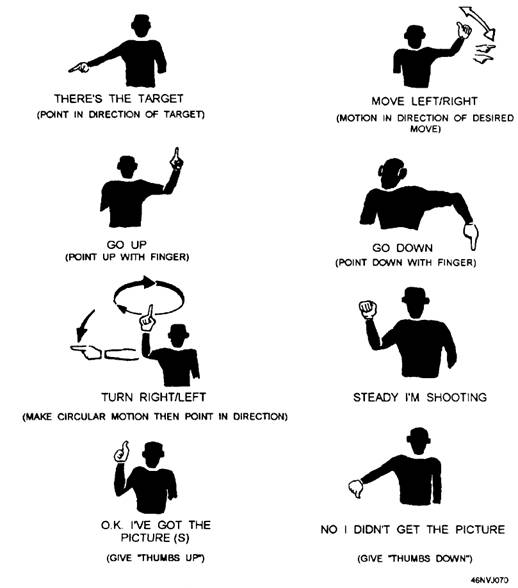
PREFLIGHT AND POSTFLIGHT INSPECTIONS As an aerial photographer shooting hand-held images, your preflight inspection is concentrated primarily on your photographic equipment and your personal protective equipment. You know what camera and equipment checks to make before every photo assignment. These equipment checks are particularly important in aerial work. In aerial work, more people are directly involved with the mission. As a minimum, there is the pilot, copilot, plane captain, and yourself. With the great expense and time involved in flying Navy aircraft, IT IS ESSENTIAL that you have your equipment functioning correctly. Equipment breakdowns may occur during a flight; however, it is your responsibility to be sure that the necessary equipment and materials for the mission are present and working properly. Your personal protective equipment must be checked before each flight-your life may depend on it. Because of the many types and applications of personal flight safety gear available, you must get a professional check on the use of your equipment and an inspection as to size and fit of your equipment from a knowledgeable Aircrew Survival Equipmentman (PR). The aircraft preflight inspection is the responsibility of the pilot. This is not to say, however, that you should not check those areas of the aircraft in which you will be directly involved during the flight. For example, does the door, window, or hatch open and close easily? Is the intercom system working? What about the tie-down ring to which you will hook your safety harness? Is it safe? Has the ejection seat safety pin been removed? Is the canopy clean? Is the oxygen system working? Your postflight duties after a hand-held aerial mission include removing all your equipment from the plane and "housekeeping," such as straightening up seat belts and securing the intercom and oxygen systems. You and the pilot should also discuss the mission-how did it go? What went right? What went wrong? What could be done better next time to make the flight go better? COMMUNICATIONS The pilot must know your intentions. This means you must communicate with him before and during the flight. Remember, the pilot is not looking through the camera viewfinder. The pilot's view of the target, providing he can see it, is different from yours. You must direct the pilot into positioning the aircraft for the photography. The noise level during the flight is high and voice communications are difficult at best, particularly in helicopters. Establishing a few hand signals with the pilot beforehand may prove very helpful during the mission-hand signals that indicate "there is the target," "move right," "left," "up," "down," "turn right," "left," and "steady, I am shooting' (fig. 4-23). In the air, a pilot has a better understanding of your needs with prearranged signals as compared to makeshift signals which may fail to be communicated correctly. Communications between you and the pilot are essential. During the photo part of the flight, you should be in constant communication with the pilot. To get the best photographs, you must communicate to the pilot about positioning of the aircraft. Tell the pilot when the aircraft is too close or too far from the target and when the altitude of the aircraft is correct or not correct. If camera problems develop, let the pilot know. Long periods of silence cause the pilot to wonder what is happening in the photography area and whether the mission is going as planned. This is no time to be bashful or intimidated. Do not be concerned about talking too much. COMPOSITION Since hand-held verticals are made with the camera pointed straight down at the ground, photographic composition for vertical photography is straightforward. The person requesting the work tells you what to show in the picture. Then it is primarily a
Figure 4-23. -Hand signals. matter of including all of the subject or ground area in the picture. Hand-held oblique aerial photography often provides a unique communication capability an overall view that cannot be obtained from the ground in a single photograph or even in several photographs. Generally, aerial oblique photos show relationships in size and spacing between objects better than ground views. The angle of view is unusual and attention getting, partly because people are unaccustomed to seeing subjects from above. As with composition for any type of photography, when you compose an aerial photograph, you should consider all the aspects of good composition-image size, subject placement within the picture area, balance, camera angle, lighting, and timing (when to fire the shutter). The target and purpose of the pictures are the guides you should use for determining proper composition. Good aerial photographic composition is harder to achieve than ground photographic composition. In aerial work you are in a moving aircraft and do not have the time necessary to compose a picture in the viewfinder. You must compose the picture in your mind as you observe the target from the aircraft during the approach. You cannot move the subject around or change the direction from which the light is coming. Your two primary tools in aerial composition are camera viewpoint and timing. You must shoot your pictures at the correct instant to ensure the area and objects of interest are in the picture. Also, in a sequence of exposures (a strip), each photograph must have the correct relationship to the others in the sequence. In other words, you cannot have any "holidays" or missed areas within the strip. You may have some control over what time of day to fly the mission. If so, use the sun to best advantage for the most desirable lighting. When the sun is at an angle that causes shadows to fall across the subject and obscure some important detail, you may ask to fly the mission at a different time of day or even on an overcast day. Whenever possible, shoot obliques with the sun falling on the scene from about a 45 degree angle. This provides proper shadows and creates a feeling of depth. With the sun directly in back of the camera, the picture appears flat. With the sun directly in front of the camera, the shadows may obscure detail and lens flare can result. Shadows play an important role in picture balance by creating an illusion of depth; they also aid in determining the physical characteristics of ground areas. The size of objects in a photograph can be determined by the length and width of their shadows. You can obtain the desired shadow effect by ensuring the pilot places the aircraft properly in relation to the target. Teamwork between the pilot and the photographer is another contributing factor to good aerial composition. Remember, both the photographer and pilot are "handling" the camera, but you are responsible for getting the images. A minimum image size may be required to locate or identify large objects in a photograph. Small objects and great detail require a large image size. You can obtain the proper image size in your photographs by selecting the proper altitude of the aircraft and the lens focal length of the camera. Subject placement within the image area is also an important consideration. Because you are in the air and have a "bird's eye" view of the subject does not mean you have a good camera viewpoint. Is a tall building or grove of trees hiding some important subject detail? If so, direct the pilot to move the aircraft into position for a better viewpoint. A good rule for composing low obliques is to divide the camera viewfinder into three sections: the first section at the bottom of the viewfinder is foreground, the center third of the picture is target area, and the top third is background. For high obliques, divide the camera viewfinder into four sections: the bottom section of the viewfinder is filed with foreground, the next section above it is target area, the third section is background, and the last quarter is sky. Subject balance should also be considered while keeping in mind the three or four primary divisions or areas of low and high obliques, respectively. Study the view during your approach to the target. The horizon is another factor for consideration in oblique work The horizon or, in the case of a low oblique, the imaginary horizon should be straight in your pictures. A real horizon that is crooked, even in a high-oblique picture, does not appear natural; it is distracting and does not reflect the work expected of a professional aerial photographer. When making obliques, you should hold the camera so the horizon is straight. This is easy to do in a high oblique because the horizon is included in the picture and can be seen while the picture is taken. When making a low oblique, hold the camera as though a high oblique was being made, straighten the horizon, then lower the camera carefully to the correct angle for the low oblique. A horizon that is crooked is often the result when a photographer concentrates on the subject alone and does not compose the image in the viewfinder. The camera may be tilted in some instances; for example, when two points of interest must be included in one exposure. If you cannot do this by holding the camera level, then turn the camera slightly at an angle; the two points can sometimes be included in the diagonal of the picture are fig 4-24 .
Figure 4-24:-Tilting the camera to include subject area.
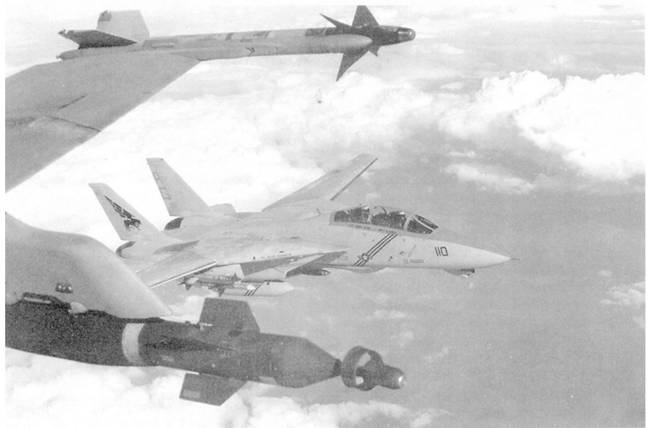
Figure 4-25-Missiles used to frame the F-14 Tomcat. |
 
|
|
|
||