Custom Search
|
|
  |
|
|
CONNECTOR LINK INSPECTION To inspect connector links, you should proceed as follows: 1. First, examine the connector links for proper part numbers, signs of corrosion, distortion, bends, dents, nicks, burrs, sharp edges, breaks, and if applicable, defective yoke and plate assemblies.
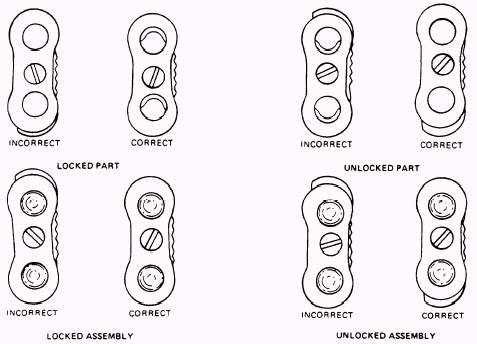
Figure 1-18.-Locked and unlocked connector links. 2. If required, examine the yoke and plate assembly for proper installation (fig. 1-18). When the yoke and plate assembly screw is tightened, there should be a maximum of 1/64-inch play in the assembly. (To tighten the screw use a torque of 20 to 25 lb-in.) At this point, a mandatory inspection is performed by a quality assurance inspector. All of your work stops until the mandatory inspection is performed and the assembly has been found acceptable. BALLISTIC SPREADING GUN INSPECTION While inspecting the ballistic spreading gun, you may have to remove, replace, or make some adjustment. All work must be in accordance with the procedures in the applicable chapter of the NAVAIR 13-1-6.2. The ballistic spreading gun is described in the next chapter of this text. HARNESS/RISER ASSEMBLY INSPECTION Inspect the harness webbing for signs of contamination from oil, grease, acid, or other foreign matter, such as rust at points of contact with metal parts. Inspect for cuts, twists, fading, excessive wear or fusing (indicated by unusual hardening or softening of webbing fibers), fraying, burns, abrasions and loose or broken stitching (in excess of three stitches). If applicable, inspect the four-line-release lanyard flute for wear and proper attachment. If you find any damage to the harness, dispose of it and replace it in accordance with applicable rigging and packing procedures. When a replacement harness is installed, you should stencil the date, preceded by the letter R, in the center of the horizontal back strap in letters 1/2-inch high. For example, R-2-88 indicates a replacement was made in February 1988. If fewer than three stitches are loose or broken, repair the riser or harness assembly by using nylon 6-cord, lock-stitch over original stitch and 3/4 inches on both sides of the original. Use four to six stitches per inch. Hardware Inspection To inspect harness and riser hardware, proceed as follows: 1. Inspect the canopy quick-release fittings for breaks, corrosion, pitting, bends, dents, and sharp edges. Check the tamper-dot on the locking screw. If it is broken, tighten it and apply a new tamperdot to the screwhead using lacquer (TT-L-32, 11136, insignia red) or equivalent. Remove sand or any dirt from the mechanism using an air hose to blow it out at not more than 50 psi pressure. Wipe dirt and grease from fittings with a clean rag. Do not lubricate the fittings. Replace all damaged fittings. 2. With the canopy quick-release fitting locking cover plate held in the open position, insert a torquemeter into the hexagonal cavity located on either end of the knurled locking-lever shaft. With the canopy quick-release fitting locking cover plate held in the open position, rotate the knurled lever shaft until it reaches the stop. Record the torque reading. The allowable torque is 28 to 50 ounce-inches. All canopy quickrelease fittings that do not meet torque test requirements must be replaced. 3. Inspect all other hardware for signs of corrosion, pitting, ease of operation, security of attachment, bends, dents, nicks, burrs and sharp edges. Make sure that the rollers in the roller yokes turn freely. If you find any parts damaged, forward the riser or harness assembly to supply for screening. NOTE: Hardware that has been rejected is forwarded to the Commanding Officer, Naval Weapons Center, China Lake. California, Attention: Code END, 4. Cross-Connector Strap Inspection Inspect the cross-connector strap(s) for signs of contamination, cuts, fraying, burns, and loose or broken stitching. If you find any damage, dispose of them locally, and replace them in accordance with applicable rigging and packing procedures.
|
 |