Custom Search
|
|
  |
|
|
You may have a foot-operated grommet press or a hand press, as illustrated in figures 10-6 and 10-7. To use either type of press, you need an assortment of chucks and dies. Install the die in the bottom of the press and the chuck in the top of the press. Set the foot press and check for a clearance of the thickness of heavy paper between the chuck and die. This prevents damage by striking the chuck and die together. By depressing the foot pedal or handle, you securely flatten the grommet.
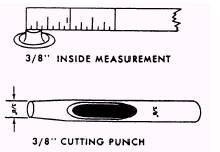
Figure 10.11.-Inside diameter measurements.
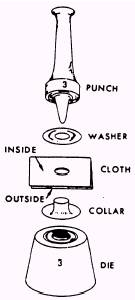
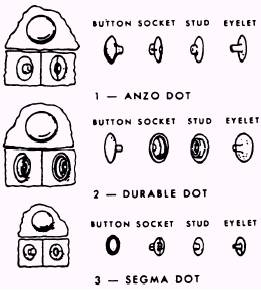
Figure 10-12.-Grommet collar, cloth, and washer in grommet set. Grommet Set Installation A grommet set, consisting of a punch and die, is used to install grommets in material. Figure 10-12 illustrates a grommet set. The grommet set has to be the same size as the grommet for a proper grommet installation. Use a rawhide mallet to strike the punch. This action flattens the grommet. The grommet set installation is used because of its simplicity and portability. GLOVE FASTENERS The most common type of fastener used on clothing and other items made of fabric and rubber is the glove fastener. In many instances, the glove fastener has replaced the conventional button. Glove fasteners are dependable and are used for their holding and firm gripping ability. Figure 10-13 shows the three different types of glove fasteners most commonly used. The main difference between the three fasteners is size. The Segma Dot is the smallest; the Durable Dot is the largest type of glove fastener. Each fastener is made of four parts: button, socket, stud, and
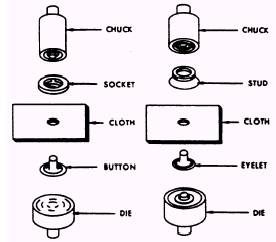
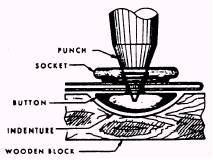
Figure 10-13.-Glove fasteners. eyelet, as illustrated in figure 10-13. The socket and button are matched to form the snap. The stud and eyelet form the part to which the socket and button snap. Press Installation Cut a hole the size of the collar of the button and insert the button in the material. Place the correct chuck and die into either a foot-or handoperated press, as shown in figures 10-6 and 10-7. The die is the lower and the chuck is the upper tool, as shown in figure 10-14. Fit the socket to the chuck, as shown in figure 10-14. Lay the button in the die and complete the attachment by depressing the handle or foot pedal. Cut the proper size hole in the material to receive the eyelet. Place the correct chuck and die in the press. Insert the collar of the eyelets through the hole from the back of the material. Fit the stud into the chuck. Lay the eyelet on the die and complete the attachment. Hand Installation Cut a hole the proper size for the collar of the glove fastener button. Insert the button in the material and place the socket over the collar of the button. Make an indentation in a wooden
Figure 10-14.-Durable dot fastener installation.
Figure 10-15.-Flaring button collar. block for holding the head of the button. Flare the collar of the button slightly with a center punch, as shown in figure 10-15. Flatten the collar of the button with a solid drive pin punch. Assemble and install the stud and eyelet on the other pieces of material so the base of the eyelet is on the backside of the material. Flare and flatten the collar of the eyelet in a manner similar to the installation of the button and socket. |
 |