Custom Search
|
|
  |
|
|
STRUT REMOVAL AND REPLACEMENT
To remove a strut assembly, first jack the aircraft according to instructions furnished in the applicable MIM. To reduce the weight and allow for easier handling, remove the wheel (with tire and brake assembly). CAUTION Before removing a wheel assembly from an aircraft deflate the tire completely. To ensure positive removal of all pressure from the tire you should remove the valve core and attach a "deflated tire" tag to the valve stem after deflating the tire. Remove all attached fairings and door connecting rods. Disconnect and cap the hydraulic brake lines and fittings. Disconnect electrical connections at the cannon plugs, and remove wiring from clamps as necessary. Retain all removed hardware in a cloth bag. Disconnect the drag brace by partially pulling the upper torque arm pin. After disconnecting the drag brace, reinstall the pin and nut to retain the torque arm. The side brace is generally removed with the strut assembly. It should be disconnected at its upper end by removing the nut and pin. After the side brace is disconnected, reinstall the pin. If equipped with a shrink rod, disconnect the shrink rod from the strut, not from the aircraft. This is accomplished by removing the rod fitting bolt at the bottom of the rod. When the shrink rod is disconnected, the nut and bolt should be reinstalled in the fitting for safekeeping.
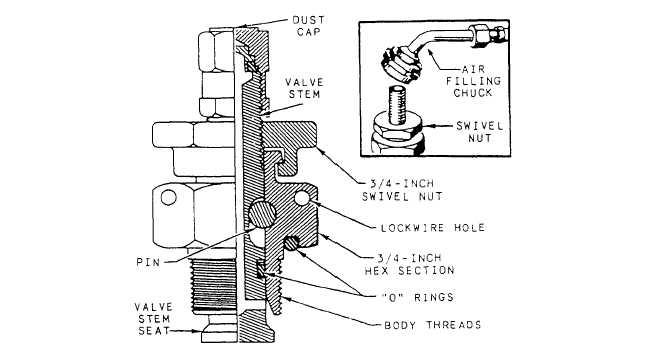
Figure 12-18.-High-prcssure air valve, type MS 28889. Support the recoil strut and partially pull the crossbolt at the top of the strut to disengage it from the support structure. Lower the strut and reinstall the bolt and nut.Installation essentially reverses the removal procedures. With the aircraft still on jacks, carefully move the top of the recoil strut into place to engage the support structure fitting. Install the crossbolt, washer, nut, and cotter pin. Connect the shrink rod to the shrink rod fitting. Connect the side brace to the support structure fitting. Partially pull the upper torque arm pin and connect the drag brace. Reinstall the pin, tongued washer, nut, and cotter pin.Assemble the brake and wheel to the strut axle, bleed the brake, and service the strut as specified in the aircraft MIM. Ensure that the air valve is safety wired before charging the strut with nitrogen. After the strut has been serviced with hydraulic fluid and nitrogen, tighten the air valve to the specified torque value required by the MIM. Replace all removed fairings, doors, hydraulic lines, and electrical connections. Lubricate all reinstalled linkages, and check the landing gear for proper operation. |
|
|
|