Custom Search
|
|
  |
|
|
PG-1 Reads Low The 0-160 psig pressure gage is used to indicate pressure applied to an item under test. Anytime
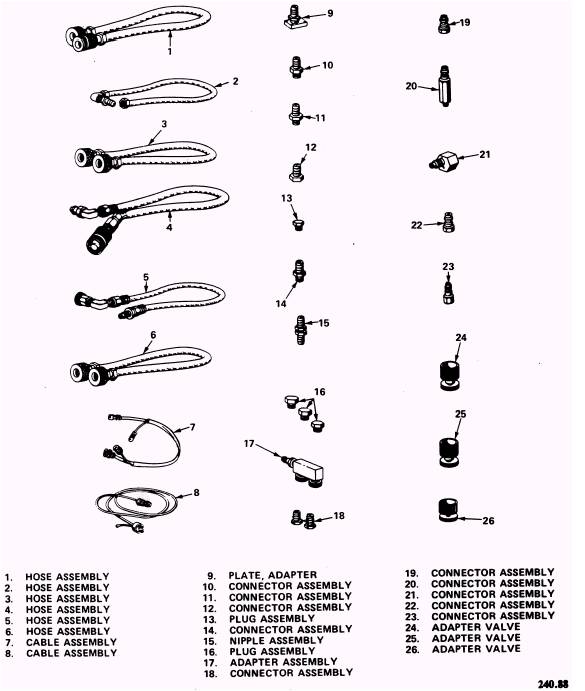
Figure 1-5.\Test Stand Accessories. this gage consistently reads low, you probably have leaky fittings. To correct this problem, you will need to perform one or two leakage tests. To perform leakage tests, pressurize the system and apply a soap solution to the various fittings. Escaping gas will form soap bubbles, and you can locate the leaks. Leakage Test, Accessories Section To perform the leakage test on the accessories section of the test stand, proceed as follows: 1. Install nipple assembly 14 (figure 1-5) in bell jar bottom coupling C-1. Connect one end of hose 3 (figure 1-5) to the adapter and the other end to differential pressure connection NIP-7. 2. Ensure test-pressure-gage-to-bell-jar valve V-2 is open. Ensure system bleed valve V-5, test pressure gage build-up and vent valve V-10, and differential pressure bleed valve V-7 are closed. 3. Open differential pressure shutoff valve V-8. 4. Open oxygen supply cylinder valve. Open oxygen supply valve V-6 until 160 psig is indicated on test pressure gage PG-1. 5. Close oxygen supply valve V-6. Leakage will be indicated by a drop in pressure on PG-1. Leakage must not be more than 2 psig in 10 minutes. 6. Leave all hoses and valves in their present position. Leakage Test, Test Stand To perform the leakage test on the entire test stand, proceed as follows: 1. Open converter supply flow control valve V-9 and test pressure gage build-up and flow valve V-10. 2. Plug converter supply outlet NIP-5 and supply to converter connection NIP-6. Ensure system bleed valve V-5 is closed. 3. Open supply valve V-6 until relief valve V-11 unseats. (Relief valve shall relieve at no more than 120 psig and be leak-tight at 100 psig.) Using system bleed valve V-5, decrease pressure until 100 psig is indicated on test pressure gage PG-1. Close valve V-6. Leakage will be indicated by a drop in pressure on PG-1. Leakage shall be no more than 10 psig in 10 minutes. 4. Bleed the test stand by opening system bleed valve V-5. Close all test stand valves. Remove plugs from converter supply outlet NIP-5 and supply to converter connection NIP-6. PG-1 Pointer Pegs Anytime the 0-160 psig pressure gage pegs, it is caused by pressure regulator R-1. This pressure regulator is set to maintain 160 psig with 1800 psig supply pressure applied. If the PG-1 pressure gage pegs, your regulator is delivering pressure above 160 psig and the pressure must be adjusted. To set oxygen pressure regulator R-1 to maintain 160 psig with 1800 psig supply pressure applied, proceed as follows: CAUTION Valves V-2, V-5, V-6, V-7, and V-10 are metering (needle) valves. Overtightening when closing will damage valve seat. Only finger-tight pressure should be used when closing valves. 1. Ensure all test stand valves are closed, and plug bell jar bottom coupling C-1. WARNING When you are working with oxygen, make certain that clothing, tubing, fittings, and equipment are free of oil, grease, fuel, hydraulic fluid, or any combustible materials. When oxygen is under pressure, fire or explosion may result when even slight traces of combustible materials come in contact. 2. Open oxygen supply cylinder valve. NOTE: When setting regulator R-1, a minimum of 1800 psig oxygen pressure should be applied to the regulator. 3. Slowly open test-pressure-gage-to-bell-jar valve V-2, and fully open oxygen supply valve V-6. 4. Loosen the hex locknut located on the front of regulator R-1. Turn the T-handle until 160 psig registers on test pressure gage PG-1. Tighten the hex locknut. 5. Close the oxygen supply cylinder valve and open system bleed valve V-5 to bleed pressure from system. Remove the plug from bell jar bottom coupling C-1. PG-4 Indicates Low Readings Consistently The 0-15 psig pressure gage PG-4 measures extremely low pressures from the item under test. This gage is protected from high pressures by gage guard GP-1, which is set between 11 and 14 psig. To locate any leaks in this system, you will need to perform the leakage test described earlier for the test stand. You will not be required to perform the leakage test for the accessories section. In most cases by tightening the necessary fittings, you will be able to remedy the low readings on the PG-1 pressure gage. Differential Pressure Gage (DF-1) Indicates Low The 0-100-in. H2O differential pressure gage is a bellows-operated gage used to indicate differential pressure when the pressure closing and pressure opening valves are tested. The probable cause for low readings on this gage is a leaky shut off differential pressure valve V-8. If you are lucky, you can correct it by tightening the fittings. If this does not solve the problem, you will need to replace the valve. |
 
|
|
|