Custom Search
|
|
 
|
||
|
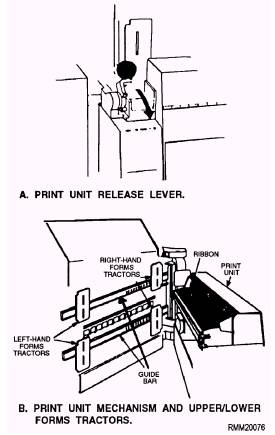
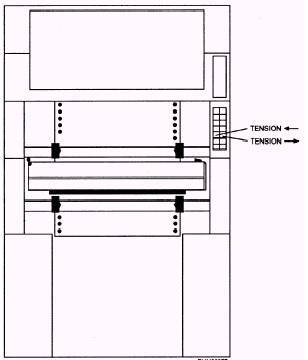
STORING TAPES.\ When not being used, tape reels should be properly supported. The plastic canister or tape strap is designed to fully support the reel. A tape reel that is supported in any other manner may become warped. LOADING AND UNLOADING PAPER FORMS.\ Many printers have a soundproof cover that you must raise to gain access to the forms tractors and other manual controls. By moving the print-unit release lever toward you (figure 2-20, frame A), you unlock the print unit assembly. This allows you to swing the unit out to the side and gain access to the upper and lower forms tractors (figure 2-20, frame B). You then open all four tractors to unload or load paper forms. Unloading Forms.\ To remove forms already in the printer, tear off the form at the end of the report and let the unused portion fall back into the box. The printed portion will normally follow on down into the printer's stacker. Now, you are ready to insert (load) a new form. Loading Forms.\ Quite often, you will find yourself having to load a form of a different width. To do this you will have to adjust the tractors. When adjusting the tractors, it is a good practice (and sometimes a command policy) to keep the left-hand tractors in one permanent location. In this way, both you and the programmer always know where print position 1 will print on any given form. To adjust the right-hand tractors, you must use the tension control (figure 2-21). This allows you to move the tractors to the desired location. As you become more experienced, you will know where to position the tractors for all standard form widths. You then place the form over the sprockets and close the tractors. Now that the forms are in place, you apply the proper amount of tension to the paper. To do this, use the tension control (figure 2-21). By depressing the left button, you move the right-hand tractor closer to the left-hand tractor, thereby decreasing the amount of tension to the paper. By depressing the right button, you move the right-hand tractor farther away from the left-hand tractor, thereby increasing the amount of tension to the paper. If there is not enough tension, the forms tend to feed improperly, and they may tear. If too much tension is applied, the tractor latching pins tend to rip out the sprocket holes in the form and may cause the forms' tractors to open. Once the proper tension is applied, you can proceed to align the forms so that the information will print in the correct location, both vertically and horizontally.
Figure 2-20.\Open the print unit to access the print unit and forms tractors.
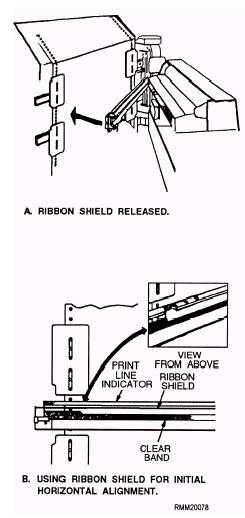
Figure 2-21.\Tractor and tension control adjustments. Aligning Forms.\ Most high-speed impact printers are designed with a ribbon shield. This ribbon shield protects the form from coming into contact with the printer ribbon, thus eliminating ink smears. It also serves as a print line indicator, which we use to align the form. The ribbon shield swings in front of the form (figure 2-22, frame A). Once the ribbon shield is in position, it can be used as illustrated in figure 2-22, frame B, to help in the adjustment of the form. Use the horizontal adjustment control shown in figure 2-23, to slide the entire print mechanism to the left or right. When the left margin of the form is even with the first ruled line on the ribbon shield print line indicator (figure 2-22, frame B), release the horizontal adjustment button. At this point, the horizontal printing is accurate to within one print position. Use the horizontal adjustment button (figure 2-23) for any additional fine horizontal adjustments that may be necessary. This
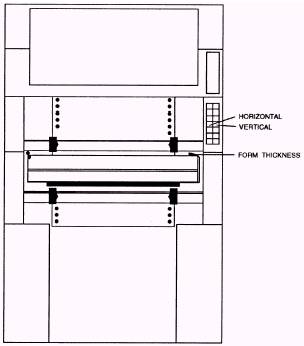
Figure 2-22.\Using the ribbon shield for alignment. control is especially useful when working with preprinted forms, such as your LES statement. Now that the form is positioned horizontally, you can make the necessary vertical adjustments. Again, using the ribbon shield print line indicator as a guide, you can move the form up or down one line at a time until the form is vertically aligned by pushing the line feed button. Use the vertical print adjustment button (figure 2-23) for any additional fine vertical adjustments to align the print line to its proper position. Now that the form is vertically adjusted, close the print mechanism and lock it into place with the print-unit release lever. Print forms not only vary in size but in thickness as well. For this reason, you will have to adjust the printer to accommodate for thickness differences. To do this, you move the form thickness control knob (figure 2-23) either left or right. This will move the print unit mechanism closer to or farther away from the print hammers, thereby giving the forms sufficient clearance to pass between these two components. The paper
Figure 2-23.\Vertical and horizontal alignment controls used to adjust printer paper. thickness control knob has a direct effect on the printer's phasing (which has to do with the quality of the printed character). For this reason, it is important that this be set properly. Once you become familiar with the various buttons, levers, and controls of anyone of the many printers you may be working on, you will quickly find that most forms are relatively easy to align. For those that are not, such as preprinted forms, often the programmer will assist you by printing out form alignment characters to allow for proper alignment before the actual printing of the job. |
 
|
|
|
||