Custom Search
|
|
  |
|
|
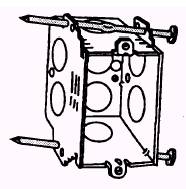
Nail Through Box Mounting One of the simpler boxes to mount is a device box. Boxes without brackets are mounted by putting two sixteen penny nails (3 1/ 2 inches long) through the holes in both sides of the box and then driving them into the wood framing member (stud). Nails that pass through the inside of a box must not be more than a quarter inch from the bottom (or back) of the box, as shown in figure 5-10. Also, note the markings on the side of the box. These are depth markings which let you easily install the box to project the proper distance from the edge of the stud to offset the thickness of the wall material that will be installed. Another way to mount device boxes with sixteen penny nails is shown in figure 5-11. In this case, the nails are outside the box, eliminating the possibility of wiring interference inside. The extension of the box sides, as is done here to provide for nailing, is often referred to as an S bracket mount. The bracket is made so that the nails can be driven in straight or on a slant, depending on whichever is easier. Being able to drive the nails at a slant is especially useful when the stud spacing is less than normal. The notches on the front outer ends of the bracket serve as a depth guide for mounting, the same as the markings mentioned before.
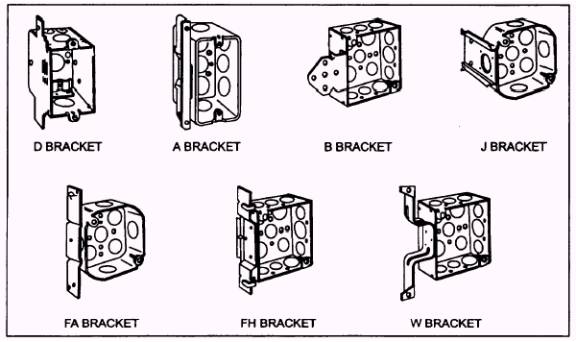
Figure 5-11.- S bracket box. Many boxes come with attached brackets of various designs. Several of these brackets are shown in figure 5-12. The D bracket illustration is the simplest one of the group and is simply an extended box side. It is nailed or screwed to the stud. It also has notches to serve as an installation guide. The next bracket is the A bracket. As you can see, it is a straight bracket with a turned over upper edge that fits over the edge (face) of the stud. When nailed from both the front and side, this bracket makes an extremely strong mounting. The A brackets come attached to the boxes at varying distances from their edges to allow for use with different thicknesses of wall material. The B bracket is made to fasten the box to the face of the stud. It has a couple of spurs that, when driven into the stud, hold the box in place while it is being nailed. The bracket may be attached to the box so it projects slightly above the edge, as shown in the illustration. This bracket prevents the device cover and its holding screws from causing a bulge when sheetrock is used for the wall surface. B brackets on device boxes are located at various depths to coincide with the thickness of the finished wall. Some B brackets are about twice as long as the one shown. These brackets are suitable for mounting on doorway framing studs to place switches and their cover plates beyond the edge of the door trim. This same bracket may be attached to the end of a device box for the horizontal mounting of a switch or receptacle. The J bracket is used the same as any other bracket that is fastened directly to the side of a stud. The holes are slotted to permit the box to be toenailed. The bracket is flush with the edge of the box and has gauging notches for positioning. This bracket has a knockout that allows installation of conduit through the stud into the box. The FA bracket is similar to the D bracket, except the bracket is welded to the side of the box. It also has a positioning spur to assist in holding the box in place while it is being nailed The bracket is offset from the edge of the box one-half inch or five-eighths inch to allow for the wall material thickness. The FH bracket is similar to the FA bracket, except it has two barbed hooks that drive into the face of the stud. The bracket is welded flush on square boxes and offset one-half inch on device boxes. Driving the barbed hooks into the stud face and nailing the side make a very rigid mount. The W bracket is fastened to both the face and side of the stud to provide a rigid mount. Since it stands the box off to the side of the stud, it is used to provide clearance between switches and switch plates and doorway trim, as does the long B bracket. Box Mounting on Metal Framing Much modem construction makes use of metal framing members. The ones you are concerned with mostly are the studs and the doorframes. Boxes can be attached with sheet metal screws or machine bolts and nuts. However, special attaching devices are available. A special anchor, as shown in figure 5-13, provides a
Figure 5-12.- Assorted box mounting brackets.
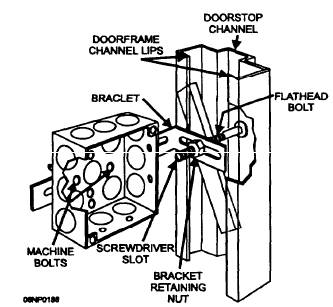
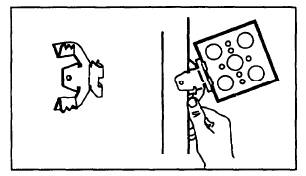
Figure 5-13.- Box mounting on metal doorframe. quick, simple method of installing a box on the doorframe. This anchor allows the box to be adjusted in all directions; that is, toward or away from the frame, the depth from the outside wall surface, and up or down as needed. The nut on the bolt shown in the figure holds the bracket to the anchor and must be loose while the anchor is installed. The anchor itself consists of a flathead bolt with a screwdriver slot and a threaded channel. The channel comes in two sizes; one for narrow doorframes not over 4 inches wide and a second for doorframes up to 7 inches wide. The anchor is set in place by inserting it in the frame channel with the flathead of the bolt toward the doorstop channel and the threaded channel under the lips of the doorframe. The anchor is locked in place by inserting a screwdriver in the slot of the bolt and turning it clockwise until tight. As you can see in the figure, the bracket is adjustable and is held in position by the tightened nut on the bolt. The box is adjustable toward or away from the doorframe and is attached to the bracket with two machine bolts and nuts. Metal spring clips provide a quick and easy way of mounting boxes onto metal studs. The same clip will work on studs of more than one design and size, such as 1 5/ 8-to 3 5/ 8-inch C channel studs and the truss type of studs. They are designed to mount square boxes with cover plates and to permit device boxes to be flush-mounted with various thicknesses of wall surfacing. A metal spring clip is shown at the left in figure 5-14. To mount a box, tap the clip over the open edge of the box. Then tip the box so the upper prong slips behind the face of the stud, as you can see at the right in figure 5-14. Press the lower prong back with your thumb until it slips
Figure 5-14.- Box mounting on metal stud with spring clip. behind the stud face and locks the box in place. The box can be moved easily up or down on the stud by releasing the spring tension. Boxes can also be attached to metal framing members with sheet metal screws or machine bolts and nuts.
|
 |
|
|